Product:
Planning Analytics 2.0.9.19
Microsoft Windows 2019 server

Issue:
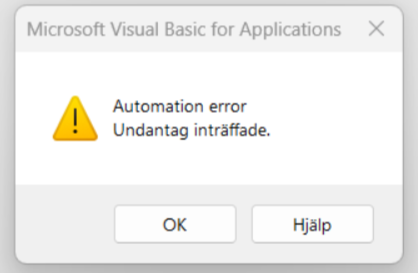
We change the password for the system account that we use when calling TI processes inside TM1 instances, and now Tm1RunTi.exe does not work.

Solution:

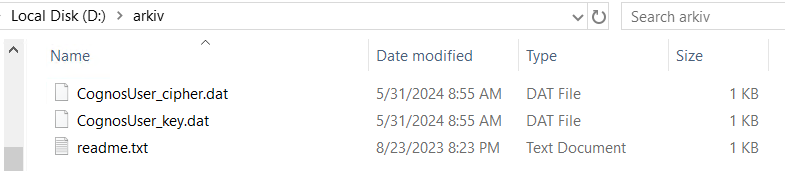
Find the file that contain the password and key, run below command to create the new password files:

tm1crypt.exe  -keyfile  d:\arkiv\CognosUser_key.dat  -outfile  d:\arkiv\CognosUser_cipher.dat  -validate

(above will create the files in the folder d:\arkiv\, then you have to copy them to correct folder that you referee in your code)

You have to enter the new password for your service account twice.

#======================
# Parameters
#======================

sQuote = Char(34);

sRunTIPath=sQuote |'D:\Program Files\ibm\cognos\tm1_64\bin64\\TM1RunTI.exe'|sQuote ;
sPwdFile='CognosUser_cipher.dat';
sPwdKeyFile='CognosUser_key.dat';
sPasswordFile=sQuote |'D:\TM1 data\Tm1_Trigger\'|sPwdFile|sQuote ;
sPasswordKeyFile=sQuote |'D:\TM1 data\Tm1_Trigger\'|sPwdKeyFile|sQuote ;
sUserName='Cognos';
sUser=sQuote | sUserName | sQuote ;
sProcess = sQuote | pProcessName | sQuote ;
sInstance=sQuote|pInstance|sQuote;
sNameSpace=sQuote|'domain'|sQuote;
sAdminHost=sQuote|'servername'|sQuote;


#=====================
# Execute Command
#=====================

sCommand = sRunTIPath | ' -Process ' | sProcess | ' -Adminhost ' | sAdminHost | ' -Server ' | sInstance | ' -CAMNamespace ' | sNameSpace |
' -User ' | sUser | ' -passwordfile ' | sPasswordFile | ' -passwordkeyfile ' | sPasswordKeyFile ;
ExecuteCommand(sCommand , 0 );


Above in a prolog dialog will execute the TM1runTI.exe with the parameters you provide for TI process ( pProcessName ) to run and TM1 instance (pInstance) to use.

You need to update above TI code with the correct windows server name and Active Directory domain name, also point to the correct folder where you save the dat files, and the windows user account that you use for the access to the tm1 models.


More Information:

https://www.ibm.com/docs/en/planning-analytics/2.0.0?topic=encryption-run-tm1crypt-utility 

https://code.cubewise.com/blog/4-ways-to-speed-up-your-processes-in-ibm-tm1-and-planning-analytics/


Product:
Planning Analytics 2.0.9.19
Microsoft Windows 2019 server
Planning Analytics Workspace version 95

Problem:

Where is the files uploaded to?

When you try to create a new folder in PAW version  95, then you get a error like below, then something with the installation went wrong.

The following administration agent error occurred – {“errorMessage”:{},”query”:”/pakate-agent/v0/filemanager/Planning%20Sample/files”,”httpStatusCode”:500}


Suggestion:
The file manager will only access a folder under your applications data folder called model_upload like in C:\Program Files\ibm\cognos\tm1_64\samples\tm1\PlanSamp\model_upload. (i think you can edit this folder name in the paa-agent bootstrap.properties file.)  Try change this value:

MODEL_UPLOAD=model_upload

To upload a file go to PAW and WORKBENCH

Right click on the application you want to work with files and select file manager.

Click on the upload icon, and then drag the file to the area, and press upload button.

When the file is uploaded, close above dialog.

The file is put in a folder below your data folder, for your tm1 instance.


If the paa-agent not work as expected, then the files are created here, for all tm1 instances.

D:\Program Files\ibm\cognos\tm1_64\paa_agent\wlp\usr\servers\kate-agent\model_upload

Check the messages.log file above for more information why it does not work.

Reinstall PAA agent, for you to try resolving the issue.

The problem could be related to one or more old files in the paa_agent folder structure, test below steps.
1. Stop the “IBM Planning Analytics Administration Agent” service
2. Remove the the cache folders: “.logs” and “.classCache” in ../tm1_64/paa_agent/wlp/usr/servers
3. Remove the folder: “workarea” in ../tm1_64/paa_agent/wlp/usr/servers/kate-agent
4. Restart the “IBM Planning Analytics Administration Agent” service
Wait 5 minutes time as the Agent starts, before you test again.
Do not Remove the D:\Program Files\ibm\cognos\tm1_64\paa_agent\paaAgentCache folder, as it looks that it corrupts the PAA agent installation.

More Information:

https://www.ibm.com/docs/en/planning-analytics/2.0.0?topic=model-using-file-manager 

https://www.ibm.com/support/pages/planning-analytics-administration-agent-didnt-work-error-exception-javalangnullpointerexception 

Working with files and folders in File manager

​You can use the toolbar to create folders and sub-folders, upload files, refresh files, and search for a folder or file. Use the Actions button Actions button​ or select a file or folder to access options​such as Download, Delete, Cut, Copy, and Compress.

Deleting a file or folder
To delete an item, select the file or folder and click Delete. You can also click the Action button for the item and click Delete.

Warning: When you delete a folder or sub-folder, all files within that folder are also deleted.
Cut, copy, and paste files
You can move or copy files or folders to a different folder within the File manager. The Cut and Copy options are available from the Actions button or display in the toolbar when you select one or more items.
To cut or copy, select one or more items and click Cut or Copy. Your selections display in alphabetical order as a horizontal list for a quick review before you cut or copy the items.
Selected files for cutting or copying display in the File manager
After you review the list of items that you want to cut or copy, you can paste the items to a different folder. To paste a cut or copied item, go to the destination folder and click Paste.
Compress and expand files
Select one or more files or folders and click Compress to compress the items into a .zip file. You can compress a file and move it to a new location without using Cut. To do this, select a file and click Compress. Then, go to the destination folder and click Compress again.
To expand a compressed file, select the file and click Expand. As with compressing a file to a new location, you can expand a file to a new folder.


Product:
Planning Analytics 2.0.9.19
Microsoft Windows 2019 server
Microsoft® Excel® for Microsoft 365 (Version 2308 Build 16.0.16731.20542) 64-bit

Issue:

When using the drill function in TM1 Perspective, you get a error, if you do the same task in a different version of TM1 Perspective it works.

Excel crash, and then restarts recovering your xls file. The drill down does not work.

Solution:

Install and use a different version of TM1 Perspective.

The issue started with version 2.0.9.7 and was first solved with version 2.0.9.16 of TM1 Planning Analytics Perspective.

So if you use TM1 Perspective 2.0.9.19 with 64 bit excel, you do not have a issue.

Or if you use TM1 Perspective 2.0.9.6 with 32 bit excel, you should also be fine.

Planning Analytics 2.0.9.11 is the last release to include 32-bit versions of the TM1 clients (Architect and TM1 Perspectives).

More Information:

Determine the version of IBM Planning Analytics (cubewise.com)

Using the Drill option in 64-bit IBM Cognos TM1 Perspectives causes an “Excel Stack Exceeded” error.

IBM Planning Analytics 2.0 Fix Lists

IBM Planning Analytics – Setting up Basic DRILL THROUGH Functionality – QueBIT

Drill through cells to see detailed data – IBM Documentation

Product:
Planning Analytics 2.0.9.19
Microsoft Windows 2016 server

Issue:
The security scan program reports that the port 12345 is not secure. Cause ssl-cve-2016-2183-sweet32 issue.

Possible solution:

Try to implement this limit in the ciphers that TM1 internally can use for communications.

Login to the PAL (planning analytics) server as admin.

Stop TM1 admin service and all the other TM1 instance services.

Open Cognos Configuration for TM1.

Add below to Supported ciphersuites:

TLS_RSA_WITH_AES_128_CBC_SHA256,TLS_RSA_WITH_AES_256_CBC_SHA256, TLS_RSA_WITH_AES_128_GCM_SHA256,TLS_RSA_WITH_AES_256_GCM_SHA384, TLS_ECDHE_ECDSA_WITH_AES_128_CBC_SHA256,TLS_ECDHE_ECDSA_WITH_AES_256_CBC_SHA384, TLS_ECDHE_ECDSA_WITH_AES_128_GCM_SHA256,TLS_ECDHE_ECDSA_WITH_AES_256_GCM_SHA384, TLS_ECDHE_RSA_WITH_AES_128_CBC_SHA256,TLS_ECDHE_RSA_WITH_AES_256_CBC_SHA384, TLS_ECDHE_RSA_WITH_AES_128_GCM_SHA256,TLS_ECDHE_RSA_WITH_AES_256_GCM_SHA384


Then open each TM1S.CFG file for each instance, and add below last in the file:

tlsCipherList=TLS_RSA_WITH_AES_128_CBC_SHA256, TLS_RSA_WITH_AES_256_CBC_SHA256,TLS_RSA_WITH_AES_128_GCM_SHA256, TLS_RSA_WITH_AES_256_GCM_SHA384,TLS_ECDHE_ECDSA_WITH_AES_128_CBC_SHA256, TLS_ECDHE_ECDSA_WITH_AES_256_CBC_SHA384,TLS_ECDHE_ECDSA_WITH_AES_128_GCM_SHA256, TLS_ECDHE_ECDSA_WITH_AES_256_GCM_SHA384,TLS_ECDHE_RSA_WITH_AES_128_CBC_SHA256, TLS_ECDHE_RSA_WITH_AES_256_CBC_SHA384,TLS_ECDHE_RSA_WITH_AES_128_GCM_SHA256, TLS_ECDHE_RSA_WITH_AES_256_GCM_SHA384


Save the file.

Start the TM1 Admin service first, and then the other TM1 instances one by one.

Check that you can login.

Wait and see if the security scan report a problem less.

More Information:

https://www.ibm.com/docs/en/planning-analytics/2.0.0?topic=pa2f82-disable-des-3des-ciphers-in-planning-analytics-mitigate-false-positive-security-scans 

https://www.rapid7.com/db/vulnerabilities/ssl-cve-2016-2183-sweet32/ 

https://en.wikipedia.org/wiki/List_of_TCP_and_UDP_port_numbers 

https://www.ibm.com/docs/en/planning-analytics/2.0.0?topic=pitf-tlscipherlist 


Product:
Cognos Controller 11.0.12
Microsoft Windows 1016 server

Issue:

Error message about missing files when doing a upgrade installation of Cognos Controller 11.

Failed to copy file “d:\cognos controller upgrade\cntrl_11.0.1_win_ml\winx64h\./resource/utf-8\is_en_rc.txt” to destination “d:\program files\ibm\cognos\ccr_64\uninstall\./resource/utf-8\is_en_rc.txt”: No such file or directory.

If you press skip, you get a new message for other missing file.

Solution:

Check the size of the cntrl_11.0.1_win_ml.tar.gz   file – if it is less than 2 326 187 KB, you have the wrong file. Download again from IBM.

Parts and platforms Details eImage
IBM Cognos Controller 11.0.1 Microsoft Windows Multilingual Required M0DH2ML


A zip file of the size 409 587 KB is wrong.

More information:

https://www.ibm.com/support/pages/downloading-ibm-cognos-controller-1101

https://www.ibm.com/docs/en/cognos-controller/11.0.1?topic=icclo-installing-configuring-cognos-controller-one-computer

To log a ticket with IBM support go to: https://www.ibm.com/mysupport/s/?language=en_US

IBM Documentation: https://www.ibm.com/docs/en/cognos-controller

Product:
Microsoft Windows 2019 server

Issue:

Your security scan software report that you have a issue on the Windows server with ciphers.

TLS/SSL Birthday attacks on 64-bit block ciphers (SWEET32)
Negotiated with the following insecure cipher suites:
* TLS 1.2 ciphers:
* TLS_RSA_WITH_3DES_EDE_CBC_SHA

Configure the server to disable support for 3DES suite.

Solution:

Check that the application software you use on the server does not need this cipher.

Login to the Windows server as local administrator.

Then run this powershell command to remove the support for the cipher:

Disable-TlsCipherSuite -Name 'TLS_RSA_WITH_3DES_EDE_CBC_SHA'


Reboot the windows server for the change to take affect.

Get list of cipher that is 3DES:

Get-TlsCipherSuite -name “3DES”


Get list of all cipher on server:

Get-TlsCipherSuite | Format-Table Name

Get list of curves:

certutil.exe –displayEccCurve


More Information:

A cipher suite is a set of cryptographic algorithms. The schannel SSP implementation of the TLS/SSL protocols use algorithms from a cipher suite to create keys and encrypt information. A cipher suite specifies one algorithm for each of the following tasks:

  • Key exchange
  • Bulk encryption
  • Message authentication

Key exchange algorithms protect information required to create shared keys. These algorithms are asymmetric (public key algorithms) and perform well for relatively small amounts of data.

Bulk encryption algorithms encrypt messages exchanged between clients and servers. These algorithms are symmetric and perform well for large amounts of data.

Message authentication algorithms generate message hashes and signatures that ensure the integrity of a message.

Developers specify these elements by using ALG_ID data types. For more information, see Specifying Schannel Ciphers and Cipher Strengths.

In earlier versions of Windows, TLS cipher suites and elliptical curves were configured by using a single string:

Diagram that shows a single string for a Cipher Suite.


https://learn.microsoft.com/en-us/windows/win32/secauthn/cipher-suites-in-schannel 

https://learn.microsoft.com/en-us/windows-server/security/tls/manage-tls#configuring-tls-cipher-suite-order 

https://learn.microsoft.com/en-us/powershell/module/tls/?view=windowsserver2022-ps

https://learn.microsoft.com/en-us/powershell/module/tls/disable-tlsciphersuite?view=windowsserver2022-ps 

https://rdr-it.io/en/windows-server-disable-a-cipher-suite/ 

https://learn.microsoft.com/en-us/windows-server/security/tls/tls-registry-settings?tabs=diffie-hellman

Product:
Cognos Controller 11.0.12

Microsoft Windows 2022 server

Issue:

User get a error when they try to login to Cognos Controller after you have upgraded the software on the server.

Solution:

Ask the user to install the new Cognos Controller client that match the version you have installed on the windows server.

This is often done by central distribution system, like Software center.

INSTALLATION INFORMATION
IBM Cognos Controller Version 11.0.1200.28
Integration Version 11.0.1200.8
Install/Updater Kit Version 11.0.1200.36


More information:

https://www.ibm.com/docs/en/cognos-controller/11.0.1?topic=icclo-installing-configuring-cognos-controller-one-computer 

https://www.ibm.com/support/pages/troubleshooting-error-invalid-database-version-version-controller-requires-database-version-710-when-launching-controller 

https://www.ibm.com/support/pages/how-install-controller-local-client


Product:
Cognos Controller 11
Microsoft Windows 2022 server

Issue:

Error when you try to setup the Cognos Controller web, by running bat command to add the databases.

D:\Program Files\ibm\cognos\ccr_64\fcmweb>SyncDBConf.bat ..\data wlp\user\shared\config\datasources
Found 6 udl files in ..\data

FATAL ERROR: ‘java.io.FileNotFoundException: D:\Program Files\ibm\cognos\ccr_64\fcmweb\wlp\user\shared\config\datasources\datasources.xml (The system cannot find the path specified.)’
:D:\Program Files\ibm\cognos\ccr_64\fcmweb\wlp\user\shared\config\datasources\datasources.xml (The system cannot find the path specified.)
Datasources updated.

Solution:

Try to Find the config.js file in C:\Program Files\IBM\cognos\ccr_64\frontend folder
Open the file in a text editor and make the following changes:

/* IBM SOURCE CODE HEADER START

* =====================================================================

* IBM Confidential

*

* IBM Cognos Products: ccr

*

* © Copyright IBM Corp. 2023

*

* The source code for this program is not published or otherwise

* divested of its trade secrets, irrespective of that has been

* deposited with the U.S. Copyright Office.

* =====================================================================

* IBM SOURCE CODE HEADER END */

var fs = require('fs');


module.exports =

{

"proxies": [{

"urlPath": "fcm.web",  //root context for Controller Web backend

"enabled": true,      //forward requests through UI service


"options": {

"ws": true,


// details for Controller web backend connection

"target": {

"host": "controllerservername.domain.com",

"port": 3000,

"protocol": "http:" //set https: for SSL

},

"secure": true  //set this to false if Controller Web Backend is using Self Signed certificates

}

},

{

"urlPath": "ibmcognos",  //root context for Controller Server Backend

"enabled": true,      //forward requests through UI service


"options": {

"ws": true,


//details for Controller Server connection

"target": {

"host": "controllerservername.domain.com",

"port": 80,

"protocol": "http:" //set https: for SSL

},

"secure": true  //set this to false if Controller Server Backend is using Self Signed certificates

}

}],


//Details for Controller UI service 

"expressJs": {

"host": "controllerservername.domain.com", //interface used by Controller Web UI Service

"port": "9080",              //port used by Controller Web UI Service

"adminContext": "admin",

"enableAdminApp": true,

"enableRemoteExcel": false,

"enableClient": false,

"enableFap": true,

"enableFileSettings": true,

"enableIBMIDAuth": false,

"enableEncryption": false,

"allowedOrigin": '{allowedOrigin}',

"oidcProvider": 'IBMid', //IBMid or google or azure

"options": {


//Add ssl object with path to certificates file below for using HTTPS 

//Note: the protocol in proxies section must also be set to HTTPS

                /*

                "ssl": {

// certificates

"key": fs.readFileSync(__dirname+"/keyfile.key"),  //__dirname points to ccr_64\frontend

                    "cert": fs.readFileSync(__dirname+"/cert.crt"),

                    "passphrase":"changeit"

}

*/

},


//false to enable "real time updates" feature for all the users

//true to disable "real time updates" feature for all the users

"disableRealTimeUpdates": false

},

ibmIDConfig: {

"discoveryEndpoint": "{discoveryEndpoint}",

"client_id": "{client_id}",

"client_secret": "{client_secret}",

"redirect_uris": ["{basePath}/auth/sso/callback"]

},

"entryPoints":

{

"paLink": "http://tm1servername.domain.com:9510/tm1web"

},

}

Reboot the Microsoft Windows Server, and then try to run the SyncDBConf.bat command again.

More Information:

https://www.ibm.com/docs/en/cognos-controller/11.0.1?topic=only-configuring-controller-web

Product:

Cognos Controller 11

Microsoft Windows 2022 server

Issue:

You click on the excel icon in cognos controller to start Excel program. The excel program starts very small.

Solution:

Remove the ccr.exe properties to adjust screen resolution (change high DPI settings)  or

open a excel document first in excel, before you login to cognos controller from excel, and run a report.

You have change the ccr.exe properties to not make cognos controller shrink when you open a java menu inside the cognos controller program. This is done by go to C:\Program Files\IBM\IBM Cognos Controller Local Client folder.
Right click on CCR.exe > Properties > Compatibility > Change high DPI settings > Check Override high DPI scaling behavior. Scaling performed by: System (Enhanced).

https://www.ibm.com/support/pages/controller-screen-shrink-after-opening-java-related-menu-function 

If user need to send report to Excel, they need to have an Excel book open first before run send to Excel. Otherwise the Excel will shrink after apply setting.

More Information:

https://www.ibm.com/support/pages/screen-shrinks-after-opening-java-related-menu-function-caused-limitation-apar-pi94499 

https://www.ibm.com/support/pages/controller-screen-shrink-after-opening-java-related-menu-function 

Product:

Cognos Analytics 11.2.4

Issue:

Can not install CA11 as there are file in use.

Solution:

Stop the ibm cognos service and set it to manual in windows services manager.

Stop the IIS ( World Wide Web Publishing Service ) and set it (W3SVC) to manual.

Reboot the Windows server, to clear the memory.

Login as administrator again.

Go to the folder where you have the CA11 media.

Now start the installation from; a file like analytics-installer-3.7.21-win.exe

https://www.ibm.com/support/pages/ibm-cognos-analytics-1124-fix-pack-2 

Ensure that you have backed up the content store database, and saved the cognos configuration as a text file, before you start the upgrade of Cognos Analytics.

If the setup fail during installation, you may have files to restore in folder C:\Program Files\ibm\cognos\analytics\install_backup

More Information:

https://www.ibm.com/support/pages/how-upgrade-your-version-cognos-analytics

https://docs.oracle.com/en/industries/health-sciences/inform/cognos1124-install/index.html?toc.htm?227090.htm

https://docs.oracle.com/en/industries/life-sciences/inform/cognos1124fp2-install/index.html?toc.htm?227238.htm

The IBM Cognos Analytics installation consists of two components: the installer executable and a repository zip file.

  1. Download the ca_instl_win_3.6.39.exe and ca_srv_win64_11.2.4.zip files from My Oracle Support (MOS) in Patch 23294044.
  2. Right click on ca_instl_win_3.6.39.exe, and select Run as administrator.
  3. Select the language to use for the installation, and click Next.

    The Repository selection page appears.

  4. Click Choose, browse to the server repository where the ca_srv_win64_11.2.4.zip file is located, click Open, and then click Next.

    The install getting started page appears.

  5. Select IBM Cognos Analytics, and click Next.
  6. Review and accept the license agreement, and click Next.
  7. In the Installation location field, browse to or type the drive and destination folder for the Cognos Analytics application (for example E:\cognos\c11), and click Next.

    If the Folder does not exist message appears, click Yes to create the folder.

  8. Select the appropriate installation type and components depending on your server configuration, and click Next. Do not select the Optional Gateway component.

    Server Configuration

    To install…

    Installation type

    Choose components

    Single server

    Content Manager and Report Server

    Custom

    Content Tier (mandatory)

    Application Tier

    Active Content Manager

    Custom

    Content Tier (mandatory)

    Application Tier

    Distributed environment

    Standby Content Manager

    Custom

    Content Tier (mandatory)

    Application Tier (mandatory)

    Report Server

    Custom

    Application Tier (mandatory)

  9. Review the pre-installation summary, and click Install.

    The installation program installs the components that you selected. This takes several minutes. When the component installation is complete, the Complete page appears.

  10. Click Done.
  11. On the Complete page, click Done.
  12. Open the cmplst.txt file in the Cognos installation directory.
  13. Look for the line Manifest=casrv-manifest-11.2.4-2212070924-winx64h.json to confirm that Cognos Analytics 11.2.4 is installed successfully.


Upgrade to IBM Cognos Analytics 11.2.4 FP2

Install IBM Cognos Analytics 11.2.4 FP2 software on all the applicable servers:

  1. Download the analytics-installer-3.7.12-win.exe and casrv-11.2.4-2307061628-winx64h.zip files from My Oracle Support (MOS) in patch 23294044.
  2. Stop all IBMCOGNOS and IIS services, set them to manual.
  3. Reboot the Windows server to clear the memory before starting the installation.
  4. Right click on analytics-installer-3.7.12-win.exe, and select Run as administrator.
  5. Select the language to use for the installation, and click Next.

    The Repository selection page appears.

  6. Click Choose, browse to the server repository where the casrv-11.2.4-2307061628-winx64h.zip file is located, click Open, and then click Next.

    The install getting started page appears.

  7. Select IBM Cognos Analytics, and click Next.
  8. Review and accept the license agreement, and click Next.
  9. In the Installation location field, browse to or type the drive and destination folder for the Cognos Analytics application (for example E:\cognos\c11), and click Next.

    A warning appears informing you that you are installing in the same location as a previous location and that files will be overwritten.

  10. Click Yes to agree to choose this location.
  11. Review the pre-installation summary, and click Install.

    A warning appears informing you about failure in pre-action installation step. Click OK to continue.

  12. Click Done.
  13. On the Complete page, click Done.
  14. Open the cmplst.txt file in the Cognos installation directory.
  15. Look for the line casrv-manifest-11.2.4-2307061628-winx64h.json to confirm that Cognos Analytics 11.2.4 FP2 is installed successfully.
  16. Go into Cognos Configuration – check that the environment values are correct – click save.
  17. Change the IBMCOGNOS service to automatic, the same for the WWW service.
  18. Reboot the Windows server.
  19. Wait 20 minutes.
  20. Check that you can login to Cognos Analytics.


Problems solved can be found in the Fix List for Cognos Analytics 11.2.4 FP2

Entitled Bundled Customers use this link Cognos Analytics 11.2.4 FP2 to get access to download Cognos Analytics Fix Pack 2.