Product:
Planning Analytics 2.0.9.13 TM1_version=TM1-AW64-ML-RTM-11.0.913.10-0

Microsoft Windows 2019 server

Problem:
How do i give a message to Tm1Web users that they will always see?

Solution:

Edit the CommonMessages.js file and the home.jsp files in Notepad++.

The first is the name of the tab in the web browser – here you can add text, like 1984 in our example by edit the file home.jsp in folder C:\Program Files\ibm\cognos\tm1web\webapps\tm1web. Change the row 47 to the text you want:

<title>IBM Cognos TM1 Web 1984</title>

Save the file and refresh your web browser to see the change.

The second value is in a different folder for each language. The language setting in your web browser will tell what text you will show.

Go to folder C:\Program Files\ibm\cognos\tm1web\webapps\tm1web\scripts\tm1web\common\nls\sv for Swedish language.

Edit the 378 or 379 row in file CommonMessages.js to your message text:

OFFERING_NAME:"Cognos® TM1® Web (please use chrome)",

Save the file and refresh the web browser. If you do not see the text, go into the settings and change the language for the web browser.

For English language, you may need to edit in the Tm1WebAppCam.js file, direct in folder C:\Program Files\ibm\cognos\tm1web\webapps\tm1web\scripts\tm1web\standalone. Search for the word cognos to find where you can edit the file.


Third, you may want that the users of TM1WEB should not see the cubes views at all. This is done by a change in the tm1web_config.xml file in folder

C:\Program Files\ibm\cognos\tm1web\webapps\tm1web\WEB-INF\configuration.  Edit the line 25 to this:

<add key="NavTreeDisplayServerView" value="N" />

Save the file and restart the service “IBM Planning Analytics Spreadsheet Services”.

To change the background picture in TM1WEB you may need to edit the file C:\Program Files\ibm\cognos\tm1web\webapps\tm1web\scripts\tm1web\themes\carbon\standalone\images\login\PA_Header.svg.

These changes is not supported by IBM.

More information:

https://www.ibm.com/docs/en/planning-analytics/2.0.0?topic=ctwsas-displaying-hiding-views-node-in-navigation-pane

https://www.w3schools.com/html/html_css.asp

https://www.toptal.com/designers/htmlarrows/

https://www.iso.org/obp/ui/#search

https://www.w3schools.com/charsets/ref_html_entities_4.asp

https://www.iso.org/obp/ui/#iso:pub:PUB500001:en

https://developer.mozilla.org/en-US/docs/Learn/CSS/First_steps/How_CSS_is_structured

https://cubewisecode.squarespace.com/blog?offset=1528787669586

https://www.tm1forum.com/viewtopic.php?t=426

Product:
Planning Analytics 2.0.9.18
Microsoft Windows 2019 server

Issue:
How get the month before today?

Solution:

In TM1 TI code you can write something similar to this in prolog:

## sMonth = 1 ;
## remove sMonth = below and test with above line

sMonth = ( MONTH ( TODAY ) ) ;
sYear = ( YEAR (TODAY) ) ;
IF ( sMonth = 1) ;
pMonth = numbertostring ( 12 ) ;
pYear = sYear - 1;
ELSE ;
pMonth = numbertostring (sMonth - 1 ) ;
pYear = sYear ;
ENDIF ;

IF (LONG (pMonth) = 1) ;
p2Month = '0' | pMonth ;
ELSE ;
p2Month = pMonth ;
ENDIF ;

pVersion = (p2Month) | ' - ' | numbertostring(pYear) ;

ASCIIOUTPUT ( 'd:\temp\debugtestdate.txt', numbertostring (sMonth) , numbertostring(sYear) , (p2Month) , numbertostring(pYear) ) ;

Will give a test file with this result:


If you want to have the year in 4 digits, you can add it like this;

IF ( sMonth = 1) ;
pMonth = numbertostring ( 12 ) ;
pYear = '20' | numbertostring ( sYear - 1 ) ;
ELSE ;
pMonth = numbertostring (sMonth - 1 ) ;
pYear = '20' | numbertostring ( sYear ) ;
ENDIF ;


More Information:

https://www.ibm.com/docs/en/planning-analytics/2.0.0?topic=dtrf-month

Dates and Time in TM1

Product:
Microsoft SQL Azure database

Issue:
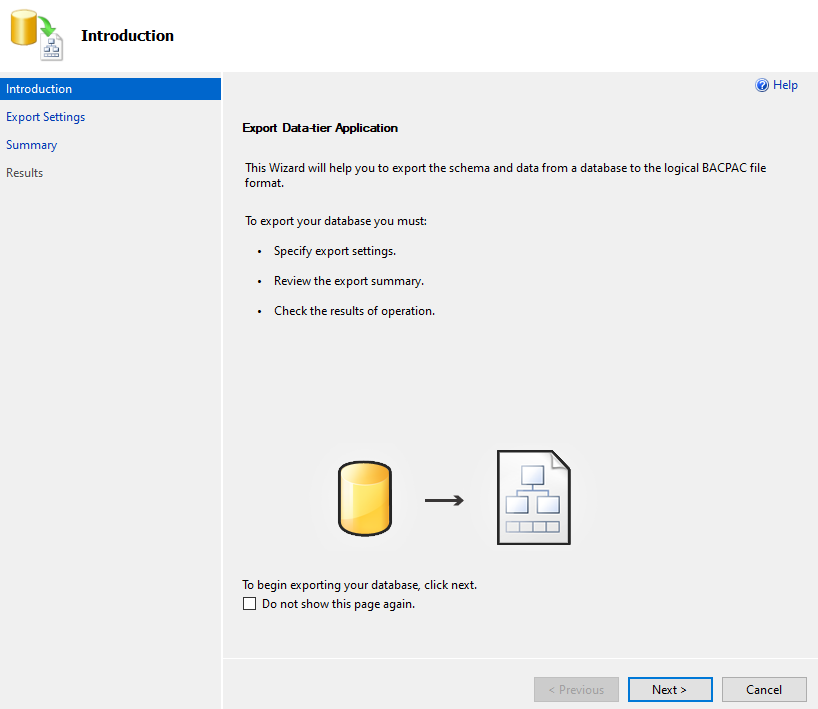
How create a new database from a BACPAC file in SQL Azure?

The Azure portal only supports creating a single database in Azure SQL Database and only from a .bacpac file stored in Azure Blob storage.

Depending how your firewall and network endpoints are setup in the SQL azure, you can get different problems.

https://learn.microsoft.com/en-us/azure/azure-sql/database/database-import?view=azuresql&tabs=azure-powershell 

Error: The ImportExport operation failed because of invalid storage credentials, can be that you need to click in “use private link” for the subscription.

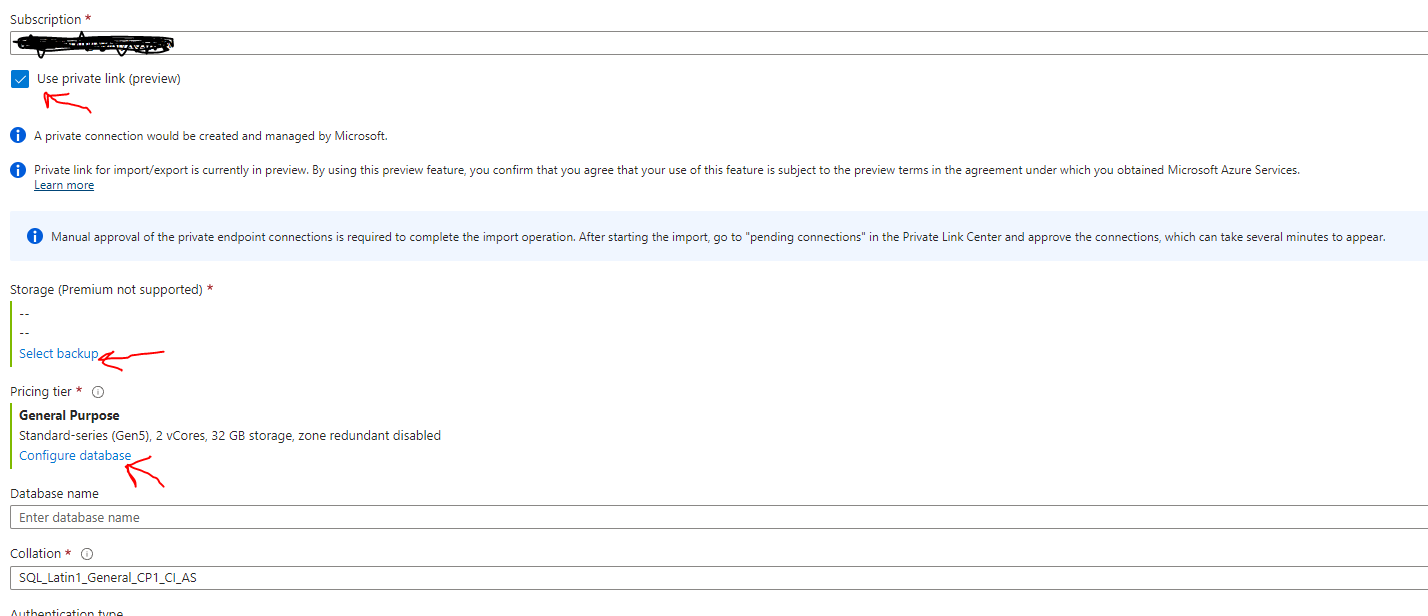
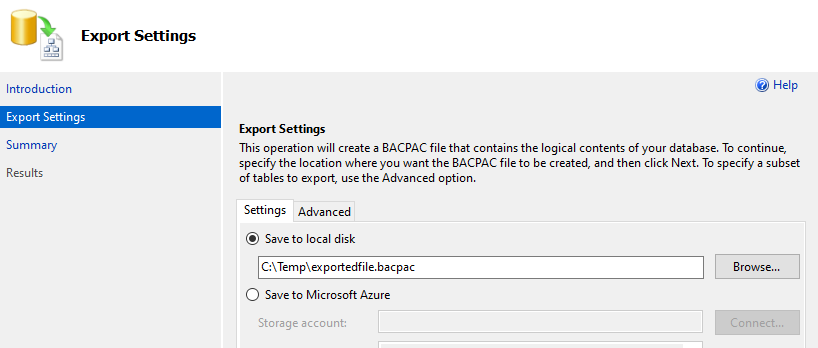
You need to select the backup bacpac file from your blob storage.
You should select the database model you want to get a big and valuable SQL Azure database created.
Enter a name that you can easy find from the other databases.

The ImportExport operation with Request Id 'xxxxx-xxxxx' failed due to 'The server principal "donald" is not able to access the database "sqldatabasename-new" under the current security context.
Cannot open database "sqldatabasename-new" requested by the login. The login failed.

Error like above, can be that you do not have access to the database, the user account is not ADMIN on the SQL Azure server.

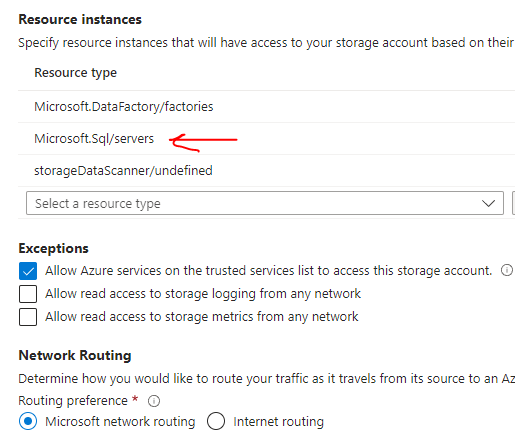
Other common issue can be that the BLOB storage is not allowing access from the SQL Azure database.
When doing the import above, you need to monitor both Private Endpoint Connections and SQL azure private access, to Approve the request for access that the above import process will ask for.

You can also may need to add the SQL server as resource type.  But it may still fail, if you have not given access to the SQL server over the network from the BLOB storage.

Solution:

If you know you have access from your computer to the SQL azure server, then you should upload the DACPAC from you c:\temp folder with a powershell script.

.\SqlPackage.exe /Action:Import /SourceFile:"C:\temp\sqldatabasfilesavedname.bacpac" /TargetConnectionString:"Server=tcp:sqlservername.database.windows.net,1433;Initial Catalog=databasename_test_restore;Authentication=Active Directory Password;MultipleActiveResultSets=False;Encrypt=True;TrustServerCertificate=False;Connection Timeout=30;User ID=donald.duck@company.com;Password=xxxxxxx" /p:DatabaseEdition=Standard /p:DatabaseServiceObjective=S4

First you need to install the DacFramework.msi from https://learn.microsoft.com/en-us/sql/tools/sqlpackage/sqlpackage-download?view=sql-server-ver16

Then start powershell as administrator and go to the folder C:\Program Files\Microsoft SQL Server\160\DAC\bin, and run above powershell script after you change the names to match yours.

Parameters used in script:

.\SqlPackage.exe /Action:Import
= start the process and what action we do – in this case import
/SourceFile:”C:\temp\sqldatabasfilesavedname.bacpac”
= tell the location and filename of the file to restore from
/TargetConnectionString:”Server=tcp:sqlservername.database.windows.net,1433;
= tell protocol and name of SQL server and port the script should use
Initial Catalog=databasename_test_restore;
= tell the new name of the database in SQL azure
Authentication=Active Directory Password;MultipleActiveResultSets=False;Encrypt=True;TrustServerCertificate=False;Connection Timeout=30;
= set parameters that you will login with active directory
User ID=donald.duck@company.com;
= enter the name of a administrator – this account should not be specified in the database
Password=xxxxxxx”
= enter the password for the account
/p:DatabaseEdition=Standard
= set the version of SQL Azure database you want in the subscription
/p:DatabaseServiceObjective=S4
= set the number of DTU you will use first in your new database

When it does the import – it start with this – check the line for servername to ensure it is correct

Importing to database ‘databasename_test_restore’ on server ‘tcp:sqlservername.database.windows.net,1433’.
Creating deployment plan
Initializing deployment
Verifying deployment plan
Analyzing deployment plan
Importing package schema and data into database
Updating database
Importing data
Processing Import.
Disabling indexes.

….

When done it should say something like this:

Successfully imported database.
Changes to connection setting default values were incorporated in a recent release. More information is available at https://aka.ms/dacfx-connection
Time elapsed 0:13:32.42


If you get below error, it can be that you are on VPN, and need to be at the office instead, to be allowed to connect to the Azure SQL Server.

The ImportExport operation with Request Id ‘xxxxx-xxxx’ failed due to ‘An error occurred while communicating with the SQL Server using AdPassword-login: AADSTS50076: Due to a configuration change made by your administrator, or because you moved to a new location, you must use multi-factor authentication to access ‘xxxxx-xxxxxx’

If you get below error, the account you gave, already exist in the DACPAC file, you need to remove the user from the database, and do a new extract of data to dacpac.

Error SQL72014: Framework Microsoft SqlClient Data Provider: Msg 15063, Level 16, State 1, Line 1 The login already has an account under a different user name.
Error SQL72045: Script execution error.  The executed script:
CREATE USER xxxxxxx

You may need to remove logins for the user account used at the import, on the database that you see exist at the server level (on the master database).

To see server accounts, run below on master database:

SELECT A.name as userName, B.name as login, B.Type_desc, default_database_name, B.* 
FROM sys.sysusers A 
    FULL OUTER JOIN sys.sql_logins B 
       ON A.sid = B.sid 
WHERE islogin = 1 and A.sid is not null

More Information:

https://learn.microsoft.com/sv-se/azure/azure-sql/database/database-import?view=azuresql&tabs=azure-powershell 

SqlPackage /a:import /tcs:”Data Source=<serverName>.database.windows.net;Initial Catalog=<migratedDatabase>;User Id=<userId>;Password=<password>” /sf:AdventureWorks2008R2.bacpac /p:DatabaseEdition=Premium /p:DatabaseServiceObjective=P6

SqlPackage /a:Import /sf:testExport.bacpac /tdn:NewDacFX /tsn:apptestserver.database.windows.net /ua:True /tid:”apptest.onmicrosoft.com”

https://support.ptc.com/help/windchill/r13.0.0.0/en/index.html#page/Windchill_Help_Center/WCUpgradeGuide/WCUpgrade_ImportingAzureSQL.html 

https://learn.microsoft.com/en-us/sql/tools/sqlpackage/sqlpackage-import?view=sql-server-ver16 


Product:

Microsoft Azure SQL database

Issue:

How create a BACPAC, a file that contain both data and table structure (metadata) from the database? That you can import to other database later.

If you are going to import the BACPAC into SQL Azure later, the user account doing the import, can not exist inside the database. Please remove that user from inside the database.

Solution:

From inside SSMS (SQL Server Management Studio) you right click on the database and select task – export data-tier application.

You can enter a filename and save the file to your computer. (downloading database from Azure can take some time)

It is faster to save the file to AZURE BLOB storage (if they are at the same location), then you select “save to Microsoft Azure”.
Select a Storage Account, from your subscription.
Enter a name for the file, or keep the default.
Leave the temporary file as is.
Click next…

Or to save the file to disk, keep the “save to local disk” settings.

Click next and finish to start download the file to your local disk.

A DAC is a logical database management entity that defines all of the SQL Server objects which associates with a user’s database. A BACPAC includes the database schema as well as the data stored in the database.

More Information:

https://learn.microsoft.com/en-us/azure/azure-sql/database/database-export?view=azuresql 

https://www.sqlshack.com/azure-automation-export-azure-sql-database-to-blob-storage-in-a-bacpac-file/ 

SQLPackage utility to export Azure SQL Databases

Product:

Microsoft SQL Azure database

Issue:

Can not delete a user in the database from SSMS.

The database principal owns a schema in the database, and cannot be dropped. (Microsoft SQL Server, Error: 15138)

Solution:

Go to inside SSMS, check what schema is with this command (replace donald with the login you want to check):

select * from information_schema.schemata
where schema_owner = 'donald'

Change the schema stage to use DBO instead with command:

 ALTER AUTHORIZATION ON SCHEMA::[Stage] TO [dbo]


After the schema is changed to have a different owner, then the user can be dropped in SSMS.

More Information:

https://www.mssqltips.com/sqlservertip/2620/steps-to-drop-an-orphan-sql-server-user-when-it-owns-a-schema-or-role/

To list all user in database enter:

 SELECT DB_NAME(DB_ID()) as DatabaseName, * FROM sys.sysusers

Product:

Planning Analytics 2.0.9.13 TM1_version=TM1-AW64-ML-RTM-11.0.913.10-0

Microsoft Windows 2019 server

Problem:

How make a drill process?

Solution:

Inside sample application proven_techniques login as ADMIN and create a drill from cube “Drivers Alloc” to cube “employeedetails” (not the best example as they do not contain much information).

First right click on cube “Drivers Alloc” and select drill – create drill process.

Click Next, and then select a cube view as source and select any view from that target cube.

Click finish, and select a name like “TOemployees”. The hidden process }Drill_TOemployees is created.
Right click on the cube “Drivers Alloc” and select drill – create drill assignment rule.

Enter in below in rule, to make all cells drill-able to the TI process TOemployees :

[]=s:'TOemployees' ;

Then save it.

Then open the TI process to edit it. The first tabs i automatic populated from the creation cube.

In prolog add this code:

#****Begin: Generated Statements***
#****End: Generated Statements****

ByPass = 'YES';

# set the name of the target cube where the view is build
pCube = 'employeedetails' ;

# Specify dimension name
DimName1= 'employees' ;
DimName2 = 'budget' ;
DimName3 = 'departments' ;
DimName4 = 'employeedetails' ;

#Set Constants for Inserting into View

# Element1 = 'Total Employees' ; we should get only lowest member by MDX
Element2 = 'Budget' ;

# set the parameter we get from the drill function to make a selection in the view
Element3 = Receivers ;

# Element4 = 'Current Salary' ; we get all members by not including it in the code

# set view name to a uniq value
sView = 'Drill__' | pCube ;
sSubset = sView;

If( ViewExists( pCube, sView ) = 1 );
ViewDestroy( pCube, sView );
EndIf;
ViewCreate( pCube, sView );

# delete subset if it exist
If( SubsetExists( DimName1 , sSubset ) = 1 );
SubsetDestroy( DimName1 , sSubset );
EndIf;

# add all leaf elements to the dimension
sMDX = '{TM1FILTERBYLEVEL( {TM1SUBSETALL( [ ' | DimName1 | ' ] )}, 0)}' ;
SubsetCreateByMDX( sSubset, sMDX );

ViewSubsetAssign( pCube, sView, DimName1, sSubset );

# only include on elemet of the dimenstion in the view
If( SubsetExists( DimName2 , sSubset ) = 1 );
SubsetDeleteAllElements( DimName2 , sSubset );
Else;
SubsetCreate( DimName2 , sSubset );
EndIf;
SubsetElementInsert( DimName2, sSubset, Element2, 1 );

ViewSubsetAssign( pCube, sView, DimName2, sSubset );

# 
If( SubsetExists( DimName3 , sSubset ) = 1 );
SubsetDeleteAllElements( DimName3 , sSubset );
Else;
SubsetCreate( DimName3 , sSubset );
EndIf;
SubsetElementInsert( DimName3, sSubset, Element3, 1 );

ViewSubsetAssign( pCube, sView, DimName3, sSubset );

# as dimname4 does not have a total, 
# we leave it out and get all values in the view for that dimension.

# set what dimensions that should be in row and columns
ViewRowDimensionSet( pCube, sView, DimName1 , 1 );
ViewColumnDimensionSet( pCube, sView, DimName4 , 1 );
ViewTitleDimensionSet( pCube, sView, DimName3 );

# set standard values to exclude some cells
ViewExtractSkipCalcsSet( pCube, sView, 1 );
ViewExtractSkipRuleValuesSet( pCube, sView, 1 );
ViewExtractSkipZeroesSet( pCube, sView, 1 );

in epilog add this code:

IF (ByPass @= 'NO' ) ;

#****Begin: Generated Statements***
RETURNVIEWHANDLE('employeedetails','employeedetails');
#****End: Generated Statements****

ELSE;
RETURNVIEWHANDLE( pCube, sView ) ;
ENDIF;


Click on the lowest cell and select Drill from the popup menu.

The view is shown (that is built by the TI process) – only value that change is the receivers dimension, as that parameter is used to build the view.

You can do a better solution by checking out below links.

More Information:

https://www.wimgielis.com/tm1_neatmdxtricks_EN.htm

http://yinsolutions.blogspot.com/search/label/7.%20Planning%20Analytics%20%2F%20TM1

https://pmsquare.com/analytics-blog/2020/4/13/pa-drilling-through-to-greater-detail

https://quebit.com/askquebit/ibm-planning-analytics-setting-up-basic-drill-through-functionality/

https://lodestarsolutions.com/tm1-drill-through-from-cube-to-cube-not-working/

https://blogs.perficient.com/2011/10/13/cognos-tm1-drill-through-3/

https://quebit.com/askquebit/creating-effective-source-and-zero-out-views-in-planning-analytics/

https://code.cubewise.com/ti-helper

https://www.bihints.com/book/export/html/68

https://exploringtm1.com/drill-through-processes/

Product:
Microsoft Azure Data Factory
Issue:
How schedule the ADF main pipeline to run every hour?

Solution:

Inside ADF  ( https://adf.azure.com/en/authoring/pipeline/Main ) under Factory Resources select you pipeline named “main”.
Click on the Trigger(1) icon to get the dropdown that show “New/Edit”, select that. (The number show how many triggers you got running)

Click the arrow at choose trigger to get the New icon to select.

Enter the name for your trigger.
Edit the start date to sometime next day – easy to only write the numbers in this field. It will start at the time specified, so set 1:00:00 AM to make it run at every whole hour. If you set it to 1:30:00 will make it run at 1:30 and then 2:30 etc.
Select a time zone that is the one you are in – otherwise it will run at for you unexpected time.

Set the Recurrence to 1 hour, if you want it to run each hour.
Note: that it is marked to Start.
And click OK.

You need to click OK one more time.

You need to click on the Publish All button in ADF, to make the change be uploaded and activated.

To check your trigger the next day, go to Monitor icon and Trigger runs. Here will be a list of the last 24 hours trigger runs and if they where successful.

To edit a existing Trigger – go to the pipeline and select again the Trigger drop-down and New/Edit link.

Click on your trigger name to get it up in Edit dialog. Here you can change the name and time it will run – select a start date and time in the future.

Ensure it is started, before you press OK.
Then you have to Publish your changes again to ADF, to make it happen.

As Azure change the layout all the time, the dialogs may look different when you read this.

More Information:

https://www.mssqltips.com/sqlservertip/6062/create-schedule-trigger-in-azure-data-factory-adf/ 

https://www.mssqltips.com/sqlservertutorial/9402/azure-data-factory-scheduling-and-monitoring/ 

https://www.sqlshack.com/how-to-schedule-azure-data-factory-pipeline-executions-using-triggers/ 

https://www.serverlessnotes.com/docs/schedule-azure-data-factory-pipeline-executions 

https://learn.microsoft.com/en-us/azure/data-factory/how-to-create-schedule-trigger?tabs=data-factory 

Product:
Azure Data Factory (ADF)

Issue:
Can not connect to SQL server from ADF in same subscription.

Cannot connect to SQL Database: ‘databaseservername.database.windows.net‘, Database: ‘databasename‘, Reason: Connection was denied since Deny Public Network Access is set to Yes. To connect to this server,
1. If you persist public network access disabled, please use Managed Virtual Network IR and create private endpoint. https://docs.microsoft.com/en-us/azure/data-factory/managed-virtual-network-private-endpoint; https://docs.microsoft.com/en-us/azure/data-factory/tutorial-copy-data-portal-private;
2. Otherwise you can enable public network access, set “Public network access” option to “Selected networks” on Auzre SQL Networking setting.

Solution:

Prompt yourself to Owner in the subscription and ADF.
Inside ADF you need first ensure that Integration Run-times are using a Managed Virtual Network. Create a new Integration runtime setup,
select Azure. self-hosted.
select Azure
set region to your needs, and click create.

When this use Managed Virtual Network, you can go and create the Linked Service.
Select Azure SQL database.
In connect drop-down select the above created integrationruntime2 that have managed virtual network.
Select your Azure Subscription.
Select your database server name from the drop-down.
Select the database name.
Select the Authentication type to be “System Assigned Managed Identity”
Click Test, and if there is OK, click Create.

Then you may inside SSMS add the ADF managed user to the database with command similar to this:

In master database:

CREATE login [adf_user] FROM EXTERNAL PROVIDER

CREATE USER [adf_user] FROM LOGIN [adf_user] WITH DEFAULT_SCHEMA=[dbo]

In user database:

CREATE USER [adf_user] FROM LOGIN [adf_user]

ALTER ROLE [db_owner] ADD MEMBER [adf_user]


More Information:

https://learn.microsoft.com/en-us/azure/data-factory/managed-virtual-network-private-endpoint

https://lazyadmin.nl/office-365/how-to-use-azure-managed-identity/ 

https://www.inthecloud247.com/configure-a-user-assigned-managed-identity-the-basics/ 

Product:

Planning Analytics Workspace 88
Microsoft Windows 2019 server

Issue:

How setup the smtp mail function?

Solution:

Check that the port 25 is open from the TM1 server to the SMTP EXCHANGE server first.

Check that the SMTP EXCHANGE server accepts mail from the TM1 server – talk to the e-mail people at the company.

Update the bootstrap properties file located in folder D:\Program Files\ibm\cognos\tm1_64\paa_agent\wlp\usr\servers\kate-agent


Set these properties for un-encrypted mail internal at the company:

SMTP_EMAIL_PORT=25

SMTP_EMAIL_AUTH=FALSE

SMTP_EMAIL_HOST=smtp.servername.domain.com

SMTP_EMAIL_START_TLS_ENABLE=FALSE

SMTP_EMAIL_USERNAME=

SMTP_EMAIL_PASSWORD=

PAA_EMAIL_ADDRESS=donald@domain.com

SEND_GRID_API_KEY=""

SEND_GRID_EMAIL_URL=https\://api.sendgrid.com/v3/mail/send

After changes – you need to restart the windows service: IBM Planning Analytics Administration Agent

Then go to the PAW and the administration agent tab and click on the Test email button – enter your mail address at the company.

Then you can setup Alerts, so you will get a email when the disk is full.

To get the share book function to have a email option, you need to update the paw.ps1 file on the PAW server, with information like this:

$env:ENABLE_EMAIL="true"
$env:SENDGRID_API_KEY=""
$env:EMAIL_FROM="donald@domain.com"
$env:EMAIL_SMTP_URL="smtp://servername.domain.com:25"


You need to stop and start the PAW for the changes in paw.ps1 should take effect. run  .\paw.ps1 stop   ,then  .\paw.ps1  in the scripts folder.

if you get error – check the log file (app.log) in folder D:\PAW88\log\share-app on the PAW server.

Error [ERR_TLS_CERT_ALTNAME_INVALID]: Hostname/IP does not match certificate’s altnames:  can be that the EMAIL_SMTP_URL server name not match the DNS altnames. Change to other server name.

https://www.ibm.com/docs/en/planning-analytics/2.0.0?topic=2wnj12-enable-email-notifications-in-planning-analytics-workspace-local

https://www.ibm.com/support/pages/planning-analytics-agent-messagelog-email-configuration-properties-missing 

https://pmsquare.com/analytics-blog/2020/11/8/ibm-planning-analytics-system-alerts-via-email

From Declan, Tm1 champion:

Setup in paw server

The obvious starting points are to gather details of your SMTP server, the port it uses (for sending email) – it can often have multiple ports available in which case – find out the “preferred” one. Generally speaking:

  • 587 – for TLS
  • 465 – For SSL
  • 25 – This might work (it does for office 365 at least) but general consensus is to not use it as it’s often blocked due to SPAM.

Also, gather the relevant account’s email and password.

Relevant Material

Based on googling the examples provided in the documentation:

I believe that node.js is being used to send the emails, and nodemailer.com/smtp has documentation covering most of the parameters used in the examples (e.g. ?Secure=true)

This doesn’t cover the tls.rejectUnauthorized=false that is used in the example, but looking that up suggests that in the event that your server can’t be verified it will go ahead and send the email anyway… so that sounds like a parameter that I would be cautious about using!

What Worked

Gmail:

  • $env:EMAIL_SMTP_URL=”smtp://<MyUserName>:<MyPassword>@smtp.gmail.com:587″
  • $env:EMAIL_SMTP_URL=”smtps://<MyUserName>:<MyPassword>@smtp.gmail.com:465″
  • $env:EMAIL_SMTP_URL=”smtps://<MyUserName>:<MyPassword>@smtp.gmail.com:465?secure=true&tls.rejectUnauthorized=false”

In all cases:

  • $env:ENABLE_EMAIL=”true”
  • $env:SENDGRID_API_KEY=””
  • $env:EMAIL_FROM=”<An email address that the credentials used in $env:EMAIL_SMTP_URL have access to send from>”

Product:
Planning Analytics 2.0.9.18
Microsoft Windows 2019 server

Issue:
How make a TM1 Ti process who read values from a file and add them as alias to a dimension?

Solution:

Create a text file with the first column with the elements in the dimension names, then the second column with the text you want to have in the alias.

Above we have two alias that we want to add to each element.

Create a new TM1 TI process and load the file similar to this: (you have to upload the file first, and then in the TI code change to location from where the file is read)

In the data source tab, enter the Variables name and change to String type.

Enter the parameters you need, to make the process work with any dimension and alias name that you need in future. When you run the process, you change filename and path etc to the values that are correct for you.

Enter a script similar to above. You can add code to check for it the alias exist, and not delete the attribute and then only update the elements listed in the text file.  Run the process and enter your filename.

The alias attribute are listed in the dimension.

You can view an icon indicating the attribute type in column headers. Click Settings icon and enable the Attribute type option to see the attribute type on column headers. Disable this option to hide the attribute type on column headers.

More Information:

https://everanalytics.wordpress.com/2017/08/10/tm1_alias_attributes/ 

Accomplish Attibute Update in Cognos TM1 Smartly!

https://everanalytics.wordpress.com/2015/07/26/create-a-very-large-dimension-in-cognos-tm1-using-turbo-integrator-ti/ 

AttrPutS in TM1: How to Use and Syntax

https://cubewise.com/blog/tm1-attributes-things-to-be-aware/ 

https://www.ibm.com/docs/en/planning-analytics/2.0.0?topic=cdipawc-import-members-attributes-into-dimension-in-planning-analytics-workspace