Product:
Cognos Planning 10.2.1
Microsoft Windows 2012
(This text is partly a copy from IBM web site – to keep it, in case it is removed)
Previously, to perform a complete IBM Cognos Planning 10.2.1 installation, you had to obtain the Planning 10.2.1 components and the BI Server 10.2.2 components from separate locations. Now, however, you can download and install all components from one location in IBM Passport Advantage.
This document walks you through the process of replicating the Planning Complete installation with the current version. The installation Kits for Planning 10.2.1 are full installs, and thus not able to upgrade any existing installation.
Downloading IBM Cognos Planning 10.2.1
To download and install the IBM Cognos Planning 10.2.1 eAssembly, follow the steps in Downloading IBM Cognos Planning 10.2.1.
The eAssembly consists of:
- Planning Client (eImage: CNLY3ML)
- Planning Server (eImage: CNLY4ML)
- Planning Administration (eImage: CNLY5ML)
- Planning Gateway (eImage: CNLY6ML)
- Framework Manager 10.2.2 (eImage: CN1YRML)
- BI Server 10.2.2 32-bit (eImage: CN1YNML)
- BI Server 10.2.2 64-bit (eImage: CN1YPML)
Note: A corresponding Cognos Planning non-production eAssembly is also available.
https://www.ibm.com/support/pages/cognos-planning-1021-fix-lists
If you are an existing BI customer, you may use your existing install if it is version 10.2.2 or above. If you are a Cognos Analytics customer, you can use your existing install if it is CA 11.0.7 or above. You can use either 32 or 64 bit.
https://www-01.ibm.com/support/docview.wss?uid=swg21991239
Installing and configuring the components
Once you have downloaded the kits you need, you can start to install.
The BI server and the planning code must be installed in separate directories on your disk.
For example, and for the rest of this document, we’ll install BI into a folder called BI1022 and the planning software into the EP1021 folder. Recommended to only use short (8 characters) folder names.
You can place these into the root of a drive, below Program Files, or in any other path.
When installing a mixture of 64-bit and 32-bit Cognos products in a single environment, the 32-bit instance of the appropriate version of the BI gateway should be used. The 32-bit Gateway components for each product (Planning, BI, Metric Studio etc.) should all be installed to a single location on the Gateway or web server(s); and the 64-bit BI Gateway component is not required (however it does not need to be un-installed; if you are adding 32-bit components to an existing 64-bit BI environment, you can install each of the 32-bit Gateways to a new location on the server, and then simply re-configure IIS to reference the 32-bit Gateway location).
Step 1 – Install BI Server
Install the BI server kit into BI 10.2.2. This install is very similar to the Planning installs, and it will set up a few start menu icons for you, among which are Cognos Configuration.
Note: You should also install the latest BI 10.2.2 fix pack at this time. It can be downloaded from Fix Central at https://ibm.biz/BdY77S for 32-bit BI and https://ibm.biz/BdY776 for 64-bit BI.
https://www.ibm.com/support/pages/cognos-business-intelligence-1022-fix-lists
You need to copy the sqljdbc42.jar file to folder D:\ibm\bi1022\c10_64\webapps\p2pd\WEB-INF\lib

Step 2 – Install Planning Gateway
Install the Planning Gateway install Kit into the same location as the BI server. This will put some extra static files into the right folders in the BI server location. (This assumes that the BI gateway is on the same computer as the BI server. If the BI gateway is installed elsewhere the Planning Gateway should be installed on top of that).
Step 3 – Configure BI Server
Start Cognos Configuration that was just installed. You will see that this looks very similar to the configuration you are used to seeing in previous Planning versions. This will allow you to connect to a content store, and set up any security namespace that you need.
Setup Content Store
- Create a database using your Microsoft SQL Server administration tools.
- Ensure that the collation sequence for the database is case insensitive.
In a custom installation, you choose a collation sequence, which includes character sets and sort order, during the Microsoft SQL Server setup. In a typical installation, the installation uses the locale identified by the installation program for the collation. This setting cannot be changed later.
- Ensure that TCP/IP connectivity is used for Microsoft SQL Server.
- From the Start menu, click Programs then click IBM Cognos 10 then click IBM Cognos Configuration.
- In the Explorer window, under Data Access, Content Manager, right-click Content Store, and click Delete.
This removes the default content store properties, which are defaulted to use an IBM DB2® database.
- Right-click Content Manager, and click New Resource then click Database.
- In the Name field, type a name for the resource. Such as Content Store.
- In the Type box, select the appropriate Microsoft SQL Server database type, and click OK.
If you use Windows authentication for your Microsoft SQL Server database, select Microsoft SQL Server database (Windows authentication). If not, select Microsoft SQL Server database.
- In Database server and port number, enter the name of your computer and port number on which Microsoft SQL Server is running. For example, localhost:1433. The value 1433 is the default port number used by Microsoft SQL Server. If you are using a different port number, ensure you use that value.
- Click the Value field next to the User ID and password property and then click the edit button when it appears. Type the appropriate values and click OK.
- In the Properties window, for the Database name property, type the name for your content store database.
- Right-click the resource you added for the content store database, and click Test.
If the test is successful, Content Manager can create the required tables in the content store when you start the IBM Cognos service for the first time. If the connection properties are not specified correctly, you cannot start the IBM Cognos services.
You can also configure dispatchers and set up the connection to the website (Gateway URI).
The website should be set up exactly as you are used to, using IIS or similar software. See existing tech notes on how to do this.
Note: If you are upgrading from a previous install, and you have made customizations to, for example, the Cognos namespace, it would be a good idea to reuse your existing content store database. The upgrade then runs silently, which is the preferred method for a BI upgrade. Ensure that you back up your old content store database, restore it to a DB on your new system, and connect to it in Cognos Configuration.
Setup the connection to active directory
- In every location where you installed Content Manager, open IBM Cognos Configuration.
- In the Explorer window, under Security, right-click Authentication, and then click New resource > Namespace.
- In the Name box, type a name for your authentication namespace.
- In the Type list, click Active Directory and then click OK.
The new authentication provider resource appears in the Explorer window, under the Authentication component.
- In the Properties window, for the Namespace ID property, specify a unique identifier for the namespace.
- Specify the values for all other required properties to ensure that IBM Cognos components can locate and use your existing authentication provider.
- Specify the values for the Host and port property.
To support Active Directory Server failover, you can specify the domain name instead of a specific domain controller.
For example, use mydomain.com:389 instead of dc1.mydomain.com:389.
- If you want to search for details when authentication fails, specify the user ID and password for the Binding credentials property.
Use the credentials of an Active Directory Server user who has search and read privileges for that server.
- From the File menu, click Save.
- Test the connection to a new namespace. In the Explorer window, under Authentication, right-click the new authentication resource and click Test.
You are prompted to enter credentials for a user in the namespace to complete the test.
Depending on how your namespace is configured, you can enter either a valid user ID and password for a user in the namespace or the bind user DN and password.
https://www.ibm.com/support/pages/enabling-single-sign-cognos-secured-against-active-directory
- In addition to those steps, if you want to use SSO, an advanced property needs to be set using Cognos Configuration to disable the use of Microsoft Kerberos for single signon like this:
+ In the Explorer window, under Security, Authentication, click the Active Directory namespace.
+ Click in the Value column for advanced properties and then click the edit button

+ In the Value – Advanced properties window, click Add.
+ In the Name column, type singleSignonOption (Case sensitive)
+ In the Value column, type IdentityMapping (Case sensitive)
+ Click OK.
Step 3a – Configure IIS Server
- In the Microsoft Windows Control Panel, click .
If you are using Microsoft Windows 8 or 2012 Server, Programs and Features is available directly from the Control Panel.
- Click Turn Windows features on or off.
- If you are using Microsoft Windows 2012 Server, use the following steps:
- In the Add Roles and Features Wizard, click Role-based or feature-based installation, and click Next.
- Select your server, and click Next.
- Select Web Server (IIS), if it is not already installed, ensure that Common HTTP Features is selected, and click Next until you get to the Role Services section of the wizard.
- Expand Application Development.
- Select CGI and ISAPI extensions if it is not already selected, and click Next.
- Click Install.
- In the Internet Information Services (IIS) Manager console, under Connections, select your server name.
- Double-click ISAPI and CGI Restrictions.
- Under Actions, click Add.
- Enter the path to the cognos.cgi file. The file is in the c10_location\cgi-bin directory.
You must enter the full path, including the file name. If the path includes spaces, ensure you use quotation marks around the path. For example, enter:
“C:\Program Files\ibm\cognos\c10\cgi-bin\cognos.cgi“
- Enter a Description, such as CognosCGI.
- Select Allow extension path to execute, and click OK.
- Under Connections, expand Sites, and under your website, add the virtual directories as shown in the table:
Table 1. Required virtual directories
|
Alias
|
Location
|
|
ibmcognos
|
c10_location/webcontent
|
|
ibmcognos/cgi-bin
|
c10_location/cgi-bin
|
- Select the cgi-bin virtual directory that you created.
- Double-click Handler Mappings.
- Under Actions, click Add Module Mapping.
- In Request Path, type cognos.cgi.
- In Module, select CgiModule.
- Leave Executable (optional) blank.
- In Name, enter a name for the entry, such as CognosCGI.
- Click OK.
- Under Actions, click Add Module Mapping.
- In Request Path, type cognosisapi.dll.
- In Module, select IsapiModule.
- In Executable, enter the path to the cognosisapi.dll file.
For example, enter:
C:\Program Files\ibm\cognos\c10\cgi-bin\cognosisapi.dll
- In Name, enter a name for the entry, such as CognosISAPI.
- Click OK.
- Click Yes in the dialog box to allow the ISAPI extension.
- Start IBM Cognos Configuration.
- In the Explorer panel, click Local Configuration > Environment.
- In the Gateway URI box, change the cognos.cgi part of the URI to cognosisapi.dll.
On the IBM Cognos 10 Gateway install,
- Open <COG_ROOT>\webcontent\default.htm in a text editor. For example, D:\cognos\c10\webcontent\default.htm.
- Find the line that reads
|
1
2
|
window.setTimeout("window.location.replace('cgi-bin/cognos.cgi?
b_action=xts.run&m=portal/main.xts&startwel=yes')",5);
|
and change cognos.cgi to cognosisapi.dll.
|
1
2
|
window.setTimeout("window.location.replace('cgi-bin/cognosisapi.dll?
b_action=xts.run&m=portal/main.xts&startwel=yes')",5);
|
This will make http://<webserver>/<alias> work like http://<webserver>/<alias>/isapi, redirecting to the ISAPI Gateway after showing a splash screen.
For SSO, set windows authentication on the cgi-bin folder in IIS manager.
After you are done, start the Cognos service and verify that you can connect to the website and access the portal and Cognos Administration.
If you use Windows Authentication to connect to the SQL content store database, you need to set the IBM Cognos service to use a windows account, and not local system, or you get below error;
CFG-ERR-0103 Unable to start IBM Cognos service.
Execution of the external process returns an error code value of ‘-1’.
Step 3b– copy the BI content store data
Export your old Cognos BI content to a zip file, copy the zip file to the new deployment folder, and import the content store data, to get security and reports moved over.
Data source you have to manually update in cognos connection, to point to correct server.
To be able to schedule Planning Macros from Cognos BI you need to add this;
In IBM Cognos Administration in Cognos BI, on the Configuration tab, click Dispatchers and Services. Click the Cognos BI dispatcher that you want to configure. The list of services is displayed. Find the MonitorService service. You may have to click the Next Page icon to find the service in the list.
Click the Set properties – MonitorService icon.
On the Settings tab, for the Advanced settings of the Environment Category, click Edit.
Select Override the settings acquired from the parent entry.
Create a new parameter named enable.session.affinity. Set its value to true.
Create another new parameter named session.affinity.services.
Set its value to serviceName=planningAdministrationConsoleService.

Click OK, then click OK again.
Step 4 – Install Planning Server and Planning Administration
Install Planning Server and Planning Administration into EP1021. This will give you some startup icons.
Note: You will now have two different Cognos Configuration instances that work on their own set of configuration files in the two locations you have installed into. This is how it should be.
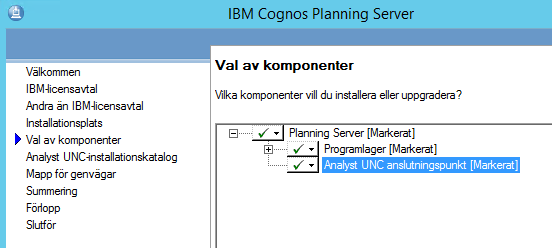
At d:\cognos create cognos$ fileshare for your filesys.ini file. When installing Cognos Planning Server enter \\servername\cognos$\planning as Analyst UNC path, to get the files created at d:\cognos\planning\bin\filesys.ini
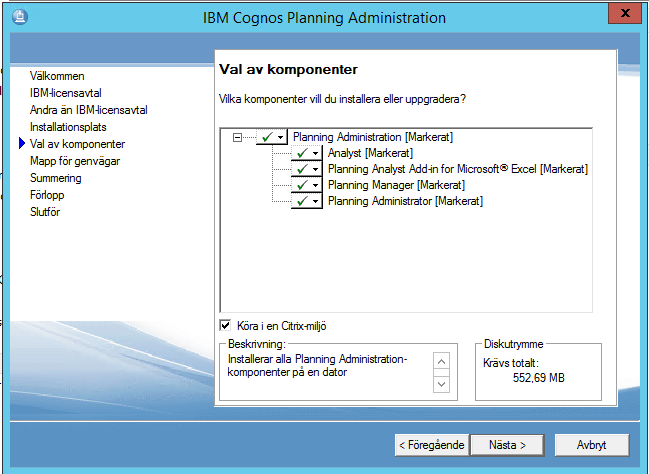
When installing admin tools on a server, mark that you run them on a citrix server.
Create a SQL alias for the planning store, in the SQL client on the Cognos Planning server.
You need to install the following Microsoft SQL Server 2005 Backward Compatibility Component:
● SQL Distributed Management Objects (SQL-DMO) from SQLServer2005_BC.msi file.
If you use the Generate Framework Manager extension or the Generate Transformer Model extension you will need to install either Framework Manager or Transformer on the same machine that you have installed the Planning Admin tools on.
Since Framework Manager and Transformer are now different renditions they need to be installed into separate directory paths. To accommodate for this in Cognos Configuration browse to the Planning entry in the Cognos Configuration tree and enter a path pointing to the directory that IBM Cognos Business Intelligence is installed in.
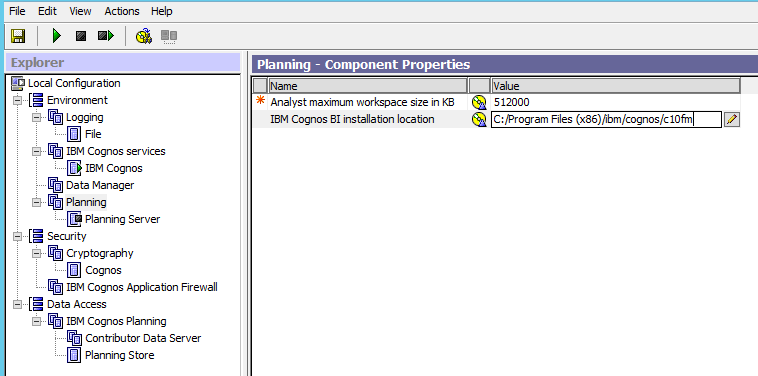
Note: A common mistake is browsing too deeply into the directory such as to the \bin location. Browse only to the parent directory such as \ibmcognos\c10 or in this example \ibm\bi1022\c10_fm.
Set the Gateway URI to the BI server like this
http://servername.domain.com:80/ibmcognos/cgi-bin/cognosisapi.dll
Set the External and Internal dispatcher URI to point to the Cognos Planning server itself as this
http://servername.domain.com:9301/p2pd/servlet/dispatch
Dispatcher URI for external applications should point to BI server
http://servername.domain.com:9300/p2pd/servlet/dispatch
Content Manager URI should point to primary content manager on BI server http://servername.domain.com:9300/p2pd/servlet
Step 5 – Configure the Planning Store
Start the new Cognos Configuration from your Planning install and set up a planning store, by connecting to a new, fresh planning store database.
If not SQL server 2012 is shown inside Cognos Configuration as an option, you can add support to it by update the D:\ibm\ep1021\c10\bin\epEAdminSQL7Resources.xml file.
Make a backup copy of the c10_location\bin\epEAdminSQL7Resources.xml file.
Open the c10_location\bin\epEAdminSQL7Resources.xml file in a text editor.
Find the entry for Resource ID=”2k8DefaultProviderDriverString” and locate the <![CDATA[SQLNCLI10]]> entry.
Change the entry to read <![CDATA[SQLNCLI11]]>.
Save the file and close it.
Note: It is ok to reuse an old content store and therefore save some work configuring, for example, the security settings. However, you should always create a new, empty planning store database, and connect to that. All your planning components can then be moved over using the deployment export/import tool.
Make sure that the dispatchers you have in Planning configuration do not have port conflicts with the ones specified in the BI configuration. You have to select a different port on the Planning dispatchers.
In the Planning configuration, point to the main gateway so that it can find the content store. Therefore, ensure that the Gateway URI in the Planning configuration is the same as in the BI configuration. For this reason, you must configure your BI gateway first.
Start the Planning service and you should be able to run Analyst and Cognos Administration console.
The Cognos services should be set to startup type “Automatic (Delayed start)” on a Microsoft Windows 2012 server.
Step 6 – Install Planning Client (Optional)
Optionally, you can also install the Planning client kit if you want to have the client application on the same computer.
In folder C:\ibm\ep1021\bin\Language\English, on server where Analyst is installed, do
Copy adminbifs.amf to adminbif.AMF
Copy adminodbc.AMF to adminodb.AMF
You must start Cognos Planning Contributor Administration Console as “run as administrator” to make it work.
Post Installation
Moving Over Applications
Use the Deployment Wizard to move any applications from your old system that you want on the new, upgraded system. On the old system, select Export with data to export one or more applications into a folder on your disk. This folder can be moved to the deployment location on the new system, and you can use the Deployment wizard to import the application into the new system.

If you want the deployment wizard to bring in existing security settings, it is important that you have set up the same or similar namespaces. If the new namespaces contains the same users, groups and roles, the import wizard can automatically match the names and bring over the security. If you want to use new groups and roles, it also allows you to manually map from the old security to the new one.
Any Analyst libraries used by the exported Contributor applications can be included in the deployment files and easily moved to the new system. If you have some Analyst-only libraries or if you do not use Contributor at all, see the next section.
First import the database and then import macro and links.
Moving Over Applications – old way
Disconnect the application in the old CAC
Copy the database files over to the new SQL server (with SQL backup / restore)
Load the database in the new SQL server and setup the SQL login
Update each database with SQL Server Management Studio
Expand tables and select table dbo.adminoption
right click and select “edit top 200 rows”

find in column optionid, the following 3 rows and erase the value at optionvalue if any
PAD_GUID
PAD_NAME
PAD_NAMESPACE
Exit SQL Server Management Studio
Go into the new CAC and select Link to existing Applications.
Moving Over Analyst Libraries
Analyst objects are stored in files in folders. Therefore, if you want to use existing analyst libraries on a new system, you have two options:
- If you don’t need to use the old system again, you can leave the libraries where they are, and move the file called LIBS.TAB to the new system. This file contains the path to all the libraries set up in Analyst. If you point to this file in the Filesys.ini entry called Libs= it will just work on the old libraries where they are stored already.
- If you want a transition period, where both the old and the new system are operational, you should take a copy of all your existing Analyst library folders and move them to where you want them to be stored when using the new system.
After the libraries are moved, you can manually reconnect to the libraries via the Analyst administration screens. If you have many files, it is faster to make use of the old LIBS.TAB file and move it to the new system. This will replace the LIBS.TAB file created during installation. On a default installation, this will be in the BIN folder below your installation location.
Next, start Analyst, look on the administration screens, and you will see it pointing to the old Analyst libraries. Right-click in the table with the library information, and choose Change Path which allows you to search and replace portions of the path on all libraries in one operation.
For example, if your old libraries were stored below \\servername\data\analyst\libraries, and you made a copy of these in \\newservername\data\analyst\libraries, you would do a search and replace on \\servername and replace it with \\newservername.
If the filesys.ini is in the wrong folder, you can remove this instancelock line in the filesys.ini
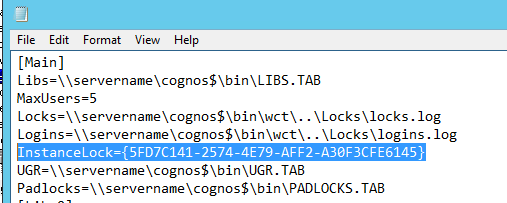
and then copy the filesys.ini to the correct folder. You need to copy the other files too.
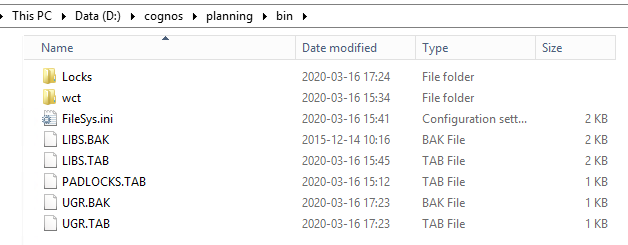
You need to update the path inside filesys.ini to point to the new location for all files.
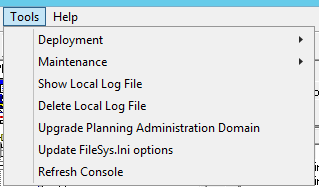
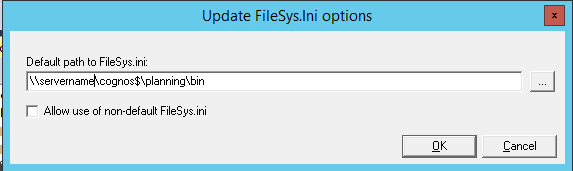
Then from inside CAC, you go to Tools – Update FileSys.ini options to point out the new location.
Backing-Up Old Applications
As your model evolves or as budgeting cycles pass, you may have old applications on your system that you no longer use, but want to keep in case you ever need to reference them. There are various ways to remove them from your Administration Console to make it more manageable and easy to overview.
You should first determine if there is data in the applications that is not already stored elsewhere. Some applications work by loading data from external sources and never have data entered that is not already stored elsewhere. If you have the original data sources, you may not need to keep the old applications at all.
If you do need to keep a backup of your application, there are two options:
- If you want to be able to bring the application back online and access the data via the Planning software, you can export the application with data using the Deployment wizard. The resulting folder can be compressed and backed up for later use. When it needs to be restored, the Deployment wizard will be able to do that as well.
- If you just want to keep a copy of your data that can be accessed from any data access tool, you can publish the cubes into a database table. The data can then be viewed using whatever client tools you would normally use to access that database, or be backed up as you would any other database.
Additional settings on the Cognos Planning Windows server
To prevent errors because of people login to the server with the service account this should be set;
Logon to the application server as an administrator
Launch the group policy editor (click “Start – Run” then type “gpedit.msc”)
Navigate “Computer Configuration -> Administrative Templates -> System-> UserProfiles”
Double-click on “Do not forcefully unload the user registry at user logoff”
Change the setting from “Not Configured” to “Enabled”.
Move database log files to different folder
From inside the SQL management studio, do similar to this;
ALTER DATABASE database_name SET OFFLINE;
... move the file(s) to new location
ALTER DATABASE database_name MODIFY FILE ( NAME = logical_name, FILENAME = 'new_path\os_file_name' );
ALTER DATABASE database_name SET ONLINE;
More information:
https://www.ibm.com/support/pages/downloading-ibm-cognos-planning-1021
https://www-01.ibm.com/support/docview.wss?uid=swg21991239
https://www.ibm.com/support/pages/how-configure-ibm-cognos-planning-102-work-ibm-business-intelligence-1022-fp5
https://www.ibm.com/support/pages/node/161227
https://www.ibm.com/support/pages/error-unable-get-list-drives-0
https://www.microsoft.com/en-us/download/confirmation.aspx?id=42295
https://www.ibm.com/support/pages/node/553105
https://www.ibm.com/developerworks/data/library/cognos/infrastructure/web_servers/page599.html
https://www.ibm.com/support/pages/node/571589
https://social.technet.microsoft.com/Forums/en-US/c55aa101-059d-491e-9fc2-73b5d8171eb8/protect-against-syn-attacks?forum=winservergen