Product:

Microsoft Windows 2019 server

Issue:

How to open the windows firewall, to allow the server to respond to ping request?

Solution:

  1. Open Control Panel, open Administrative Tools.
  2. Open Windows Defender Firewall.
  3. From the left pane of the resulting window, click ‘Inbound Rules’.
  4. In the right pane, find the rules titled ‘File and Printer Sharing (Echo Request – ICMPv4-In)’.
  5. Right-click each rule and choose Enable Rule

More Information:

https://www.rootusers.com/how-to-enable-ping-in-windows-server-2019-firewall/

Product:

Microsoft SQL server 2016

Issue:

How to test import only 10 rows from a text file, with bulk insert command? To check if it works.

Solution:

BULK INSERT Salestable
FROM 'C:\temp\data.txt'
WITH (LASTROW = 10,
    BATCHSIZE=250000,
    MAXERRORS=2);

Enter LASTROW = 10 to only read ten rows of data from your data.txt file. Then you can check if you get the correct type of data to your table.

LASTROW = last_row

Specifies the number of the last row to load. The default is 0, which indicates the last row in the specified data file.

MAXERRORS = max_errors

Specifies the maximum number of syntax errors allowed in the data before the bulk-import operation is canceled. Each row that can’t be imported by the bulk-import operation is ignored and counted as one error. If max_errors isn’t specified, the default is 10.

BATCHSIZE = batch_size

Specifies the number of rows in a batch. Each batch is copied to the server as one transaction. If this fails, SQL Server commits or rolls back the transaction for every batch. By default, all data in the specified data file is one batch.

If you cancel a BULK INSERT, it will try to roll back all data, this will take time.


More information:

https://learn.microsoft.com/en-us/sql/t-sql/statements/bulk-insert-transact-sql?view=sql-server-ver16#performance-considerations

https://www.mssqltips.com/sqlservertip/6109/bulk-insert-data-into-sql-server/

Product:
Microsoft SQL server 2016

Issue:
Can i see if i should improve anything on my SQL server?

Solution:

Mr Ozar have develop some sp that can give you more information, get the kit from

https://github.com/BrentOzarULTD/SQL-Server-First-Responder-Kit#writing-sp_blitz-output-to-a-table

install this one in your master database

Install-Core-Blitz-With-Query-Store.sql

Now you have a set of SP to use.

First run (if you have performance issues just now)

sp_BlitzFirst

Run this to get the most common wait issues you need to check on your server:

sp_BlitzFirst  @sincestartup = 1, @outputtype = 'Top10'


Setup a database LOGSQL and schedule this every month;

EXEC sp_Blitz @OutputDatabaseName = 'LOGSQL', @OutputSchemaName = 'dbo', @OutputTableName = 'BlitzResults';

Will give you a table BlitzResults to look at to see what status is for your SQL server.

Run this manually to see what can be done with index

EXEC sp_BlitzIndex @GetAllDatabases = 1, @BringThePain = 1;

copy result to excel for further analysis, remove unused index and duplicates.


Run to see the biggest queries:

EXEC sp_BlitzCache @Top = 20,  @BringThePain = 1;

Run this to see the size of index in one database:

SELECT OBJECT_NAME(IX.OBJECT_ID) Table_Name
  ,IX.name AS Index_Name
  ,IX.type_desc Index_Type
  ,SUM(PS.[used_page_count]) * 8 IndexSizeKB
  ,IXUS.user_seeks AS NumOfSeeks
  ,IXUS.user_scans AS NumOfScans
  ,IXUS.user_lookups AS NumOfLookups
  ,IXUS.user_updates AS NumOfUpdates
  ,IXUS.last_user_seek AS LastSeek
  ,IXUS.last_user_scan AS LastScan
  ,IXUS.last_user_lookup AS LastLookup
  ,IXUS.last_user_update AS LastUpdate
FROM sys.indexes IX
INNER JOIN sys.dm_db_index_usage_stats IXUS ON IXUS.index_id = IX.index_id AND IXUS.OBJECT_ID = IX.OBJECT_ID
INNER JOIN sys.dm_db_partition_stats PS on PS.object_id=IX.object_id
WHERE OBJECTPROPERTY(IX.OBJECT_ID,'IsUserTable') = 1
GROUP BY OBJECT_NAME(IX.OBJECT_ID) ,IX.name ,IX.type_desc ,IXUS.user_seeks ,IXUS.user_scans ,IXUS.user_lookups,IXUS.user_updates ,IXUS.last_user_seek ,IXUS.last_user_scan ,IXUS.last_user_lookup ,IXUS.last_user_update

Check the size of the index and the usages – have it been used?

https://www.sqlshack.com/boost-sql-server-performance-with-wait-statistics/

https://www.sqlskills.com/blogs/paul/wait-statistics-or-please-tell-me-where-it-hurts/

What is the most worrying wait type?


More Information:

https://www.brentozar.com/archive/2018/07/cxconsumer-is-harmless-not-so-fast-tiger/ 


Product:

Microsoft SQL server 2016

Issue:

Should i make a index?

Solution:

Yes, all table should have a index – at least a clustered index.

But a data-ware house table, should maybe not have a index when you load a lot of data.

Index can be created after you have loaded a lot of data. This to speed up the process.

Correct made index make the SELECT faster. Any index in the target table, makes the INSERT slower.

You should have not too few, or too many index on a table to get the best performance.

To create a index:

CREATE TABLE dbo.TestTable 
(TestCol1 int NOT NULL, 
TestCol2 nchar(10) NULL, 
TestCol3 nvarchar(50) NULL);

CREATE CLUSTERED INDEX IX_TestTable_TestCol1 
ON dbo.TestTable (TestCol1);

You can also create index by right-click on table name – indexes – New Index.

Check if index exist, before you drop it;

IF EXISTS (SELECT name FROM sys.indexes  
    WHERE name = N'IX_ProductVendor_VendorID')   
    DROP INDEX IX_ProductVendor_VendorID ON Purchasing.ProductVendor;   

CREATE NONCLUSTERED INDEX IX_ProductVendor_VendorID   
    ON Purchasing.ProductVendor (BusinessEntityID); 

Use ONLINE=ON to make the table readable when you create the index:

CREATE NONCLUSTERED INDEX [IX_NonClusteredIndexDemo_StudentName] 
ON [dbo].[NonClusteredIndexDemo] ([StudentName],[STDAddress]) 
WITH ( ONLINE=ON, FILLFACTOR=90) 

To get more information of a query process use:

SET STATISTICS TIME ON
SET STATISTICS IO ON

SELECT * FROM [dbo].[DimAccount] 
WHERE [AccountType] ='Assets'

More Information:

https://www.sqlshack.com/tracing-and-tuning-queries-using-sql-server-indexes/

https://dataschool.com/sql-optimization/how-indexing-works/

  • Columns with text, image, ntext, varchar(max), nvarchar(max) and varbinary(max) cannot be used in the index key columns.
  • It is recommended to use an integer data type in the index key column. It has a low space requirement and works efficiently. Because of this, you’ll want to create the primary key column, usually on an integer data type.
  • You should consider creating a primary key for the column with unique values. If a table does not have any unique value columns, you might define an identity column for an integer data type. A primary key also creates a clustered index for the row distribution.
  • You can consider a column with the Unique and Not NULL values as a useful index key candidate.
  • You should build an index based on the predicates in the Where clause. For example, you can consider columns used in the Where clause, SQL joins, like, order by, group by predicates, and so on.
  • You should join tables in a way that reduces the number of rows for the rest of the query. This will help query optimizer prepare the execution plan with minimum system resources.
  • If you use multiple columns for an index key, it is also essential to consider their position in the index key.
  • You should also consider using included columns in your indexes.

https://blog.quest.com/11-sql-server-index-best-practices-for-improved-performance-tuning/

https://hungdoan.com/2017/04/13/nvarcharn-vs-nvarcharmax-performance-in-ms-sql-server/

The clustered index defines the order in which the table data will be sorted and stored. As mentioned before, a table without indexes will be stored in an unordered structure. When you define a clustered index on a column, it will sort data based on that column values and store it. Thus, it helps in faster retrieval of the data.

There can be only one clustered index on a table because the data rows can be stored in only one order.

When you create a Primary Key constraint on a table, a unique clustered index is automatically created on the table.

The non-clustered index does not sort the data rows physically. It creates a separate key-value structure from the table data where the key contains the column values (on which a non-clustered index is declared) and each value contains a pointer to the data row that contains the actual value. It is similar to a textbook having an index at the back of the book with page numbers pointing to the actual information.

https://www.tutorialsteacher.com/sqlserver/indexes

https://www.midnightdba.com/Jen/2014/12/create-a-clustered-index-and-a-primary-key-on-existing-tables/

https://www.sqlshack.com/designing-effective-sql-server-clustered-indexes/

https://developer.ibm.com/articles/i-sql-indexs-and-native-io/

https://tprojects.schneider-electric.com/GeoSCADAHelp/ClearSCADA%202017%20R2/Content/SQLGuide/IntroductiontoSQLQueryStructure.htm

https://www.brentozar.com/archive/2021/06/learn-fundamentals-of-index-tuning-for-1/

https://www.sqlshack.com/designing-effective-sql-server-non-clustered-indexes/

Product:

Microsoft SQL server 2016

Issue:

How allow a domain group only to execute all SP in a database?

Solution:

Create a role with only the correct rights:

CREATE ROLE db_executor;

GRANT EXECUTE TO db_executor;

Add a existing database user to that role:

ALTER ROLE db_executor ADD MEMBER [company\username]


To add a domain user to the sysadmin role:

exec sp_addsrvrolemember 'whatDomain\Domain Admins', 'sysadmin';

To add a domain user and add it to a predefined role in the database:

CREATE LOGIN [company\User] 
CREATE USER [company\User]
ALTER ROLE [db_datareader] ADD MEMBER [company\User]


More Information:

https://www.sqlmatters.com/Articles/Adding%20a%20db_executor%20role.aspx

https://kimconnect.com/how-to-add-domain-admins-to-sql-server/

https://help.genesys.com/pureconnect/mergedprojects/wh_tr/mergedprojects/wh_tr_active_directory_sql/desktop/run_sql_server_script_to_add_ad_accounts.htm

Product:

Microsoft SQL server 2016

Issue:

How list the size of the tables in a database?

Solution:

Try this SQL query:

SELECT 
    t.NAME AS TableName,
    i.name as indexName,
    sum(p.rows) as RowCounts,
    sum(a.total_pages) as TotalPages, 
    sum(a.used_pages) as UsedPages, 
    sum(a.data_pages) as DataPages,
    (sum(a.total_pages) * 8) / 1024 as TotalSpaceMB, 
    (sum(a.used_pages) * 8) / 1024 as UsedSpaceMB, 
    (sum(a.data_pages) * 8) / 1024 as DataSpaceMB
FROM 
    sys.tables t
INNER JOIN      
    sys.indexes i ON t.OBJECT_ID = i.object_id
INNER JOIN 
    sys.partitions p ON i.object_id = p.OBJECT_ID AND i.index_id = p.index_id
INNER JOIN 
    sys.allocation_units a ON p.partition_id = a.container_id
WHERE 
    t.NAME NOT LIKE 'dt%' AND
    i.OBJECT_ID > 255 AND   
    i.index_id <= 1
GROUP BY 
    t.NAME, i.object_id, i.index_id, i.name 
ORDER BY 
    SUM(a.total_pages) DESC


More Information:

https://ss64.com/sql/syntax-largest-table.html

Useful T-SQL queries and scripts to work in SQL Server

https://gist.github.com/hlsupe/d38b10ffdf34eb620f428100257a2695

Product:

Cognos Analytics 11.1.7

Microsoft Windows 2016 server

Issue:

Can not create new Planning Analytics data source connections inside CA11.

You have changed the security on the PAL installation, in case it worked before.

When you test the data connection in Cognos Analytics administration page, you get an error like this:

Dynamic Failed XTR-ERR-0005 A request to TM1 resulted in error: “[400] javax.net.ssl.SSLHandshakeException: com.ibm.jsse2.util.j: PKIX path building failed: com.ibm.security.cert.IBMCertPathBuilderException: unable to find valid certification path to requested target”.

Solution:

Add the TM1 default certificate to the CA11 certificate store in java.

Stop IBM cognos service

Go to D:\Program Files\ibm\cognos\analytics\ibm-jre\jre\bin and start Ikeyman.exe as administrator.

Click on open icon.

Select the cacerts file in folder D:\Program Files\ibm\cognos\analytics\ibm-jre\jre\lib\security

Set type as JKS

Click OK

Enter password: changeit

Select in Signer Certificates from the drop-down menu

Click on Add.

Select the ibmtm1.arm file (that you copied over from the Planning Analytics server)

Click OK.

Give it a name like TM1ServerCert.

Close IKEYMAN program.

Start Cognos service.

If you test the connection – the message should be similar to this:

Dynamic Succeeded XQE-DS-0015 TM1 Server Name: tm1ServerName: “11.8.01000.6”.


More information:

https://www.ibm.com/support/pages/xtr-err-0005-error-when-testing-ibm-planning-analytics-20x-datasource-ibm-cognos-analytics-1112

Product:
Cognos Controller Web 10.4.2
Microsoft Windows 2016 Server

Issue:
User can not login to Cognos Controller Web after update to HTTPS.

In folder D:\Program Files\ibm\cognos\ccr_64\frontend\logs

error in log file can be;

error from web proxy: { Error: Client network socket disconnected before secure TLS connection was established at TLSSocket.onConnectEnd (_tls_wrap.js:1088:19)
at Object.onceWrapper (events.js:277:13)
at TLSSocket.emit (events.js:194:15)

Solution:

Check that the local windows firewall allow connections on port 3443.

Add a inbound rule that allow communications on port 9080,9081,3443,3000.

Controller web ports are set in the config.js and server.xml file.

<httpEndpoint host="*" httpPort="3000" httpsPort="3443" id="defaultHttpEndpoint">
<httpOptions removeServerHeader="true" />
</httpEndpoint>

More information:

https://www.ibm.com/support/pages/server-not-reachable-or-still-initializing-handshake-failure-signer-might-need-be-added-local-trust-store-ccr-ws-api-not-initialized-yet-errors-controller-web-caused-keystore-file-keyjks-containing-wrong-information

https://www.ibm.com/support/pages/node/883036

https://www.ibm.com/support/pages/controller-web-does-not-work-when-installed-same-server-cognos-analytics

https://www.ibm.com/support/pages/how-configure-controller-web-use-ssl-https

Product:

Cognos Controller Web 10.4.2

Microsoft Windows 2016 server

Issue:

When change Controller Web configuration, user can not login to Controller web. You get a error in the log file that it does not work.  There could be error like this:

[ERROR   ] CWPKI0033E: The keystore located at d:/Program Files/ibm/cognos/ccr_64/fcmweb/wlp/usr/servers/fcm.web/resources/security/key.jks did not load because of the following error: Keystore was tampered with, or password was incorrect…

Check log file D:\Program Files\ibm\cognos\ccr_64\fcmweb\wlp\usr\servers\fcm.web\logs\messages.log

Check log file D:\Program Files\ibm\cognos\ccr_64\frontend\logs\fcmwebui-stderr.2022-09-13.log

Server ip written in backend-url.js!
Express server listening on port 9080
error from web proxy: { Error: connect ECONNREFUSED 192.168.1.71:3443
at TCPConnectWrap.afterConnect [as oncomplete] (net.js:1097:14)
errno: ‘ECONNREFUSED’,
code: ‘ECONNREFUSED’,
syscall: ‘connect’,


Solution:

Check that you use the same password for your PFX file you import certificate from as you use for the key.jks file you created for the Controller Web setup.

Update the file config.js in folder D:\Program Files\ibm\cognos\ccr_64\frontend to correct password

…..

},
“secure”: false //set this to false when you use custom certificates for Controller Web
}
}],

…..
“ssl”: {
// certificates
“key”: fs.readFileSync(__dirname+”/keyfile.key”), //__dirname points to ccr_64\frontend
“cert”: fs.readFileSync(__dirname+”/cert.crt”),
“passphrase”:”TheNewPasswordHere
}…..

Update the file server.xml in folder D:\Program Files\ibm\cognos\ccr_64\fcmweb\wlp\usr\servers\fcm.web to correct password

….

</webApplication>
<keyStore id=”defaultKeyStore” password=”TheNewPasswordHere” sslProtocol=”SSL_TLS” />
</server>…..

Save the changes and restart all 3 IBM Cognos Controller Web services.

Wait at least 20 minutes for it to load fully, before you test.


More information:

https://www.ibm.com/support/pages/server-not-reachable-or-still-initializing-handshake-failure-signer-might-need-be-added-local-trust-store-ccr-ws-api-not-initialized-yet-errors-controller-web-caused-keystore-file-keyjks-containing-wrong-information

https://www.ibm.com/support/pages/node/883036

https://www.ibm.com/support/pages/controller-web-does-not-work-when-installed-same-server-cognos-analytics

https://www.ibm.com/support/pages/how-configure-controller-web-use-ssl-https

Product:

Cognos Analytics 11.1.7

Microsoft Windows 2016 server

Issue:

How setup custom certificate in CA11?

Solution:

Follow IBM recommendations, from here:

https://www.ibm.com/docs/en/cognos-analytics/11.1.0?topic=components-configuring-ssl-cognos-analytics

https://www.ibm.com/support/pages/steps-set-ssl-cognos-analytics-configuration

https://www.ibm.com/support/pages/how-add-3rd-party-ca-allow-ssl-between-components-ibm-cognos-analytics-11


When configuring IBM® Cognos® Analytics to use an external certificate authority (CA), you must start with a stopped system and an empty key store.

Export the Cognos Configuration as plain text first, by use Select File – Export as, on all CA11 servers. Save as backup.xml in configuration folder.

Procedure to clean the keystore

  1. Open IBM Cognos Configuration as an administrator. Ensure HTTP is used under Environment.
  2. In the Explorer window, under Security > Cryptography, click Cognos.
  3. Under Certificate Authority settings, click the Use third party CA property, and ensure that its Value is set to False.
  4. From the File menu, click Save to save the configuration.
  5. Close Cognos Configuration.
  6. Go to the Cognos Analytics installation directory, and delete all content from the install_location\configuration\certs directory.


On Microsoft Windows installations, you can run the tool with the -java:local command to use the JRE that is provided with the installation, as shown in the following example: ThirdPartyCertificateTool.bat -java:local
-c -d ...

The default password is NoPassWordSet.

Procedure to request a new cert

  1. From the install_location\bin directory, run the ThirdPartyCertificateTool.
  2. Type the following command to create the certificate signing request for the crypto key:

On Windows from inside a Administrator Command Prompt, type

ThirdPartyCertificateTool.bat -c -e -d "CN=EncryptCert,O=MyCompany,C=CA" 
-r encryptRequest.csr -p keystore_password -a RSA
  • The distinguished name (DN) value in the command ("CN=Servername,O=MyCompany,C=SE") uniquely identifies the Cognos Analytics installation.

    You can add more information with use of a command line like this:

    ThirdPartyCertificateTool.bat -c -e -p NoPassWordSet -a RSA -r "encryptRequest.csr" -d "CN=servername.domain.com,OU=Finance,O=MyCompany,L=Stockholm,C=SE" -H "servername.domain.com dnsalias.domain.com"

    The password that you enter for this key must be used again when you import the certificate, and again in IBM Cognos Configuration.

    You can ignore any warnings about logging.

    Backup your D:\Program Files\ibm\cognos\analytics\configuration folder to d:\temp
    (in case you start Cognos BI, you may need to go back to this settings before importing the certificates)
    Important: The certificates that are generated by your CA must be PEM (Base-64 encoded ASCII) format.

Results

The command generates the following CSR files:

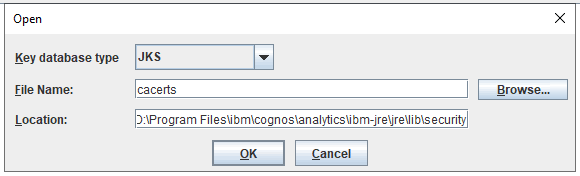
  • The CAMKeystore file in the install_location\configuration\certs directory.
  • The encryptRequest.csr file in the install_location\bin directory.
After the CSR files are generated, perform the following steps:

  • Share the crypto key file encryptRequest.csr, or its contents, with the external CA. Using this key, the CA produces a crypto key certificate, a root certificate, and an intermediate certificate for the request, and sends them back to you.
  • If you get a P7B file, you need to convert it to PEM with OPENSSL. Use this command

openssl pkcs7 -print_certs -in certificate.p7b -out certificate.cer

  • File certificate.cer can be open in Notepad++ and copy out to 3 certificate, one for each function. A pem certificate should not start with a blank line.
  • Copy the certificates from the external CA to the Cognos Analytics installation directory, such as install_location\configuration\bin.


You must import the certificates from the external certificate authority (CA) into your IBM® Cognos® Analytics key store.

The import must be done on each computer where the following Cognos Analytics components are installed: Content Manager, the Application Tier Components, the gateway, and the client components such as Framework Manager, and other components if you use them.


Procedure to import the cer files

  1. Go to the location where you saved the certificate files from the CA authority, and do the following:
    1. Create a copy of the crypto certificate, and name it encryptCertificate.cer.
    2. Create a copy of the root CA certificate, and name it ca.cer. (cer or pem files work equal good).
  2. If the files are not already there, copy the encryptCertificate.cer, and ca.cer files to the install_location/bin directory.
  3. From install_location/bin directory, start the ThirdPartyCertificateTool command line tool (as shown below).
  4. Type the following command to import the CA root certificate into the Cognos Analytics trust store:

On Windows operating systems, type

ThirdPartyCertificateTool.bat -i -T -r ca.cer -p keystore_password
  • The command reads the ca.cer file and imports the contents into the CAMKeystore file in the certs directory using the specified password.
  • If you use intermediate CA certificates, import all the intermediate certificates (ICA) into the Cognos Analytics trust store by using the same commands as in step 4. Like ThirdPartyCertificateTool.bat -i -T -r issuing.pem -p NoPassWordSet
  • Import the server crypto certificate into the Cognos Analytics encryption key store by typing the following command:

On Windows operating systems, type

ThirdPartyCertificateTool.bat -i -e -r encryptCertificate.cer -p 
keystore_password -t ca.cer
  1. Important: Ensure that the keystore_password is the same password that you entered when you exported the encryption key in the previous task.

    If you have intermediate and root certificate, they need to be merge into the text file chain.cer, that is used instead of ca.cer in above command.

    See how here:

    https://www.ibm.com/support/pages/how-add-3rd-party-ca-allow-ssl-between-components-ibm-cognos-analytics-11

Results

The command reads the encryptCertificate.cer and ca.cer files in the install_location\bin directory and imports the certificates from both files into the CAMKeystore file in the install_location/configuration/certs directory using the specified password.

Ensure that the key store locations and passwords in IBM Cognos Configuration match the ones that you typed in the ThirdPartyCertificateTool tool.

Procedure to start CA with custom cert

  1. Open IBM Cognos Configuration as an administrator. Ensure HTTPS is used under Environment.
  2. In the Explorer window, under Security > Cryptography, click Cognos.
  3. Under Certificate Authority settings, click the Use third party CA property, and set its Value to True.
  4. For the Key store password property, enter the password that you used for the crypto key.
  5. Click File > Save to save the configuration.
  6. Restart your IBM Cognos services.


Test the IIS cert by browse to (or only browse to the Server name):

https://servername.domain.com/ibmcognos/controllerserver/ccrws.asmx

Test the Cognos BI cert by browse to (update with the port you use in Cognos Configuration):

https://servername.domain.com:9300/p2pd/servlet

If you have had the Cognos BI site running HTTP before, you must change in IIS webfarm to use the new HTTPS, and also update the port in use. Otherwise you will get 404 or 502 errors in Web browser.

Best is to clear the IIS configuration, and update the CA_IIS.Config.bat file with the new port number and rerun it. You should not need to delete the COGNOSCONTROLLERS folder, as long it uses a different application pool.

To remove IIS settings.

– Open IIS
– Click Application Pools
– Select the Cognos 11 App Pool and stop it
– Expand everything
– Select the ibmcognos -> sso application and remove it
– Select the ibmcognos application and remove it
– Click Application Pools, select the Cognos app pool, and delete it
– Close IIS

Open your file explorer
– Navigate to the Cognos gateway install directory
– Delete the following web.config files:

  • cgi-bin\web.config
  • webcontent\web.config
  • webcontent\bi\web.config

https://www.ibm.com/support/pages/node/301009

Edit the CA_IIS_Config.bat file with HTTPS and correct port

:: If more than one dispatcher is defined, a Server Farm will be created
::
set disp[1].protocol=https
set disp[1].name=servername
set disp[1].port=9300

:: Enable SSO (True/False)
::

Run the script again, to reconfigure the IIS setup.

You need also to add the certificate for your server to IIS Manager, simplest is if you get a PFX file with all information and import that to Windows server. Then you can in IIS manager bind it to your default web site.


More information:

https://www.ibm.com/support/pages/how-add-3rd-party-ca-allow-ssl-between-components-ibm-cognos-analytics-11

https://www.thebestcsharpprogrammerintheworld.com/2014/01/17/configuring-application-request-routing-arr-to-use-a-port-other-than-port-80/