Product:

Planning Analytics 2.0.9.x

Microsoft Windows 2012 server

Problem:
When login with TM1 Architect you get a DNS error or a blank page.
The TM1 instance is setup with CAM security together with Cognos Analytics.

It works to login with TM1 Architect from another laptop computer.

Possible Solution:

The Internet Options for the user of TM1 Architect does not have the URL used in the TM1S.CFG file as trusted zone.

Check the TM1S.CFG file for the URL at line:

ClientCAMURI=http://servername.domain.com/ibmcognos/bi/v1/disp

Test above URL in a web browser (internet explorer) from the computer where you have issues, do you get same error?

Go to Internet Options from the windows control panel.

Select security tab.

Select trusted sites.

Click Sites button.

Enter the servername.domain.com from ClientCAMURI line and click Add button.

Restart TM1 Architect and does it work now to login to a TM1 instance?

The settings in Internet Options is for each person on the computer, so if a different person use the same computer or server, he or she need to add the URL to there trusted sites in internet options.

Recommendation is also to have Security level to Medium-low to make it work.

Other solution could be that the DNS server did not know the TM1 server name. Then you can try the IP address instead in the ClientCAMURI line. Does the two computers use the same DNS server?  Or you can clear the dns cache with command:

ipconfig /flushdns

Purges the DNS Resolver cache.

More Information:

https://www.ibm.com/support/pages/login-prompt-does-not-appear-when-connecting-tm1-achitect

https://static1.squarespace.com/static/5268c662e4b0269256614e9a/t/5c6df47cc8302592674407a7/1550709885444/IBM+TM1+Planning+Analytics+-+Cheat+Sheet+-+201902.pdf


Product:

Microsoft Windows 2019 server

Issue:

When setting up a new server, where you want to create the same shared folders as on a existing server. How do you easy transfer the folder setup?

Solution:

You can check the existing file shares on your old server by go to control panel – administrative tools – Computer Management.

Under Shared folders – Shares, can you se the existing file shares on the server. By dubbleclick on a share, you can see permissions and other settings.

Most of this are stored in the Windows Registry. At [HKEY_LOCAL_MACHINE\SYSTEM\CurrentControlSet\Services\LanmanServer\Shares] branch.

To move the shares to other server, start REGEDIT program from start menu, on the old server.

Go to branch HKEY_LOCAL_MACHINE\SYSTEM\CurrentControlSet\Services\LanmanServer\Shares.

Right click shares and select Export.

Save it in a file, called shares.reg.

Copy the file shares.reg over to the new Windows server where you want the shares to be created.

Login to the new server as local administrator.

Double click on the shares.reg file.

Click YES to the question if it should update the server with this values.

Click OK.

Then you must restart the server or the server service. Go to a command prompt as administrator.

Enter this to restart the server service;

Net Stop Server

Net Start Server

Then you should have the file share. On the new Windows server, go to the folder that you want to share, and right click and select properties.

Under Sharing tab and Advanced Sharing button, you should now see the same setup as the old other server.

Please use $ after share name when you create them, then the file share is hidden and will not show up when someone browse the network. You need to know the share name and have access to it to be able to connect to it from other computer.


More Information:

https://www.tgrmn.com/web/kb/item133.htm

Product:

Microsoft Windows 2019 server

Issue:

The new hard disk is empty, but file manager still show it contain some files. When you go to the drive it is empty in file manager.

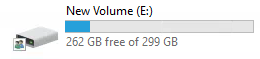
File manager show that only a part of the disk is free space.

Solution:

Some person have moved files to the recycle bin. The recycle bin is empty for you, but the other user on the windows server have a not empty recycle bin – he should empty the recycle bin, then the hard drive will show 100% free space.

Files are not removed from windows until the recycle bin is empty, so if you try to clean a hard disk, you need to empty the recycle bin also when you are done deleting files.