Product:
Planning Analytics 2.0.6
Cognos Controller 10.4 FAP
Microsoft Windows 2016 server
Problem:
How export FAP cube data to csv file in the FTD format?
https://www.ibm.com/support/knowledgecenter/SS9S6B_10.4.1/com.ibm.swg.ba.cognos.ctrl_ug.doc/c_wp0041.html
Suggested Solution:
The Cognos Controller standard export of data to file, from inside the cognos controller client, menu transfer – export data, create files of the cognos controller data. It will export the data you select, commonly limit by period and group/company.
https://www.ibm.com/support/knowledgecenter/en/SS9S6B_10.4.0/com.ibm.swg.ba.cognos.ctrl_ug.10.4.0.doc/c_e1k15_2_exportingdata.html#E1K15_2_ExportingData

You can get the output in unencrypted ASCII format, to import the data to other systems (e.g. SAP).
The output file format is similar to the columns of the XDB tables in the Cognos Controller database.
There is one XDB table for each year (xdb00-xdb99). These tables contain the period values. The amount is stored in xdb.belopp. The transaction amount is stored in xdb.trbelopp. These amounts are accumulated year to date value. The field vtyp is used to tell how data has been entered into the system.
XDBxx
|
|
| Perakt |
Period + Actuality |
| Bol |
Company |
| Vkod |
Currency Code |
| Konto |
Account |
| Dim1 |
Extended Dimension 1 |
| Dim2 |
Extended Dimension 2 |
| Dim3 |
Extended Dimension 3 |
| Dim4 |
Extended Dimension 4 |
| Btyp |
Journal type |
| Etyp |
Automatic Journal type |
| Ktypkonc |
Consolidation Type + Group |
| Vernr |
Journal Number |
| Motbol |
Counter Company |
| Ursbol |
Original Company |
| Travkd |
Transaction Currency Code |
| Motdim |
Counter Dimension |
| Belopp |
Amount |
| Trbelopp |
Amount in Transaction Currency |
| vtyp |
Currency Type (G=Group Currency, C=Converted Currency, K=Consolidated) |
| ino |
Unique record identifier |
| HID |
“Happening id” = Functional area that created the record.
Null indicates unknown. |
| PDF |
“Prepared for delete” = Other value than 0 only while Controller is processing data. |
The FAP service, will copy data from the Cognos Controller database to a cube in your TM1 (Planning Analytics) installation. Here doing some adjustment to the structure to make it work in TM1. You must have the FAP service working before you can export any data.
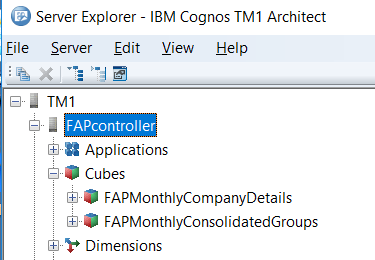
Start TM1 Architect, and check the cubes that your Cognos Controller FAP solution have created.

Create a TM1 TI process to export data from a view of the cube FAPMonthlyCompanyDetails (this cube is mostly used to export period values). Use a view that take all dimensions, and then edit the TI process to select only the dimensions element you need in your export ( for example only for a specific company ). Change the variable names to more understandable names, as shown in below picture.
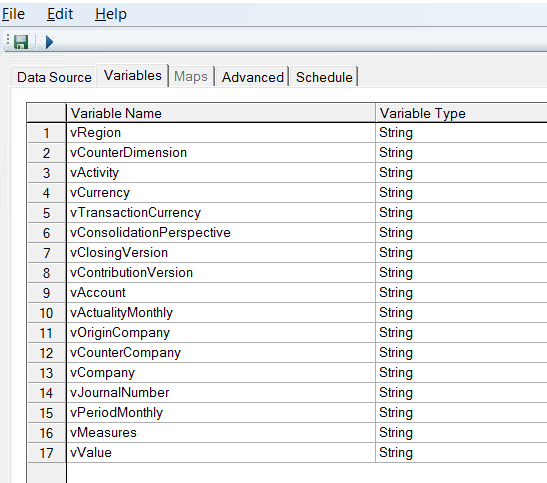
Set all to be “string” and Contents to be “other” in the variables tab of the TI process.
Create parameters to make it possible for the user who run the TI process to select period and actuality to limit the output.
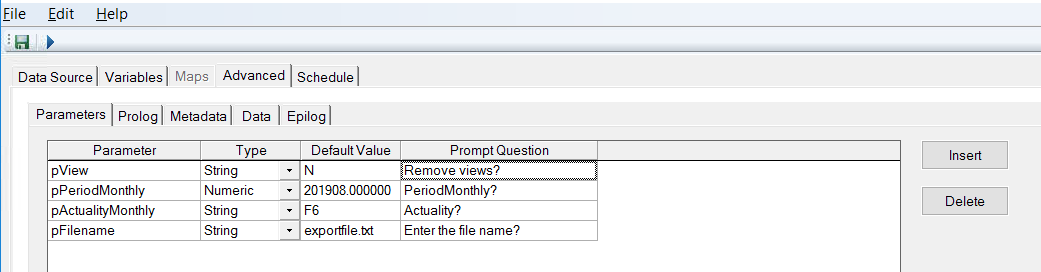
In our example we will hard-code the company that is exported.
In PROLOG tab enter code similar to this (you need to updated the script for your data):
#****Begin: Generated Statements***
#****End: Generated Statements****
#————————————————————————————————
# one single process to create view and export data to csv file
# for export from controller fap cube FAPMonthlyCompanyDetails
# updated date: 2019-08-12
# ———————————————————————————————–
# specify the location of the file – .. moves up one step from starting folder for tm1 data
sFilepath = ‘..\temp\’;
# specifiy the file name
sFileName= ‘scriptview.txt’;
# check that it is correct length
vcheck = LONG ( numbertostring ( pPeriodMonthly ) ) ;
if ( vcheck <> 6 ) ;
textoutput (‘..\temp\debug1.txt’, ‘prolog break – wrong date’);
ProcessBreak;
endif;
sPeriod = SUBST ( numbertostring (pPeriodMonthly) , 3,4);
# add the period to the file name
# check if a period is in the filename, if not add FTD at end of filename
nFileName = SCAN ( ‘.’ , pFileName );
if (LONG(pFileName) < 20);
if (nFileName <> 0 );
sFileName = sPeriod | pFileName ;
else;
sFileName = sPeriod | pFileName | ‘.FTD’;
Endif;
Endif;
# create the full file name including path
sFileName = sFilePath | sFileName;
# ————- create a view with script —————————————
# pCube: Specify cube name
# ——————————————————-
pCube =’FAPMonthlyCompanyDetails’;
#pDim1: Specifiy first dimension name – region = country code
pDim1=’Region’;
#pElement1: Specifiy element name for pDim1
pElement1=’@Aggr_@TOT’;
#pDim2: Specifiy second dimension name
pDim2=’Counter Dimension’;
#pElement2: Specifiy element name for pDim2
pElement2=’@Aggr_@TOT’;
#pDim3: Specifiy second dimension name
pDim3=’Activity’;
#pElement3: Specifiy element name for pDim3
pElement3=’@Aggr_@TOT’;
pDim4=’Currency’;
pElement4=’EUR’;
pDim5=’Transaction Currency’;
pElement5=’@none’;
pDim6=’Consolidation Perspective’;
pElement6=’@none’;
pDim7=’Closing Version’;
pElement7=’CL’;
pDim8=’Contribution Version’;
pElement8=’BASE’;
pDim9=’Account’;
pElement9=’1100′;
pDim10=’ActualityMonthly’;
# check that it is correct length
vcheck = LONG ( ( pActualityMonthly ) ) ;
if ( vcheck <> 2 ) ;
textoutput (‘..\temp\debug2.txt’, ‘prolog break – wrong ActualityMonthly’);
ProcessBreak;
endif;
pElement10= pActualityMonthly ;
# — we list all variables here – but use them not in the code – so you can remove some of the rows
pDim11=’Origin Company’;
pElement11=’AllOrigComp’;
pDim12=’Counter Company’;
pElement12=’AllCounterComp’;
pDim13=’Company’;
pElement13=’4526′;
pDim14=’Journal Number’;
pElement14=’AllJournals’;
pDim15=’PeriodMonthly’;
# format should be this
# pElement15=’201907′;
#
# add it to the period from parameter
pElement15= numbertostring( pPeriodMonthly ) ;
pDim16=’Measures’;
pElement16=’Monthly’;
#————————————————————————————————-
# set the name of the subset and view
# are time stamped to prevent collision when several users run process at same time
#————————————————————————————————–
sView = ‘FAP_Export_’ | TIMST(NOW(), ‘\Y\m\d_\h\i’, 1) ;
sSubset = sView;
#—————————————————————————
# not all dimensions need to be specified in a subset view
# remark ViewSubsetAssign line to show all elements for that dimension
#—————————————————————————
# Step 1: create View
If( ViewExists( pCube, sView ) = 1 );
ViewDestroy( pCube, sView );
EndIf;
ViewCreate( pCube, sView );
# Step 2: create first subset
If( SubsetExists( pDim1, sSubset ) = 1 );
SubsetDeleteAllElements( pDim1, sSubset );
Else;
SubsetCreate( pDim1, sSubset );
EndIf;
# Step 3: add the first element to dimension subset
SubsetElementInsert( pDim1, sSubset, pElement1, 1 );
# ————— do not include region subset (first variable) by remark out ViewSubsetAssign ——————–
# Step 4: Assigned the subset to view
## ViewSubsetAssign( pCube, sView, pDim1, sSubset );
# Step 5: create second subset and assigned it to view if needed
If( SubsetExists( pDim2, sSubset ) = 1 );
SubsetDeleteAllElements( pDim2, sSubset );
Else;
SubsetCreate( pDim2, sSubset );
EndIf;
SubsetElementInsert( pDim2, sSubset, pElement2, 1 );
# Step 6: Assigned the subset to view
## ViewSubsetAssign( pCube, sView, pDim2, sSubset );
If( SubsetExists( pDim10, sSubset ) = 1 );
SubsetDeleteAllElements( pDim10, sSubset );
Else;
SubsetCreate( pDim10, sSubset );
EndIf;
SubsetElementInsert( pDim10, sSubset, pElement10, 1 );
# for ActualityMonthly – this is already selected in FAP export program
# for the export vi only run one at a time
ViewSubsetAssign( pCube, sView, pDim10, sSubset );
#————————————————————————————————-
# defined a limit number of company — we try with a MDX
#————————————————————————————————-
If( SubsetExists( pDim13, sSubset ) = 1 );
SubsetDeleteAllElements( pDim13, sSubset );
SubsetDestroy ( pDim13, sSubset );
Else;
## should not be created as the subsetcreatebymdx demands that the subset does not exists
## SubsetCreate( pDim13, sSubset );
EndIf;
## SubsetElementInsert( pDim13, sSubset, pElement13, 1 );
# — improve code in future by use variables for repeated values.
pAlias = ‘Company Code’;
# —————————————————————————————————–
# we want to export only companies that have STO, ST1, ST2… ST7 in there name.
# mdx filter to include some groups by search for letters in name
# use this format { FILTER( {TM1FILTERBYLEVEL( {TM1SUBSETALL( [MyDim] )}, 0)}, INSTR([MyDim].[MyAlias], “SubString” ) > 0 ) }
# —————————————————————————————————–
StringMDX = ‘{ FILTER( {TM1FILTERBYLEVEL( {TM1SUBSETALL( [ ‘ | pDim13 | ‘ ] )}, 0)}, ( INSTR([ ‘ | pDim13 | ‘ ].[ Company Code ], “STO” ) > 0 ) OR ( INSTR([ ‘ | pDim13 | ‘ ].[ Company Code ], “ST1” ) > 0 ) OR ( INSTR([ ‘ | pDim13 | ‘ ].[ Company Code ], “ST2” ) > 0 ) OR ( INSTR([ ‘ | pDim13 | ‘ ].[ Company Code ], “ST3” ) > 0 ) OR ( INSTR([ ‘ | pDim13 | ‘ ].[ Company Code ], “ST4” ) > 0 ) OR ( INSTR([ ‘ | pDim13 | ‘ ].[ Company Code ], “ST5” ) > 0 ) OR ( INSTR([ ‘ | pDim13 | ‘ ].[ Company Code ], “ST6” ) > 0 ) OR ( INSTR([ ‘ | pDim13 | ‘ ].[ Company Code ], “ST7″ ) > 0 ) ) } ‘;
# next step – you need to modify this for your company structure in your cognos controller data
# ——————————————————————————
# apply the MDX to the dimension
SubsetCreatebyMDX( sSubset ,StringMDX);
# add subset to view
ViewSubsetAssign( pCube, sView, pDim13, sSubset );
If( SubsetExists( pDim15, sSubset ) = 1 );
SubsetDeleteAllElements( pDim15, sSubset );
Else;
SubsetCreate( pDim15, sSubset );
EndIf;
SubsetElementInsert( pDim15, sSubset, pElement15, 1 );
# this is PeriodMonthly that should be selected
ViewSubsetAssign( pCube, sView, pDim15, sSubset );
If( SubsetExists( pDim16, sSubset ) = 1 );
SubsetDeleteAllElements( pDim16, sSubset );
Else;
SubsetCreate( pDim16, sSubset );
EndIf;
SubsetElementInsert( pDim16, sSubset, pElement16, 1 );
# this is the Measures that should be same month
ViewSubsetAssign( pCube, sView, pDim16, sSubset );
# IMPORTANT: set view parameters
# Specify 1 to exclude consolidated values from the view extract. Specify 0 to include consolidated values.
ViewExtractSkipCalcsSet( pCube, sView, 1 );
ViewExtractSkipZeroesSet( pCube, sView, 1 );
# change the subset view to be used by the TI process to be the one you have defined above
DATASOURCECUBEVIEW = sView;
In METADATA tab enter code similar to this (you need to updated it for your data):
#****Begin: Generated Statements***
#****End: Generated Statements****
# add below to remove ” from output file
DatasourceASCIIQuoteCharacter = ”;
DatasourceASCIIDelimiter=’;’;
# print the first column as a value of two columns
sFirst = subst ( vPeriodMonthly ,3,4) | ( vActualityMonthly );
# debug print out to show all values in original order
# we hard code the last columns in the FTD file to 000000 and L.
textoutput (‘..\temp\debug3.txt’, vPeriodMonthly , vActualityMonthly , vCompany , vCurrency , vAccount , vRegion , vActivity , vCounterDimension , vTransactionCurrency ,
vConsolidationPerspective , vClosingVersion , vContributionVersion , vOriginCompany ,
vCounterCompany , vJournalNumber , vMeasures , vValue , ‘0,000000’ , ‘L’ );
# format to fixed decimals
nResult1 = SCAN ( ‘,’ , vValue ) ;
if (nResult1 = 0) ;
sResult1 = vValue | ‘,000000’ ;
else;
# values with more than 6 decimal values is rounded up — this can affect the result.
vValue = numbertostring( ROUNDP( stringtonumber(vValue) , 6) ) ;
nResult1a = 6 – ( LONG (vValue) – nResult1) ;
## textoutput (‘..\temp\scriptview3debug2.txt’, numbertostring (nResult2), vValue);
sResult1 = FILL (‘0’, nResult1a) ;
## textoutput (‘..\temp\scriptview3debug2.txt’, sResult1 );
sResult1 = vValue | sResult1 ;
endif;
# add spaces to name so we have a fixed with column
sResult2 = FILL(‘ ‘, 6 – LONG (vOriginCompany));
sResult2 = vOriginCompany | sResult2 ;
# set to blank if specific values e.g. values that start with @
# the FTD file often contain blank values for middle columns
if ( vCounterDimension @= ‘@TOT’);
vCounterDimension = ”;
endif;
if ( vTransactionCurrency @= ‘@None’);
vTransactionCurrency = ”;
endif;
if ( vConsolidationPerspective @= ‘@None’);
vConsolidationPerspective = ”;
endif;
if ( vClosingVersion @= ‘REPOBT’);
vClosingVersion = ”;
endif;
if ( vContributionVersion @= ‘BASEET’);
vContributionVersion = ”;
endif;
if ( vJournalNumber @= ‘0_’);
vJournalNumber = ‘0’;
endif;
if ( vCounterCompany @= ‘@None’);
vCounterCompany = ”;
endif;
if ( vMeasures @= ‘Monthly’);
vMeasures = ”;
endif;
# set to space if it is blank in cell
if ( vTransactionCurrency @= ”);
vTransactionCurrency = ‘ ‘;
endif;
#———————————————————————————
# change the formatting to match that of a FTD file
# ———————————————————————————
slongline = char(34) | sFirst | char(34) | char(59) | char(34) | vCompany | char(34) | char(59) | char(34) |
vCurrency | char(34) | char(59) | char(34) |
vAccount | char(34) | char(59) | char(34) | vRegion | char(34) | char(59) | char(34) | vActivity | char(34) | char(59) | char(34) |
” | char(34) | char(59) | char(34) | ” | char(34) | char(59) | char(34) | vClosingVersion | char(34) | char(59) | char(34) |
vContributionVersion | char(34) | char(59) | char(34) |
vMeasures | char(34) | char(59) |
vJournalNumber | char(59) | char(34) | vCounterCompany | char(34) | char(59) | char(34) |
sResult2 | char(34) | char(59) | char(34) | vTransactionCurrency | char(34) | char(59) | char(34) | vCounterDimension | char(34) | char(59) | sResult1
| char(59) | ‘0,000000’ | char(59) | char(34) | ‘L’ | char(34) ;
textoutput ( sFileName , slongline);
In EPILOG tab enter code similar to this:
#****Begin: Generated Statements***
#****End: Generated Statements****
if (pView @= ‘Y’) ;
# remove the view
ViewDestroy( pCube, sView );
# destroy all subsets
i = 1;
# loop through all dimensions of the cube
while (tabdim(pCube,i) @<> ”);
SubsetDestroy(tabdim(pCube,i), sSubset);
i = i + 1;
end;
endif;
# ======= end of code =========
There is better and nicer ways of doing the export of data from a TM1 cube, but this is only to show an example of it. Keep in mind that the FAP cube is rebuild at every IP (Initial publish) from the FAP service. So you must recreate the views for the export, therefor use a TI script to do it. You need to change above code examples to work in your setup of Cognos Controller FAP. This is only a starting point.
The output file should have a format like this, to be like FTD:
“1908F6″;”STOZYX”;”EUR”;”5600″;”AT”;”AO”;””;””;””;””;””;0;””;”STOZYX”;” “;””;123,560000;0,000000;”L”
“1908F6″;”STOZYX”;”EUR”;”5900″;”AT”;”AO”;””;””;””;””;””;0;””;”STOZYX”;” “;””;789,000000;0,000000;”L”
…..
Use this tool to make your work in TM1 Architect easier: https://code.cubewise.com/ti-helper
More information on MDX
http://www.wimgielis.com/tm1_neatmdxtricks_EN.htm
TM1 MDX FILTER BY SUBSTRING
http://www.wimgielis.com/tm1_mdxstatements_EN.htm
More information on FAP
https://www.ibm.com/support/knowledgecenter/en/SS9S6B_10.3.1/com.ibm.swg.ba.cognos.ctrl_fap_ug.10.3.1.doc/c_appendixa.html
https://www.ibm.com/support/knowledgecenter/en/SS9S6B_10.3.1/com.ibm.swg.ba.cognos.ctrl_fap_ug.10.3.1.doc/c_fapcubes.html
https://ibm-data-and-ai.ideas.aha.io/ideas/BACC-I-147
https://www-01.ibm.com/support/docview.wss?uid=swg21661294