Product:
Planning Analytics 2.0.97  (file tm1_winx64h_2.0.97.6_ml.tar)
(TM1_version=TM1-AW64-ML-RTM-11.0.97.6-0)
Microsoft Windows 2019 server

Issue:
Error when installing PA on Windows server.

Solution:

Uninstall Planning Analytics.

Go to control panel – administrative tools – services.

Go to Printer Spooler service, right click and select properties and change it to Automatic.

Click to start the Printer Spooler.

Run the installation of Planning Analytics again.

https://www.ibm.com/docs/en/planning-analytics/2.0.0?topic=configuration-installing-planning-analytics-local-single-computer

More information:

https://www.ibm.com/support/pages/tm1-install-generates-error-message-enummonitorsfailed-error-1722

https://www.ibm.com/docs/en/planning-analytics/2.0.0?topic=features-whats-new-in-planning-analytics

https://www.ibm.com/support/pages/ibm-planning-analytics-local-2097-now-available-download-fix-central

Product:
Cognos Controller 10.4.2
Microsoft Windows 2012 R2 Server

Issue:
In Cognos Controller the IBM license is for users and servers. The user part is divided in Administrators and Standard Users.  The limit is that the Standard Users should not have access to all the menu points on the Maintain menu. How do we set this up?

Solution:
Create a security group called ST = standard user, and limit access to menu items as shown below.

Then use this menu group as template when you create other menu security groups in Cognos Controller- if you want the data entry people only to have access to less number of menus.

Log into Cognos Controller Client as a administrator (ADM) user.

Go to maintain – rights – security groups.

Create a new security group, by click on new icon.

Name it ST, Standard User and scroll down to select all menu points that should be set to Not Available.

Then for each menu a standard user, should not see, you need to select it and click “Not Available”.

Important, that Jobs menu above is set to red “Not Available”.

Submission – Tasks – Define, is a new function for Cognos Controller, so if you upgrade from a old version of Cognos Controller this menu will be active and set to allow – giving that all your old users become Administrators. You need to go into Security Groups and set “Not Available” on this new functions (after a upgrade).

“Manage Active Users” can in some cases be allowed for a “Standard User”.

When all fields need are set to “Not Available” click save icon.

Now click on save as icon to create a new security group with this as base;

Give it a good name, and then select the menu points your data entry users should not see, and also mark them as Not Available.

Here you need to decide what menu point your different users groups need. Save the new group.

Then you go to Maintain – Rights – Users.
On each user go to limitations and select your new security group.

Click on Save icon.
Now it may be needed, that you run a optimization of the database for the changes to take affect.

Go to maintain – rights – reports and click on Generate (to get a License Management Report as PDF)

Save the pdf to a folder you can find.
Open the UserReport.pdf file in your Adobe reader or web browser.

Now you should have more standard active users in the report.

The information is also stored in a SLMT tag file for each database, in a unique folder for each database, on the Cognos Controller main server.

C:\Program Files\ibm\cognos\ccr_64\SLMTagData\UK, is the folder for the UK database.

Where you can see historical values from your Controller installation.

In folder C:\Program Files\ibm\cognos\ccr_64\swidtag you find the file that the ILMT tool should check to find what version of Cognos Controller you have installed.


More Information:
https://www.ibm.com/support/pages/controller-licensing-what-difference-between-administrator-and-non-administrator-user

http://public.dhe.ibm.com/software/passportadvantage/PA_Agreements/PA_Agreement_International_English.pdf

https://www.middlecon.se/vad-ar-ilmt-och-vem-behover-bry-sig/

https://www.ibm.com/support/pages/faq-what-does-internal-database-optimise-do-and-how-often-should-i-run-database-optimize

https://www.ibm.com/docs/en/cognos-controller/10.4.1?topic=environment-monitoring-license-usage

https://www-03.ibm.com/software/sla/sladb.nsf/lilookup/B2CD5F784772CDB08525860A0058085C?OpenDocument

Product:

Cognos Controller web 10.4.2
Microsoft Windows 2012 R2 server

Issue:
Upgrade of controller web to later version with SSO (CAM login), you get a error after you select the database in the controller web page.

Error message:

The website declined to show this webpage
Most Likely causes:
This website requires you to login.

This error (HTTP 403 Forbidden) means that Internet Explorer was able to connect to the website, but it does not have permission to view the webpage.

Solution:

The file D:\Program Files\ibm\cognos\analytics\templates\ps\portal\variables_CCRWeb.xml

may contain the wrong information.

Open variables_CCRWeb.xml in Notepad++

Change line <CRNenv c_cmd=”http://servername.domain.com:9080/fcm.web/#!/CamLogin”>

to

<CRNenv c_cmd=”http://servername.domain.com:9080/#!/CamLogin”>
<cookies>
<param name=”cam_passport”/>
</cookies>
</CRNenv>

The extra fcm.web is from the old version of Controller web.

Save the file again.

Restart the 3 Cognos Controller Web services.

Try to browse to http://servername.domain.com:9080/ to see if Controller Web works.

More Information:

https://www.ibm.com/support/pages/how-install-controller-web

https://www.ibm.com/support/pages/node/305259

https://www.ibm.com/support/pages/controller-web-does-not-fully-logout-authenticated-users-unless-web-browser-closed-using-cam-authentication

The log files for controller web is found in folders:

D:\Program Files\ibm\cognos\ccr_64\frontend\logs\fcmwebui-stdout.2021-04-23.log

D:\Program Files\ibm\cognos\ccr_64\fcmweb\wlp\usr\servers\fcm.web\logs\fcmweb-stdout.2021-04-23.log

Product:
OPENSSL
Linux Centos

Problem:
How create a SSL (TLS) request for a server that need a certificate?

Suggested Solution:

Install openssl on your Centos Linux with command:

yum install openssl

Create a folder to work in mkdir /ibm

Go to that folder cd /ibm

Create a text file with a text editor like; nano san.txt

[ req ]
default_bits       = 2048
distinguished_name = req_distinguished_name
req_extensions     = req_ext
prompt             = no
[ req_distinguished_name ]
countryName                = Country Name (2 letter code)
stateOrProvinceName        = State or Province Name (full name)
localityName               = Locality Name (eg, city)
organizationName           = Organization Name (eg, company)
commonName                 = Common Name (e.g. server FQDN or YOUR name)
[ req_ext ]
subjectAltName = @alt_names
[alt_names]
DNS.1   = servername
DNS.2   = servername.domain.com
DNS.3   = dnsalias.domain.com

Save above text in the file after you change to your server-names.
openssl  req  -out /ibm/request.csr  -newkey rsa:2048 -nodes -keyout /ibm/privateKey.pem -config /ibm/san.txt
Above will give a new server private key and a certificate request for a cert.

Check the request with command:

openssl req -text -noout -verify -in request.csr

Check the private key with command:

openssl rsa -in privateKey.pem -check

The private-key should only be stored on the server where it should be used.
The certificate request you copy and paste to your Certificate Authority to generate your certificate.

SSL Experten

newkey rsa:2048

This option creates a new certificate request and a new private key.


More information:

https://www.openssl.org/docs/man1.1.1/man1/req.html

https://www.sslshopper.com/article-most-common-openssl-commands.html

https://geekflare.com/san-ssl-certificate/

https://www.azure365pro.com/install-and-configure-certificate-authority-in-windows-server-2016/

https://www.namecheap.com/support/knowledgebase/article.aspx/9640/69/how-to-export-certificates-between-windows-servers/

https://www.altaro.com/hyper-v/view-revoke-manually-approve-certificates/

https://www.watchguard.com/help/docs/help-center/en-US/Content/en-US/Fireware/certificates/cert_complete_signing_req_c.html 

Managing Certs with Windows Certificate Manager and PowerShell [Tutorial]

Windows certificate stores

https://en.wikipedia.org/wiki/Certificate_authority  

https://support.citrix.com/article/CTX128656

Product:
IBM License Metric Tool on Linux
Red Hat Enterprise Linux 7.5 or a higher 7.x version
Issue:
How install ILMT on Linux in one step

https://www.ibm.com/docs/en/license-metric-tool?topic=il-step-by-step-installation-guide-all-in-one-installer
Suggested Solution:
You need to install on Red Hat Enterprise Linux 7.5 or a higher 7.x version, but for this test we will use CentOS Linux  https://www.centos.org/download/
Install CentOS with a fix IP address, so you can easy connect to the Linux server.

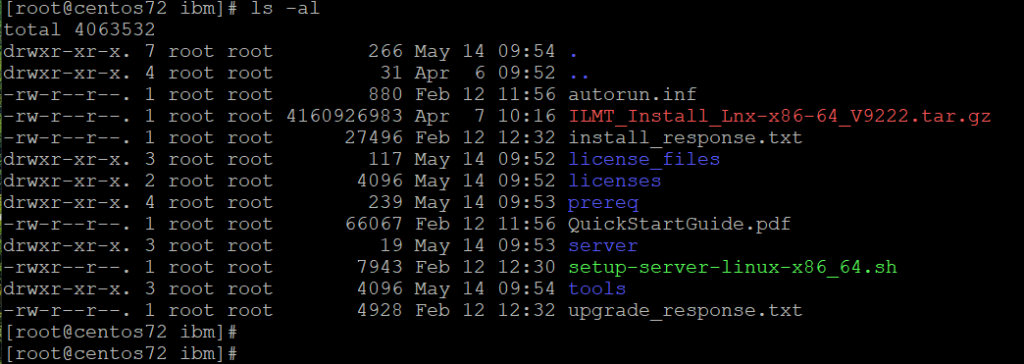
Download the installation file “ILMT_Install_Lnx-x86-64_V9222.tar.gz”

https://www.ibm.com/support/pages/node/582891#linux

Copy the file to your linux server with WinSCP program. https://winscp.net/eng/download.php

Check disk space with command df  -h

https://www.ibm.com/docs/en/license-metric-tool?topic=requirements-hardware-server-linux

Install the needed programs https://www.ibm.com/docs/en/license-metric-tool?topic=requirements-software

yum install byobu

yum install libnsl

yum install libstdc++

yum install ksh

yum install pam*i686

yum install numactl*x86_64

yum install libstdc++*i686

yum install libpng12.x86_64

yum install fontconfig.x86_64

yum install libXext.x86_64

yum install libXrender.x86_64

yum install unixODBC.x86_64

yum install nano

yum install wget*x86_64

Unzip the tar file with command:  tar  zxvf  ILMT_Install_Lnx-x86-64_V9222.tar.gz

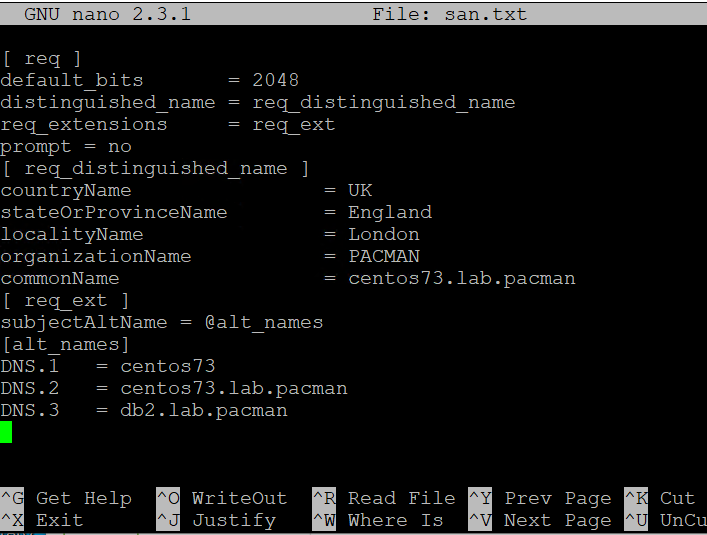
Copy the install_response.txt to a new file with command: cp install_response.txt response.txt
Edit that file in nano response.txt

Change the following values;

RSP_LICENSE_ACCEPTED=true

RSP_ADMIN_PASSWORD=

RSP_DB2_INST_PASSWORD=

#RSP_DB2_ROOT=/opt/ibm/db2/V11.5  (if you want DB2 installed in a different folder)

RSP_IEM_TEM_USER_PASSWORD=

#RSP_IEM_WR_WWW_PORT=8083 (if you want to change the port number used by BigFix)

#RSP_TLM_ROOT=/opt/ibm/LMT (if you want ILMT installed to other folder)

#RSP_TLM_HTTPS_PORT=9081 (if you want to change The port for administration server web UI)

Save the file, and run below command to start the installation:

./setup-server-linux-x86_64.sh -i silent -f /ibm/response.txt

You must install to Red Hat.  For this test we enter export disable_platform_check=true

Then the check in the script file will skip the check (if [ “$disable_platform_check” != “true” ]
then)….

Go to /root folder and enter command to unzip the log files:

tar zxvf LMT_9.2.22.0_20210514-113503_16243_logs.tar.gz

Check the log file with commando:

tail  LMT_9.2.22.0_20210514-113503_16243_logs/LMT9.2.22.0/Server.log

Solve the issue and run the ./setup-server-linux-x86_64.sh -i silent -f /ibm/response.txt again.

Add the BigFix port and ILMT port to the firewall on Linux server with commands:

firewall-cmd --permanent --add-port=52311/tcp

firewall-cmd --permanent --add-port=9081/tcp

firewall-cmd --reload


Copy windows client files to your windows share for clients with winSCP

Create a CMD file with this text to run the installation locally on the windows clients:

BigFix-BES-Client-10.0.2.52.exe /s /v”/L*vx! \”C:\temp\ClientInstallLog.txt\” SETUPEXE=1 REBOOT=ReallySuppress MSIRESTARTMANAGERCONTROL=Disable /qn”

Check the client windows services for “BES Client”, to see that it was installed.

Copy BIGFIX console files to your windows computer with winSCP

The files are in folder /var/opt/BESInstallers/ directory.

Run the BigFix console setup on a computer, and ensure the clients are listed in the Go to Sites – External Sites – IBM License Reporting (ILMT) – Fixlets and tasks – Install or Upgrade Scanner, task.

Browse to https://yourservername:9081/ in Chrome.

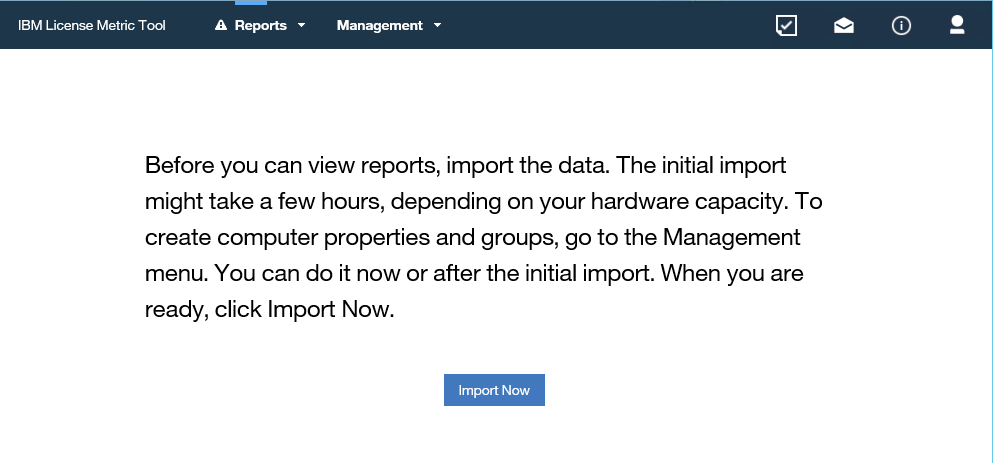
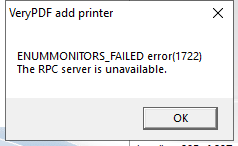
First time you log into ILMT webpage you should get above dialog, to import the data from BigFix server.

For more help contact your IBM partner.

Vår nya ILMT expert – Christer Borg

More information:

https://www.tutorialspoint.com/unix_commands/export.htm

https://www.ibm.com/docs/en/license-metric-tool?topic=il-step-by-step-installation-guide-all-in-one-installer


Product:
DB2

Problem:

How install DB2 on Centos Linux

Suggested Solution:

To change the password for root user:
sudo passwd root

Download centos from https://www.centos.org/download/

Old centos versions is found here https://vault.centos.org/

Other Linux versions can be found here https://www.linuxlookup.com/linux_iso

Inside Linux, to find version of centos enter:

cat  /etc/centos-release


How activate X11:

How configure X11 Forwarding in CentOS/RHEL 6/7

http://www.straightrunning.com/XmingNotes/trouble.php

yum upgrade libstdc++

yum install libstdc++.i686

yum install gcc-c++

yum –noplugins install pam-devel.i686

yum install libXtst.so.6

yum install libXtst.x86_64

On your laptop where you run Xming before you start putty, add the Linux server ip address in the file C:\Program Files (x86)\Xming\X0.hosts to make X11 work.


Create folder

mkdir setup

mkdir ibm

Enter df -h to see free space on Linux.

Enter ln -s /home/ibm /ibm to create a softlink from /home/ibm to /ibm


How setup DB2

Copy the DB2_Svr_11.5_Linux_x86-64.tar.gz file to /ibm folder on your Linux server with WinSCP.

Expand the file with command:

tar  xvzf  v11.5.5_linuxx64_server_dec.tar.gz

Enter cd server_dec  to go to the correct folder and then start installation with command

./db2setup

Click new install

Click Next

Change the folder to install and click next

Enter the password and select the correct folder, then press next

Enter the password and then press next

Press Finish

Click Finish

Open firewall port in centos with command:

firewall-cmd –permanent –add-port=50000/tcp

firewall-cmd –reload

Change to user db2inst1 to be able to work with the database

su – dbinst1

Enter DB2 to get into the database, and enter CREATE DATABASE books, to create a database.

Db2 Tutorial

Enter db2 list db directory to see the databases created.

You need to download a license file to db2 folder license, to be able to use all CPU and RAM in the server. https://www.ibm.com/docs/en/license-metric-tool?topic=tool-step-1-installing-db2

Add a license file to extend your license.

  1. Go to the directory where you downloaded the license activator, and extract the package.
  2. From the directory with the extracted files, go to /db2/license.
  3. Copy the db2std_vpc.lic file to the home directory of the DB2 instance owner, by default /home/db2inst1.
  4. Open the terminal and switch the user to the DB2 instance owner.
    su - db2inst1

Add the license file to your installation.

db2licm -a db2std_vpc.lic

https://www.ibm.com/docs/en/license-metric-tool?topic=linux-step-by-step-installation-guide-separate-installers

You can install a db-tool on your laptop to have a GUI to work with the database on the Linux server; https://www.dbvis.com/download/12.0

To setup ILMT see the documentation

https://www.ibm.com/docs/en/license-metric-tool?topic=installing-linux

If you get the error Unexpected Throwable caught: null. ERRORCODE=-4228, SQLSTATE=null. then the database schema maybe is not created or misspelled.

More information:

If you want to install ILMT, you can download this files:

All-in-One installer:
ILMT_Install_Lnx-x86-64_V9222.tar.gz
(PN: CC9RAML)
BigFix installer:
BigFix_Platform_Install_V10.0.2.zip
(PN: CC9RBML)
DB2 installer:
DB2_Svr_11.5_Linux_x86-64.tar.gz
(PN: CC1U0ML)
DB2 license activator:
DB2_DSE_Activation_11.5.zip
(PN: CC36WML)
Quick Start Guide:
ILMT_V9222_QS.zip
(PN: CC9R9EN)

https://www.ibm.com/support/pages/downloading-ibm-license-metric-tool-92?mhsrc=ibmsearch_a&mhq=ilmt%20download#order

How configure X11 Forwarding in CentOS/RHEL 6/7

https://www.ibm.com/support/pages/unsatisfiedlinkerror-cannot-open-shared-object-file-libxtstso6

https://www.ibm.com/docs/en/license-metric-tool?topic=tool-step-1-installing-db2

https://www.ibm.com/docs/en/license-metric-tool?topic=tool-step-4-performing-initial-configuration

https://www.ibm.com/docs/en/db2/10.5?topic=pack-stopping-all-db2-processes-linux-unix

https://www.anglepoint.com/ilmt-installation-linux-and-windows/?utm_source=Facebook&amp;utm_medium=Post&amp;utm_campaign=ilmtinstall_article&amp;utm_content=Organic%20Content

https://cdn2.hubspot.net/hubfs/1697611/Events/Webinar.%20Basic%20ILMT%20Skills%20for%20IT%203.16.17.pdf 

http://www.redbooks.ibm.com/redbooks/pdfs/sg246899.pdf

https://www.db2tutorial.com/getting-started/db2-connect-to-database/

https://www.kbce.com/db2-community-edition/

https://www.ibm.com/support/pages/node/957531

https://www.ibm.com/support/pages/step-step-installation-ilmt-9202-windows-2008-r2-server

https://www.ibm.com/support/producthub/db2/docs/content/SSEPGG_11.5.0/com.ibm.db2.luw.admin.cmd.doc/doc/r0002059.html

Product:

Cognos Controller 10.4.2

Issue:

When run a standard report in Cognos Controller, and select PDF format, the report have a “adobe tools” menu on the right side.

Solution:

Press CTRL+H to hide it.
or
Click on the arrow (in yellow in above picture) .
or
Select  view – show/hide – tools.


More information:

https://helpx.adobe.com/acrobat/kb/disable-right-hand-pane-in-acrobat-reader.html

https://community.adobe.com/t5/acrobat-reader/how-do-i-remove-the-right-hand-pane-in-reader-dc-locked/td-p/7021654