Product:
Cognos Planning 10.1.1 Fix Pack 7
Cognos BI 10.2.1 Fix Pack 12
Microsoft Windows 2012 R2 Server
Microsoft SQL 2012 database server
Symptom:
How to setup the Cognos Planning 10.1.1 on a new Windows server?
Error message when start the CAC:
An error has occurred while starting IBM Cognos Planning Administrator
Main form failed to initialize
Error Details:
Unable to determine if the Planning Table exist in Content Manager.
Please ensure the Planning Service is running.
sendRequest failedFaoled to send the SOAP message
In the file C:\Users\%username%\AppData\Local\Temp\PlanningErrorLog.txt
GUID Stack Date Time Component Version Information Module File Procedure Line Number Source Error Number Error Description User Domain\User Name Machine Domain\Machine Name Previous User Domain\Previous User Name Previous Machine Domain\Previous Machine Name Process Id Thread Id
{BAFF3619-FB57-4A0F-BB6C-E7084625CFEB} 1 2016-11-25 14:50:49.096 UTC +60 epcTransport 10.1.6307.4 default TransportClient.cpp invoke 201 epcTransport::default::TransportClient.cpp::invoke::201 -2147467259 Unexpected: missing HRESULT parameter DOMAIN\USERNAME DOMAIN\SERVERNAME None\None None\None 4392 3196
{BAFF3619-FB57-4A0F-BB6C-E7084625CFEB} 2 2016-11-25 14:50:49.112 UTC +60 epcTransport 10.1.6307.4 default TransportClient.cpp invoke 245 epcTransport::default::TransportClient.cpp::invoke::201 -2147467259 Unexpected: missing HRESULT parameter DOMAIN\USERNAME DOMAIN\SERVERNAME DOMAIN\USERNAME DOMAIN\SERVERNAME 4392 3196
{BAFF3619-FB57-4A0F-BB6C-E7084625CFEB} 3 2016-11-25 14:50:49.112 UTC +60 epcTransport 10.1.6307.4 default RemoteDispatcher.cpp invokeRemoteMethod 71 epcTransport::default::TransportClient.cpp::invoke::201 -2147467259 Unexpected: missing HRESULT parameter DOMAIN\USERNAME DOMAIN\SERVERNAME DOMAIN\USERNAME DOMAIN\SERVERNAME 4392 3196
{BAFF3619-FB57-4A0F-BB6C-E7084625CFEB} 4 2016-11-25 14:50:49.112 UTC +60 epcTransport 10.1.6307.4 default RemoteDispatcher.cpp invokeRemoteMethod 89 epcTransport::default::TransportClient.cpp::invoke::201 -2147467259 Unexpected: missing HRESULT parameter DOMAIN\USERNAME DOMAIN\SERVERNAME DOMAIN\USERNAME DOMAIN\SERVERNAME 4392 3196
{BAFF3619-FB57-4A0F-BB6C-E7084625CFEB} 5 2016-11-25 14:50:49.112 UTC +60 epcTransport 10.1.6307.4 default OSProxy.cpp invoke 120 epcTransport::default::TransportClient.cpp::invoke::201 -2147467259 Process exception DOMAIN\USERNAME DOMAIN\SERVERNAME DOMAIN\USERNAME DOMAIN\SERVERNAME 4392 3196
{BAFF3619-FB57-4A0F-BB6C-E7084625CFEB} 6 2016-11-25 14:50:49.112 UTC +60 EAdminUI_10 10.1.6307.9 MTSEAdminDB MTSPlanningTablesInCmExist 100 epcTransport::default::TransportClient.cpp::invoke::201 -2147352567 Unable to determine if the Planning Tables exist in Content Manager. Please ensure the Planning Service is running.~~~~Unexpected: missing HRESULT parameter DOMAIN\USERNAME DOMAIN\SERVERNAME DOMAIN\USERNAME DOMAIN\SERVERNAME 4392 3196
{BAFF3619-FB57-4A0F-BB6C-E7084625CFEB} 7 2016-11-25 14:50:49.127 UTC +60 EAdminUI_10 10.1.6307.9 frmMain CreatePADTables 110 epcTransport::default::TransportClient.cpp::invoke::201 -2147352567 Unable to determine if the Planning Tables exist in Content Manager. Please ensure the Planning Service is running.~~~~Unexpected: missing HRESULT parameter DOMAIN\USERNAME DOMAIN\SERVERNAME DOMAIN\USERNAME DOMAIN\SERVERNAME 4392 3196
{BAFF3619-FB57-4A0F-BB6C-E7084625CFEB} 8 2016-11-25 14:50:57.955 UTC +60 EAdminUI_10 10.1.6307.9 frmMain Form_Load 310 epcTransport::default::TransportClient.cpp::invoke::201 -2147352567 Unable to determine if the Planning Tables exist in Content Manager. Please ensure the Planning Service is running.~~~~Unexpected: missing HRESULT parameter DOMAIN\USERNAME DOMAIN\SERVERNAME DOMAIN\USERNAME DOMAIN\SERVERNAME 4392 3196
Cause:
Not DB_OWNER of the Cognos Planning Store database. Need to open SQL Management studio and make the SQL login for Cognos Planning to be DB_OWNER for that database.
Solution (how to install Cognos Planning on Windows 2012):
On the Microsoft SQL 2012 database server create three empty databases
Cognos_cs
Cognos_ps
Cognos_audit
Create two SQL logins and set unique password that only contain letters and numbers.
SQL login user: Cognos that should be DB_OWNER on database Cognos_cs and Cognos_audit
SQL login user: Cognosep that should be DB_OWNER on database Cognos_ps
You must also make the Cognosep user have the SQL server role of SysAdmin.
The SQL account that is for Cognos Planning need to be able to create and backup databases, therefor does it need a lot of power in the database.
Cognos planning cannot use Windows authentication for the SQL databases.
In our example, we will have one server 01 for Cognos BI and the Planning Gateway.
And a second server 02 for the Cognos planning server and admin parts.
Microsoft Windows server name must be short, Cognos Planning does not work with server name longer than 15 characters.
On the Microsoft Windows 2012 servers, you need to install this:
The Cognos BI server need to have IIS role and features installed.
Common HTTP Features with the all sub-components
Like this;
Static Content
Default Document
Directory Browsing
HTTP Errors
WebDav Publishing
Health and Diagnostics with the following sub-components
HTTP Logging
Performance with the following sub-components
Static Content Compression
Security with the following sub-components
Request Filtering
Basic Authentication
Windows Authentication
Application Development with the following sub-components
CGI
ISAPI
Management Tools with the following sub-components
IIS Management Console
IIS 6 Management Compatibility
IIS 6 Metabase Service
For cognos.cgi usage, the CGI Role service must be installed.
For cognosisapi.dll usage, the ISAPI Extensions Role service must be installed.
For WebDAV use, the WebDAV Publishing Role service must be installed.
All above is from control panel – server manager – local server.
On both Cognos Planning and Cognos BI server should you;
Turn off IE Enhanced Security Configuration in Server Manager
Cognos planning requires that the option “Turn on DEP for essential windows programs and services only” is selected. Turn off DEP, like this:
From the Start Menu, select Computer and then select Properties.
In the System Properties window, click Advanced System Settings in the left options pane.
In the Advanced System Properties dialog, select the Advanced tab.
On the Advanced tab, click Settings in the Performance section.
From the Performance Options dialog, select the Data Execution Prevention tab.
Select the first option Turn on DEP for essential Windows programs and services only.
Click OK to save the changes.
Setup Internet options from the Control panel to have trust to the new Cognos servers.
Click on security tab.
Select local Intranet and click on sites.
Select all 3 include all selections
Click on Advance button
Enter the name of the server like: http://servername.domain.com and press add.
Click on close.
Click on OK
Click on OK again to leave the dialog.
Best is if above setting for Internet explorer is scripted so all Cognos Planning users have it.
Install Microsoft SQL 2012 administration tools from the D:\install\SQL 2012 Std x64 SP1\setup.exe (our where ever you have the SQL media available)
Run setup of the SQL server but only select to install the Administration tools and client connectivity.
(This is needed by the Cognos Planning product and so you can create SQL aliases)
Update to the same Service Pack as you have on your SQL 2012 server.
Then you need to download and install Microsoft SQL Server Native client 2005 driver from file sqlncli_x64.msi
Also, you need to download and install Microsoft SQL Server 2005 Backward compatibility driver from file Server2005_BC_x64.msi
It is good to install 7zip so you can unpack the Cognos media files from tar.gz compression.
Install Cognos BI all server parts to folder D:\Program Files\ibm\cognos\c10_64
from files like bi_svr_64b_10.2.1_win_ml.tar and up_bisrvr_winx64h_10.2.5012.26_ml.tar.
On the same server install only the gateway part of Cognos Planning to the same location D:\Program Files\ibm\cognos\c10_64 from file pln_gtw_10.1.1_mp_ml.tar, this will work even do the Planning is a 32-bit application.
Install the latest service pack for Cognos to same folder.
in the folder D:\Program Files\ibm\cognos\c10_64\instlog you have this files:
ts-BISAMPLES-10.2-5000.275-20161206_1111.ats
ts-BISRVR-10.2-5000.275-20161206_1058.ats
ts-PLANGATE-10.1-6235.51-20161206_1139.ats
ts-UPDATE_BISRVR-10.2-5012.26-20161206_1143.ats
ts-UPDATE_PLANNING-10.1-6307.12-20161206_1142.ats
(ATS files show when and what that is installed on a Cognos BI server).
Setup the IIS as pointed out for a Cognos BI installation, like this;
http://www.ibm.com/developerworks/data/library/cognos/infrastructure/web_servers/page599.html
Go into Cognos Configuration for Cognos BI and setup and at the Environment tab set:
Deployment file location to a share like \\servername\share\deployment
If you have more than one server then you should have a common share.
Full access to the share should in Windows server be to the service account running the Cognos BI service and the Active Directory group containing the Cognos BI administrators and developers.
Gateway URI should point to the BI server http://server01.domain.com:80/ibmcognos/cgi-bin/cognosisapi.dll
Dispatcher URI for gateway should point to the BI server http://server01.domain.com:9300/p2pd/servlet/dispatch/ext
External and Internal dispatcher URI should point to the own server
http://server01.domain.com:9300/p2pd/servlet/dispatch
Dispatcher URI for external applications should point to BI server
http://server01.domain.com:9300/p2pd/servlet/dispatch
Content Manager URI should point to primary content manager on BI server
http://server01.domain.com:9300/p2pd/servlet
On IBM Cognos tab the maximum memory for TOMCAT in MB should be adjusted to 6144.
On a Cognos BI report only server it can be less amount of MB.
Under Environment – Logging, right click and select New Resource – Destination.
Enter the name Audit and type Database.
Create a Microsoft SQL server Database connection named Audit.
Point it to the new Cognos_Audit database you have created.
Only the Cognos BI servers need to point to the SQL Audit database.
Under Security – Authentication – create a new namespace for Active Directory. Set the namespace ID to be the same as the Recourse name.
Host and port should be the domain like this: domain.com:389
This will make Cognos BI to use the first available Microsoft Windows Domain Controller for the check of user’s authentication.
To make SSO work – under Advance Properties add:
Name: singleSignonOption Value: IdentityMapping
Set IBM Cognos Application Firewall – Enable CAF validation to False.
Remove the DB2 content store and create a new SQL data access.
Use Microsoft SQL Server database with SQL login. SQL login works best at the first startup of Cognos BI services, when it should create the database tables in the empty Content store.
Under Notification setup enter a SMTP mail server in your organization, like: SMTPRELAY.domain.com:25
Set the Default sender to a mail account in your domain like: cognos@domain.com
There is no need to create a planning store on the planning gateway computer.
Save and start the Cognos BI service. Exit the Cognos Configuration program.
Go to Administrative tools – Services.
Open properties for the IBM Cognos services.
Change the Log on, from Local System account, to a windows service account that is local admin on all the Cognos servers.
After you click OK you need to restart the IBM Cognos service to ensure that the account works.
To prevent big dump files on the Cognos BI server when a report crash, please change the value inside the D:\Program Files\ibm\cognos\c10_64\configuration\ cclWinSEHConfig.xml file.
From 2:2 to 0:0 at
<configuration>
<env_var name=”CCL_HWE_ABORT” value=”0:0″/>
</configuration>
More info about Cognos BI setup:
https://allthingscognos.wordpress.com/2014/08/05/maintenance-of-ibm-cognos-10-bi-servers/
Cognos BI admin tools are installed to D:\Program Files (x86)\ibm\cognos\c10
From files like fm_10.2.1_win_ml.tar, bi_trfrm_10.2.1_win_ml.tar and cubedes_10.2.1_win_ml.tar.
Install the latest Service pack to Cognos BI 10.2.1 from
http://www-01.ibm.com/support/docview.wss?uid=swg27038339
In folder D:\Program Files (x86)\ibm\cognos\c10\instlog there should be files like this;
ts-BIMODEL-10.2-5000.275-20161206_1106.ats
ts-BITRSFRMR-10.2-5000.275-20161206_1130.ats
ts-DCUBEMODEL-10.2-5000.275-20161206_1134.ats
ts-UPDATE_BISRVR-10.2-5012.26-20161206_1151.ats
Go into Cognos Configuration for Cognos BI 10 and set gateway URI to http://server01.domain.com:80/ibmcognos/cgi-bin/cognosisapi.dll and set Dispatcher for external applications to the local bi server that is http://server01.domain.com:9300/p2pd/servlet/dispatch
Save and exit the Cognos Configuration.
You need to download the .JAR files from Microsoft download center site:
http://www.microsoft.com/en-us/download/details.aspx?displaylang=en&id=11774
or search for “Microsoft JDBC Driver for SQL Server” via your favorite search engine.
Follow the Microsoft instructions to download and install.
Once done, locate the .JAR files sqljdbc4.jar and sqljdbc.jar then copy:
– sqljdbc.jar (SQLServer 2005)
– sqljdbc4.jar (SQL Server 2008 & 2012)
to <Install_Cognos>\v5dataserver\lib
and <Install_Cognos>\webapps\p2pd\WEB-INF\lib
You need to stop/start Cognos BI service to load the jars on startup.
On the Cognos Planning server 02 you need to install Cognos Planning server and admin tools only and the latest service pack from files like pln_adm_10.1.1_win_ml.tar, pln_srv_10.1.1_win_ml.tar and up_planning_win32_10.1.6307.12_ml.tar.
You should install to folder D:\Cognos. From Microsoft Windows 2012 later service packs the support for 8.3 file names is removed, and that is needed for Cognos Planning. Therefor you must install Cognos Planning to a different folder than D:\Program files (x86)\ because Cognos Planning does not support files or folders that have more than 8 characters.
During install you should point to a shared Analyst folder like: \\server02\share\analyst
During install of Cognos Planning Administrator you must also mark “to be run on a Citrix environment”.
Then you should in install log folder D:\cognos\c10\instlog have this files;
ts-PLANSRVR-10.1-6235.51-20161214_2106.ats
ts-PLANADMIN-10.1-6235.51-20161214_2112.ats
ts-UPDATE_PLANNING-10.1-6307.12-20161214_2114.ats
You should run a batch script to ensure that the Cognos Planning files are registries on the Microsoft Windows server.
Save below line of text in a REGDLL.CMD file in folder d:\cognos\c10\bin\
FOR %%1 IN (*.DLL) DO REGSVR32 /S %%1
Save below line of text in a REGOCX.CMD file in folder d:\cognos\c10\bin\
FOR %%1 IN (*.OCX) DO REGSVR32 /S %%1
Open a command prompt as administrator and run above CMD files.
When installation is done, you should take a backup of the \\server02\share\analyst folders to a d:\temp\backup folder. You may need to restore this files if you fail to start Planning Analyst later.
Then on the Cognos Planning server 02 you need to create a local SQL alias for the planning data store. The name should be same as last installation or a very good common name.
Start SQL server configuration manager
Expand SQL native Client 11.0 Configuration (32 bit) – alias
Right click and select New Alias
Set Alias name to: planningds
Set port no to: 1433
Leave protocol at: TCP/IP
Set server to: SQLSERVERNAME
Press OK.
To make sure it works – setup the same alias for the 64-bit SQL client.
Setup Cognos planning configuration to have a common deployment files location like this
\\server01\share\deployment
Set the Gateway URI to the BI server like this http://server01.domain.com:80/ibmcognos/cgi-bin/cognosisapi.dll
Set the External and Internal dispatcher URI to point to the Cognos Planning server itself as this
http://server02.domain.com:9300/p2pd/servlet/dispatch
Dispatcher URI for external applications should point to BI server
http://server01.domain.com:9300/p2pd/servlet/dispatch
Content Manager URI should point to primary content manager on BI server
http://server01.domain.com:9300/p2pd/servlet
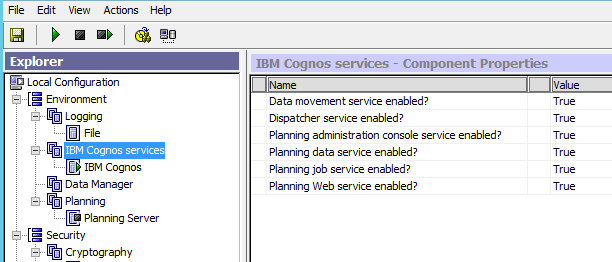
On the first Cognos Planning server all IBM Cognos Service should be active (true)
Data Movement service enabled= True
Dispatcher service enabled=True
Planning administration console service enabled= True
Planning data service enabled= True
Planning job service enabled= True
Planning Web service enabled= True
If you install more Cognos Planning Windows servers that should act as Job servers then only 3 service should be active on them, like this:
Data Movement service enabled= True
Dispatcher service enabled= True
Planning administration console service enabled= False
Planning data service enabled= False
Planning job service enabled= True
Planning Web service enabled= False
On the planning tab you need to change Analyst maximum workspace size in KB to 512000
You need to delete the DB2 planning store and create a new Planning Store for data access with Microsoft SQL server database. Cognos Planning does only work with SQL user login to database.
Version should be SQL server 2008.
Enter the database servername and port like this; databaseservername.domain.com:1433
Enter the SQL login user and password.
Cognos Planning only support user and passwords that contain A-Z and numbers, no special characters is allowed.
Point to your new database: Cognos_ps
If not SQL server 2012 is shown inside Cognos Configuration as an option, you can add support to it by update the D:\cognos\c10\bin\epEAdminSQL7Resources.xml file.
Make a backup copy of the c10_location\bin\epEAdminSQL7Resources.xml file.
Open the c10_location\bin\epEAdminSQL7Resources.xml file in a text editor.
Find the entry for Resource ID=”2k8DefaultProviderDriverString” and locate the <![CDATA[SQLNCLI10]]> entry.
Change the entry to read <![CDATA[SQLNCLI11]]>.
Save the file and close it.
In Cognos Configuration, you must still select Microsoft SQL Server 2008 from the Version list. However, you must supply connection parameters for your Microsoft SQL Server 2012 database.
After you make this change, you cannot use a Microsoft SQL Server 2008 database for your Planning store. You must change the <![CDATA[SQLNCLI11]]> entry back to <![CDATA[SQLNCLI10]]>, if you need to revert to using SQL Server 2008.
The first section of the epEAdminSQL7Resources.xml file looks like this after the change:
<Resources>
<Resource ID=”2k5DefaultProviderDriverString” Context=”Customization” Hint=”The SQL Server 2005 default string used in the ADO connection string that is generated for a new Application.”>
<![CDATA[SQLNCLI]]>
</Resource>
<Resource ID=”2k8DefaultProviderDriverString” Context=”Customization” Hint=”The SQL Server 2008 default string used in the ADO connection string that is generated for a new Application.”>
<![CDATA[SQLNCLI11]]>
</Resource>
<Resource ID=”2k12DefaultProviderDriverString” Context=”Customization” Hint=”The SQL Server 2012 default string used in the ADO connection string that is generated for a new Application.”>
<![CDATA[SQLNCLI11]]>
</Resource>
<Resource ID=”AllDefaultProviderDriverStrings” Context=”Customization” Hint=”All supported default strings used in the ADO connection string that is generated for a new Application.”>
<![CDATA[SQLNCLI,SQLNCLI10,SQLNCLI11]]>
</Resource>
<Resource ID=”Create container DDL” Context=”Customization” Hint=”%1 is container name, %2 is folder name”>
<![CDATA[CREATE DATABASE [%1] ON PRIMARY ( NAME = [%1_dat], FILENAME = N’%2%1_dat.mdf’, SIZE = 10MB, FILEGROWTH = 10% ) LOG ON ( NAME = [%1_log], FILENAME = N’%2%1_log.ldf’, SIZE = 10MB, FILEGROWTH = 10% )]]>
</Resource>
<Resource ID=”Post Create Container Script” Context=”Customization” Hint=”This will run after the database is created. %1 is the databasename”>
<![CDATA[
— USE [%1]
— EXEC sp_grantdbaccess [DOMAIN\USER]
— EXEC sp_addrolemember [db_datareader], [DOMAIN\USER]
— EXEC sp_addrolemember [db_datawriter], [DOMAIN\USER]
— EXEC sp_addrolemember [db_ddladmin], [DOMAIN\USER]
]]>
</Resource>
You must also change the value in epEAdminSQL7Resources.xml file for SIZE to a large value that match the size of the model database size on the new Microsoft SQL server, can be 512 Mb or 2048 MB. If not correct set you cannot create new Planning applications.
<![CDATA[CREATE DATABASE [%1] ON PRIMARY ( NAME = [%1_dat], FILENAME = N’%2%1_dat.mdf’, SIZE = 2048MB, FILEGROWTH = 10% ) LOG ON ( NAME = [%1_log], FILENAME = N’%2%1_log.ldf’, SIZE = 10MB, FILEGROWTH = 10% )]]>
In folder D:\cognos\c10\bin\LANGUAGE\English copy file adminbifs.AMF to adminbif.AMF
And copy file adminodbc.AMF to adminodb.AMF, this to ensure Analyst can access the long-named files. Cognos Planning can only understand 8 characters’ filenames.
Ensure that the analyst folder is shared and set an AD group with all Planning admin and developers to have full access to the share. Ensure that the AD service account used by Cognos Planning have full access to the share for filesys.ini.
To be able to run Cognos Administrator Console you must set Cognos BI to use SSO, and add the users that should run CAC to the Cognos group “Planning Rights Administrators” inside Cognos Connection.
Then on the computer where you start CAC you need to in Internet Options add the Cognos BI server to be in trusted intranet zone, to make the SSO work.
You can install Framework Manager, the metadata modeling tool for IBM Cognos BI, to create models from published planning packages. To make it work you need to install Cognos Frame Work manager on the same server as you did install Cognos Planning. Install to folder D:\cognos\c10fm and configure Cognos Configuration URI for FrameWork manager to point to the Cognos BI server.
If you use the Generate Framework Manager extension or the Generate Transformer Model extension you will need to install Framework Manager and Transformer on the same machine that you have installed the Planning Admin tools on.
Since Framework Manager and Transformer are now different renditions they need to be installed into separate directory paths. To accommodate for this in Cognos Configuration browse to the Planning entry in the Cognos Configuration tree – at Component Properties at IBM Cognos BI Installation location, set the value to a path pointing to the directory that IBM Cognos Business Intelligence Framework Manager is installed in.
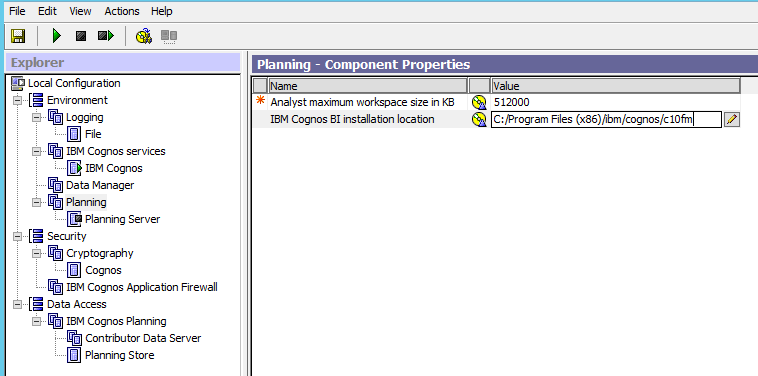
Note: A common mistake is browsing too deeply into the directory such as to the \bin location. Browse only to the parent directory such as \ibmcognos\c10 or in this example d:\cognos\ibm\c10fm.
If you did not install Cognos Analyst on the computer, you may need to add some of this values to windows registry to make Cognos Analyst work for you. (You can save them in text files with the ending .REG on your computer, then click on them to read in the values to your registry.)
This files can be created from the user who installed and run Cognos Analyst
Login to Windows as the user who installed Analyst:
From Start/Run menu of Windows, launch REGEDIT.EXE:
– Export HKEY_CURRENT_USER\Software\IBM\Cognos\Planning101
– Go to HKEY_CURRENT_USER\Software\Cognos if it exists, then on the right pane, note the value of string value called “Analyst” if this exists.
For Windows 2008 64-bit, it is also necessary to create an additional registry key (string value “Analyst”) under HKEY_CURRENT_USER\Software\Cognos\Analyst and set it to the full path of the \bin directory (i.e. for version 10 <Install Location>\ibm\cognos\c10\bin\).
For Planning Manager, it may be necessary to create the following additional key:
HKEY_CURRENT_USER\Software\IBM\Cognos\Planning101\Analyst\TableDefaults
Windows Registry Editor Version 5.00
[HKEY_CURRENT_USER\Software\IBM\Cognos]
[HKEY_CURRENT_USER\Software\IBM\Cognos\Planning101]
[HKEY_CURRENT_USER\Software\IBM\Cognos\Planning101\PAD]
[HKEY_CURRENT_USER\Software\IBM\Cognos\Planning101\PAD\{A395B1CD-AD3A-4165-A141-A208220B5F59}]
[HKEY_CURRENT_USER\Software\IBM\Cognos\Planning101\PAD\{A395B1CD-AD3A-4165-A141-A208220B5F59}\ContributorAdmin]
[HKEY_CURRENT_USER\Software\IBM\Cognos\Planning101\PAD\{A395B1CD-AD3A-4165-A141-A208220B5F59}\ContributorAdmin\Cognos Default UserName]
@=””
[HKEY_CURRENT_USER\Software\IBM\Cognos\Planning101\PAD\{A395B1CD-AD3A-4165-A141-A208220B5F59}\ContributorAdmin\Create App Wiz Show Welcome]
Windows Registry Editor Version 5.00
[HKEY_CURRENT_USER\Software\Cognos]
“Analyst”=”d:\\cognos\\c10\\bin\\”
Windows Registry Editor Version 5.00
[HKEY_LOCAL_MACHINE\SOFTWARE\Wow6432Node\Cognos]
[HKEY_LOCAL_MACHINE\SOFTWARE\Wow6432Node\Cognos\c10dot1dot132]
[HKEY_LOCAL_MACHINE\SOFTWARE\Wow6432Node\Cognos\c10dot1dot132\InstallStream]
“Install Location”=”d:\\cognos\\c10\\”
[HKEY_LOCAL_MACHINE\SOFTWARE\Wow6432Node\Cognos\CognosRCP]
“AppsLocation”=”d:\\cognos\\c10\\crcp\\CognosRCP\\rcp\\applications”
“NoUpdate”=”Yes”
Windows Registry Editor Version 5.00
[HKEY_LOCAL_MACHINE\SOFTWARE\Wow6432Node\IBM\Cognos]
[HKEY_LOCAL_MACHINE\SOFTWARE\Wow6432Node\IBM\Cognos\Planning101]
[HKEY_LOCAL_MACHINE\SOFTWARE\Wow6432Node\IBM\Cognos\Planning101\Analyst]
“-“=””
[HKEY_LOCAL_MACHINE\SOFTWARE\Wow6432Node\IBM\Cognos\Planning101\Analyst\AnalystHelp]
“EN”=”d:\\cognos\\c10\\webcontent\\documentation\\EN”
“DE”=”d:\\cognos\\c10\\webcontent\\documentation\\DE”
“FR”=”d:\\cognos\\c10\\webcontent\\documentation\\FR”
[HKEY_LOCAL_MACHINE\SOFTWARE\Wow6432Node\IBM\Cognos\Planning101\Analyst\AnalystMessageLibs]
“EN”=”d:\\cognos\\c10\\bin\\Language\\English”
“DE”=”d:\\cognos\\c10\\bin\\Language\\German”
“FR”=”d:\\cognos\\c10\\bin\\Language\\French”
[HKEY_LOCAL_MACHINE\SOFTWARE\Wow6432Node\IBM\Cognos\Planning101\Analyst\Aplpipes]
“APL_UNICODE”=”d:\\cognos\\c10\\bin\\aplunicd.ini”
“APLNAME”=”PIPES”
[HKEY_LOCAL_MACHINE\SOFTWARE\Wow6432Node\IBM\Cognos\Planning101\Analyst\BX]
@=””
[HKEY_LOCAL_MACHINE\SOFTWARE\Wow6432Node\IBM\Cognos\Planning101\Analyst\Compatibility]
“FlagsAsMasks”=”0”
“PipesAsSpaces”=”Yes”
[HKEY_LOCAL_MACHINE\SOFTWARE\Wow6432Node\IBM\Cognos\Planning101\Analyst\CP]
“Enable”=”No”
[HKEY_LOCAL_MACHINE\SOFTWARE\Wow6432Node\IBM\Cognos\Planning101\Analyst\Custom]
“WindowsTranslation”=”1”
[HKEY_LOCAL_MACHINE\SOFTWARE\Wow6432Node\IBM\Cognos\Planning101\Analyst\Dyalog]
“aplk”=”NONE”
“aplkeys”=””
“aplnid”=”0”
“aplt”=”NONE”
“apltrans”=””
“Dyalog”=”d:\\cognos\\c10\\bin”
“MAPCHARS”=”0”
“MAXWS”=”64000”
“session_file”=”d:\\cognos\\c10\\bin\\DEF_UK.DSE”
“wspath”=”d:\\cognos\\c10\\bin”
“YY_WINDOW”=”1950”
[HKEY_LOCAL_MACHINE\SOFTWARE\Wow6432Node\IBM\Cognos\Planning101\Analyst\Main]
“Analyst”=”d:\\cognos\\c10\\bin”
“APLUNICODE”=”d:\\cognos\\c10\\bin\\aplunicd.ini”
“Debug”=”No”
“DefaultUser”=”Admin”
“Language”=”English (UK)”
[HKEY_LOCAL_MACHINE\SOFTWARE\Wow6432Node\IBM\Cognos\Planning101\Analyst\MRU]
@=””
[HKEY_LOCAL_MACHINE\SOFTWARE\Wow6432Node\IBM\Cognos\Planning101\Analyst\Server]
“LocalServer32Cmd”=”d:\\cognos\\c10\\bin\\dyalog32.exe”
“LocalServer32Params”=”\”d:\\cognos\\c10\\bin\\AFW.dws\” INIFILE=\”HKEY_LOCAL_MACHINE\\Software\\IBM\\Cognos\\Planning101\\Analyst\\dyalog\” Server=No Planning=\”Software\\IBM\\Cognos\\Planning101\\Analyst\” APPNAME=Analyst”
“WINEXEC”=”d:\\cognos\\c10\\bin\\dyalog32.exe Planning INIFILE=\”HKEY_LOCAL_MACHINE\\Software\\IBM\\Cognos\\Planning101\\Analyst\\Dyalog\” Server=Yes PLANNING=\”Software\\IBM\\Cognos\\Planning101\\Analyst\” APPNAME=Analyst”
[HKEY_LOCAL_MACHINE\SOFTWARE\Wow6432Node\IBM\Cognos\Planning101\Analyst\ServerList]
“DefaultServer”=”Hydra Server”
@=””
[HKEY_LOCAL_MACHINE\SOFTWARE\Wow6432Node\IBM\Cognos\Planning101\Analyst\ServerList\Hydra Server]
“DefaultLibrary”=””
“DefaultUser”=”Admin”
“Hydra”=”Yes”
“WINEXEC”=”d:\\cognos\\c10\\bin\\dyalog32.exe Planning INIFILE=\”HKEY_LOCAL_MACHINE\\Software\\IBM\\Cognos\\Planning101\\Analyst\\Dyalog\” Server=Yes PLANNING=\”Software\\IBM\\Cognos\\Planning101\\Analyst\” APPNAME=Analyst”
[HKEY_LOCAL_MACHINE\SOFTWARE\Wow6432Node\IBM\Cognos\Planning101\Analyst\Settings]
“ReporterOnly”=”0”
“Language”=””
[HKEY_LOCAL_MACHINE\SOFTWARE\Wow6432Node\IBM\Cognos\Planning101\Analyst\Sqapl]
“APL_UNICODE”=”d:\\cognos\\c10\\bin\\aplunicd.ini”
“SQAPLPATH”=”d:\\cognos\\c10\\bin”
[HKEY_LOCAL_MACHINE\SOFTWARE\Wow6432Node\IBM\Cognos\Planning101\Analyst\StartUp]
@=””
[HKEY_LOCAL_MACHINE\SOFTWARE\Wow6432Node\IBM\Cognos\Planning101\Components]
[HKEY_LOCAL_MACHINE\SOFTWARE\Wow6432Node\IBM\Cognos\Planning101\Components\Web]
[HKEY_LOCAL_MACHINE\SOFTWARE\Wow6432Node\IBM\Cognos\Planning101\Components\Web\epCacheEx]
[HKEY_LOCAL_MACHINE\SOFTWARE\Wow6432Node\IBM\Cognos\Planning101\Components\Web\epCacheEx\JceCache]
“Name”=”jcecache84”
“Path”=hex(2):25,00,54,00,45,00,4d,00,50,00,25,00,00,00
“CleanUpDays”=dword:00000001
“CleanUpPerProcess”=dword:00000001
“ShrinkPolicy”=dword:00000000
[HKEY_LOCAL_MACHINE\SOFTWARE\Wow6432Node\IBM\Cognos\Planning101\Components\Web\epCacheEx\JceCache\Plugins]
[HKEY_LOCAL_MACHINE\SOFTWARE\Wow6432Node\IBM\Cognos\Planning101\Components\Web\epCacheEx\JceCache\Plugins\Compression]
“Library”=”epCacheCompression.dll”
[HKEY_LOCAL_MACHINE\SOFTWARE\Wow6432Node\IBM\Cognos\Planning101\Components\Web\epCacheEx\JceCache\Plugins\Encryption]
“Library”=”epCacheEncryption.dll”
[HKEY_LOCAL_MACHINE\SOFTWARE\Wow6432Node\IBM\Cognos\Planning101\Components\Web\OfflineGrid]
“FilePath”=”d:\\cognos\\c10\\bin”
“DocPath”=”$(DocDir)”
[HKEY_LOCAL_MACHINE\SOFTWARE\Wow6432Node\IBM\Cognos\Planning101\Contributor]
[HKEY_LOCAL_MACHINE\SOFTWARE\Wow6432Node\IBM\Cognos\Planning101\Contributor\Settings]
“Language”=”EN”
[HKEY_LOCAL_MACHINE\SOFTWARE\Wow6432Node\IBM\Cognos\Planning101\epLogger]
“NTEventLogOnly”=dword:00000000
[HKEY_LOCAL_MACHINE\SOFTWARE\Wow6432Node\IBM\Cognos\Planning101\epTraceLogger]
[HKEY_LOCAL_MACHINE\SOFTWARE\Wow6432Node\IBM\Cognos\Planning101\epTraceLogger\unknown.DurationTimer]
“LogLevel”=dword:00000004
[HKEY_LOCAL_MACHINE\SOFTWARE\Wow6432Node\IBM\Cognos\Planning101\Planning]
“TempPath”=””
Login with service account that should run the Cognos Planning service
And set region settings to English UK. In Control panel select Region, and under Format select English (United Kingdom) and press Apply and OK. The most important is that all Windows servers that run the Cognos program should have the same regional settings.
And temp to point to d:\temp\eptmp folder. In Control panel select System, click on Advance system settings. Click on Environment Variables button.
Select TEMP and click on EDIT button to change it to d:\temp\eptmp
Do the same for TMP value.
Click OK.
The Cognos services should be set to startup type “Automatic (Delayed start)” on a Microsoft Windows 2012 server.
In IBM Cognos Planning version 10.1.1 and later, there is no longer a Planning Monitor Service that runs tasks. Instead, Cognos Planning tasks are controlled by the IBM Cognos Business Intelligence server’s Monitor Service.
To active this you need to enter this values;
In IBM Cognos Administration in Cognos BI, on the Configuration tab, click Dispatchers and Services.
Click the Cognos BI dispatcher that you want to configure. The list of services is displayed.
Find the MonitorService service. You may have to click the Next Page icon to find the service in the list.
Click the Set properties – MonitorService icon.
On the Settings tab, for the Advanced settings of the Environment Category, click Edit.
Select Override the settings acquired from the parent entry.
Create a new parameter named enable.session.affinity. Set its value to true.
Create another new parameter named session.affinity.services.
Set its value to serviceName=planningAdministrationConsoleService.
Click OK, then click OK again.
To prevent errors because of people login to the server with the service account this should be set;
Logon to the application server as an administrator
Launch the group policy editor (click “Start – Run” then type “gpedit.msc”)
Navigate “Computer Configuration -> Administrative Templates -> System-> UserProfiles”
Double-click on “Do not forcefully unload the user registry at user logoff”
Change the setting from “Not Configured” to “Enabled”.
The Cognos Planning Contributor client need to be reinstall at each workstation for every service pack you update on the Cognos Planning server.
The install of the Cognos Planning Contributor client can be scripted with a BAT file with this content:
msiexec /i “\\server01\share\contributorclient\cognosRCP.msi” TARGETDIR=”C:\ProgramData” ALLUSERS=2
msiexec /i “\\server01\share\contributorclient\contributor.msi”
(you need to create above share and give all users access to it, also any previous installed Cognos Planning client need to be uninstalled from the workstation before above file is run.)
The file CognosRCP.msi 64904 KB and Contributor.msi 59200 KB can be found on the Cognos Planning server in folder D:\cognos\c10\webcontent\rcp_installs.
Please ask the IT department to exclude the Cognos folders from the active anti-virus scan on the Microsoft Windows servers. That should be these folders and subfolders to exclude from scan;
D:\Program Files\ibm\cognos\c10_64
D:\Program Files (x86)\ibm\cognos\c10
D:\cognos\c10
D:\temp\EPtmp
If you have problem with large Cognos Planning Contributors models you may need to adjust MaxClientRequestBuffer in Windows registry.
The MaxClientRequestBuffer limits the cumulative bytes size of the request line and header fields sent in a request to IIS. The default value has been significantly reduced by Microsoft in latest versions of IIS and Windows. Go to this key in regedit on the Windows server;
HKEY_LOCAL_MACHINE\SYSTEM\CurrentControlSet\Services\w3svc\parameters
Then edit the MaxClientRequestBuffer key. If this key doesn’t exist, add it, and set its data type to REG_DWORD. Then, in the DWORD Editor, select Decimal value, and then enter the number of bytes for the buffer.
To make Planning fully working with SQL Server 2012 you have also to download and install “SQL Server 2005 Backward Compatibility Components” (SQLServer2005_BC.msi):
Go to “Microsoft SQL Server 2008 Service Pack 3 Feature Pack” page:
https://www.microsoft.com/en-gb/download/details.aspx?id=27596
Click Download
Select ENU\x64\SQLServer2005_BC.msi if your Windows is 64-bit
Select ENU\x86\SQLServer2005_BC.msi if your Windows is 32-bit
On a 64-bit Windows, only the 64-bit version of SQL Server 2008 Feature Pack installer can be launched: trying to run the 32-bit version of the installer on a 64-bit machine will fail with message “Installation of this product failed because it is not supported on this operating system. For information on supported configurations, see the product documentation.”
If problems, check this links
http://www-01.ibm.com/support/docview.wss?uid=swg21579043
http://www-01.ibm.com/support/docview.wss?uid=swg21612480
http://www-01.ibm.com/support/docview.wss?uid=swg21574801
http://www-01.ibm.com/support/docview.wss?uid=swg21497069
To setup Cognos Planning 10.2.x with Cognos Analytics 11, see here