Product:
Planning Analytics 2.0.9.18
Microsoft Windows 2019 server

Issue:
In a TI process check that the parameter is not empty?

Solution:

If the parameter is pFirst then enter code like this in prolog:

IF ( ~( pFirst @= '' ) ) ;

    ProcessQuit ;
ENDIF;

ProcessQuit will stop the process totally,  itemreject will go to the next tab and process that – if run from prolog. In MetaData and Data tab the itemreject will act different.

# sErrorMessage = ‘The ‘ | pFirst | ‘ is not empty’;
# ItemReject ( sErrorMessage );

More Information:

 https://www.tm1forum.com/viewtopic.php?t=8074

https://exploringtm1.com/operators-tm1-ti-if-statements/ 

https://exploringtm1.com/operators-tm1-rule-statements/

https://www.wimgielis.com/tm1_ifstructures_EN.htm 

https://exploringtm1.com/itemreject-tm1-function-syntax-use/

https://www.ibm.com/docs/en/planning-analytics/2.0.0?topic=pctf-itemreject 

Product:

Planning Analytics Workspace version 88

Issue:

How add or change text to the front page?

Solution:

Login to PAW and go to administration.

Click on customization.

Click on themes.

Select system default and click download at the right.

sample-theme.zip should you save in a empty folder.

Unzip sample-theme.zip to a folder sample-theme.

Rename folder sample-theme to DEV-theme.

Go into folder, and open file spec.json in notepad++

Edit the text, to something like this

“name”: “DEV-theme”,
“brandText”:”DEVELOPMENT”,

Change the path in “brandIcon”: “DEV-theme/images/brand.svg”, to be the same as your folder name.

Change any color values – like “appbarBackground”:”#66a3ff”,

Save the file.

In file manager, use 7zip, to zip the folder to a new file:  DEV-theme.zip

Go back to PAW Admin page in your browser.

Click on ADD, and upload you new theme.

Select the new theme, and click Active on the right.

The SVG files can be edit with inkscape https://inkscape.org/ 

More Information:

https://www.ibm.com/docs/en/planning-analytics/2.0.0?topic=company-create-custom-theme 

https://quebit.com/askquebit/designing-highly-customized-dashboards-in-ibm-planning-analytics/ 

 explanation
JSON key name
Definition
name The name for the theme. This name is displayed on the Themes tab of the Excel and Customizations page in Planning Analytics Workspace Administration. You cannot use the name System default, which is reserved for the system default theme.
brandText The branding text to display on the Planning Analytics Workspace home page.
brandIcon The branding image to display on the Planning Analytics Workspace home page. This image is displayed immediately prior and near the brandText.
favicon Not currently supported.
uiShellTheme Determines the appearance of items in the Home menu Home menu. Specify either light (carbon 10) or dark(carbon 100) background.
appbarBackground Application bar background color. This color is applied to the entire application bar, both clickable and non-clickable regions.
appbarForeground Application bar foreground color. This color is applied to text and icons on the application bar.This setting is not applied to the Switcher widget on the application bar. The Switcher displays a list of open items. The text of the Switcher always appears White.
appbarSelectLine Application bar selection line color. This color is applied to the border that surrounds a selected or clicked item on the application bar.
appbarPushButtonBackground Application bar push-button background color. This color is displayed when you hover or click an item on the application bar.
navbarBackground Navigation bar background color. This color is applied to the entire navigation bar, both clickable and non-clickable regions.
navbarForeground Navigation bar foreground color. This color is applied to text and icons on the navigation bar.
navbarSelectLine Navigation bar selection line color. This color is applied to the bar that appears on a selected navigation bar item.
navbarPushButtonBackground Navigation bar push-button background color. This background color is displayed when you click on an item on the application bar.
personalMenuBackground Specifies the background color of the Personal menu icon User icon.Specify inherit to inherit the navbarBackground and navbarPushButtonBackground colors.

See Application of theme keys in Planning Analytics Workspace for a graphical depiction of the application of theme keys in the user interface.

https://convertingcolors.com/hex-color-66A3FF.html 

Product:
Planning Analytics 2.0.9.13 TM1_version=TM1-AW64-ML-RTM-11.0.913.10-0

Microsoft Windows 2019 server

Problem:
How do i give a message to Tm1Web users that they will always see?

Solution:

Edit the CommonMessages.js file and the home.jsp files in Notepad++.

The first is the name of the tab in the web browser – here you can add text, like 1984 in our example by edit the file home.jsp in folder C:\Program Files\ibm\cognos\tm1web\webapps\tm1web. Change the row 47 to the text you want:

<title>IBM Cognos TM1 Web 1984</title>

Save the file and refresh your web browser to see the change.

The second value is in a different folder for each language. The language setting in your web browser will tell what text you will show.

Go to folder C:\Program Files\ibm\cognos\tm1web\webapps\tm1web\scripts\tm1web\common\nls\sv for Swedish language.

Edit the 378 or 379 row in file CommonMessages.js to your message text:

OFFERING_NAME:"Cognos® TM1® Web (please use chrome)",

Save the file and refresh the web browser. If you do not see the text, go into the settings and change the language for the web browser.

For English language, you may need to edit in the Tm1WebAppCam.js file, direct in folder C:\Program Files\ibm\cognos\tm1web\webapps\tm1web\scripts\tm1web\standalone. Search for the word cognos to find where you can edit the file.


Third, you may want that the users of TM1WEB should not see the cubes views at all. This is done by a change in the tm1web_config.xml file in folder

C:\Program Files\ibm\cognos\tm1web\webapps\tm1web\WEB-INF\configuration.  Edit the line 25 to this:

<add key="NavTreeDisplayServerView" value="N" />

Save the file and restart the service “IBM Planning Analytics Spreadsheet Services”.

To change the background picture in TM1WEB you may need to edit the file C:\Program Files\ibm\cognos\tm1web\webapps\tm1web\scripts\tm1web\themes\carbon\standalone\images\login\PA_Header.svg.

These changes is not supported by IBM.

More information:

https://www.ibm.com/docs/en/planning-analytics/2.0.0?topic=ctwsas-displaying-hiding-views-node-in-navigation-pane

https://www.w3schools.com/html/html_css.asp

https://www.toptal.com/designers/htmlarrows/

https://www.iso.org/obp/ui/#search

https://www.w3schools.com/charsets/ref_html_entities_4.asp

https://www.iso.org/obp/ui/#iso:pub:PUB500001:en

https://developer.mozilla.org/en-US/docs/Learn/CSS/First_steps/How_CSS_is_structured

https://cubewisecode.squarespace.com/blog?offset=1528787669586

https://www.tm1forum.com/viewtopic.php?t=426

Product:
Planning Analytics 2.0.9.18
Microsoft Windows 2019 server

Issue:
How get the month before today?

Solution:

In TM1 TI code you can write something similar to this in prolog:

## sMonth = 1 ;
## remove sMonth = below and test with above line

sMonth = ( MONTH ( TODAY ) ) ;
sYear = ( YEAR (TODAY) ) ;
IF ( sMonth = 1) ;
pMonth = numbertostring ( 12 ) ;
pYear = sYear - 1;
ELSE ;
pMonth = numbertostring (sMonth - 1 ) ;
pYear = sYear ;
ENDIF ;

IF (LONG (pMonth) = 1) ;
p2Month = '0' | pMonth ;
ELSE ;
p2Month = pMonth ;
ENDIF ;

pVersion = (p2Month) | ' - ' | numbertostring(pYear) ;

ASCIIOUTPUT ( 'd:\temp\debugtestdate.txt', numbertostring (sMonth) , numbertostring(sYear) , (p2Month) , numbertostring(pYear) ) ;

Will give a test file with this result:


If you want to have the year in 4 digits, you can add it like this;

IF ( sMonth = 1) ;
pMonth = numbertostring ( 12 ) ;
pYear = '20' | numbertostring ( sYear - 1 ) ;
ELSE ;
pMonth = numbertostring (sMonth - 1 ) ;
pYear = '20' | numbertostring ( sYear ) ;
ENDIF ;


More Information:

https://www.ibm.com/docs/en/planning-analytics/2.0.0?topic=dtrf-month

Dates and Time in TM1

Product:

Planning Analytics 2.0.9.13 TM1_version=TM1-AW64-ML-RTM-11.0.913.10-0

Microsoft Windows 2019 server

Problem:

How make a drill process?

Solution:

Inside sample application proven_techniques login as ADMIN and create a drill from cube “Drivers Alloc” to cube “employeedetails” (not the best example as they do not contain much information).

First right click on cube “Drivers Alloc” and select drill – create drill process.

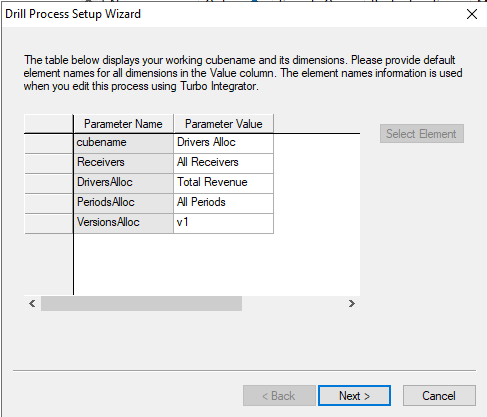
Click Next, and then select a cube view as source and select any view from that target cube.

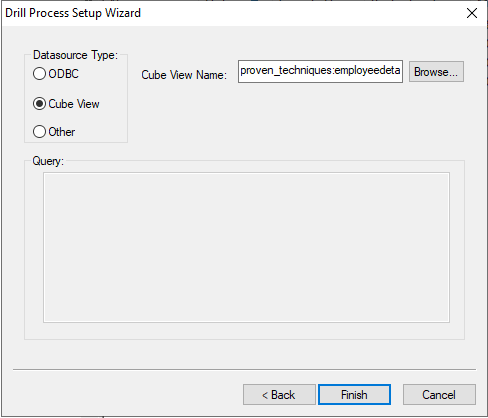
Click finish, and select a name like “TOemployees”. The hidden process }Drill_TOemployees is created.
Right click on the cube “Drivers Alloc” and select drill – create drill assignment rule.

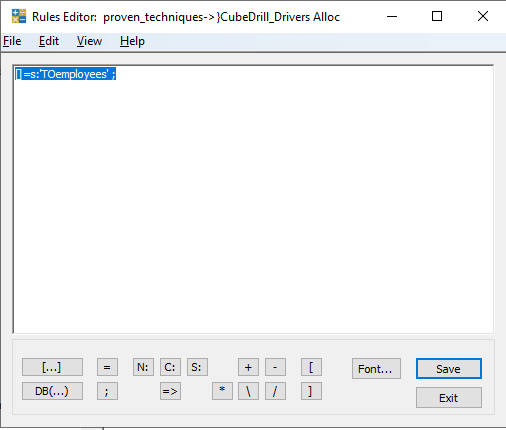
Enter in below in rule, to make all cells drill-able to the TI process TOemployees :

[]=s:'TOemployees' ;

Then save it.

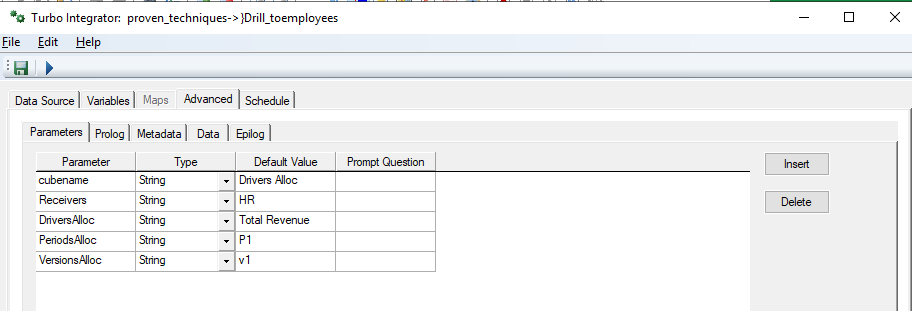
Then open the TI process to edit it. The first tabs i automatic populated from the creation cube.

In prolog add this code:

#****Begin: Generated Statements***
#****End: Generated Statements****

ByPass = 'YES';

# set the name of the target cube where the view is build
pCube = 'employeedetails' ;

# Specify dimension name
DimName1= 'employees' ;
DimName2 = 'budget' ;
DimName3 = 'departments' ;
DimName4 = 'employeedetails' ;

#Set Constants for Inserting into View

# Element1 = 'Total Employees' ; we should get only lowest member by MDX
Element2 = 'Budget' ;

# set the parameter we get from the drill function to make a selection in the view
Element3 = Receivers ;

# Element4 = 'Current Salary' ; we get all members by not including it in the code

# set view name to a uniq value
sView = 'Drill__' | pCube ;
sSubset = sView;

If( ViewExists( pCube, sView ) = 1 );
ViewDestroy( pCube, sView );
EndIf;
ViewCreate( pCube, sView );

# delete subset if it exist
If( SubsetExists( DimName1 , sSubset ) = 1 );
SubsetDestroy( DimName1 , sSubset );
EndIf;

# add all leaf elements to the dimension
sMDX = '{TM1FILTERBYLEVEL( {TM1SUBSETALL( [ ' | DimName1 | ' ] )}, 0)}' ;
SubsetCreateByMDX( sSubset, sMDX );

ViewSubsetAssign( pCube, sView, DimName1, sSubset );

# only include on elemet of the dimenstion in the view
If( SubsetExists( DimName2 , sSubset ) = 1 );
SubsetDeleteAllElements( DimName2 , sSubset );
Else;
SubsetCreate( DimName2 , sSubset );
EndIf;
SubsetElementInsert( DimName2, sSubset, Element2, 1 );

ViewSubsetAssign( pCube, sView, DimName2, sSubset );

# 
If( SubsetExists( DimName3 , sSubset ) = 1 );
SubsetDeleteAllElements( DimName3 , sSubset );
Else;
SubsetCreate( DimName3 , sSubset );
EndIf;
SubsetElementInsert( DimName3, sSubset, Element3, 1 );

ViewSubsetAssign( pCube, sView, DimName3, sSubset );

# as dimname4 does not have a total, 
# we leave it out and get all values in the view for that dimension.

# set what dimensions that should be in row and columns
ViewRowDimensionSet( pCube, sView, DimName1 , 1 );
ViewColumnDimensionSet( pCube, sView, DimName4 , 1 );
ViewTitleDimensionSet( pCube, sView, DimName3 );

# set standard values to exclude some cells
ViewExtractSkipCalcsSet( pCube, sView, 1 );
ViewExtractSkipRuleValuesSet( pCube, sView, 1 );
ViewExtractSkipZeroesSet( pCube, sView, 1 );

in epilog add this code:

IF (ByPass @= 'NO' ) ;

#****Begin: Generated Statements***
RETURNVIEWHANDLE('employeedetails','employeedetails');
#****End: Generated Statements****

ELSE;
RETURNVIEWHANDLE( pCube, sView ) ;
ENDIF;


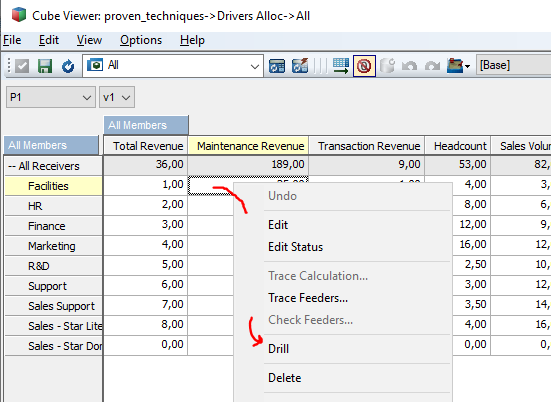
Click on the lowest cell and select Drill from the popup menu.

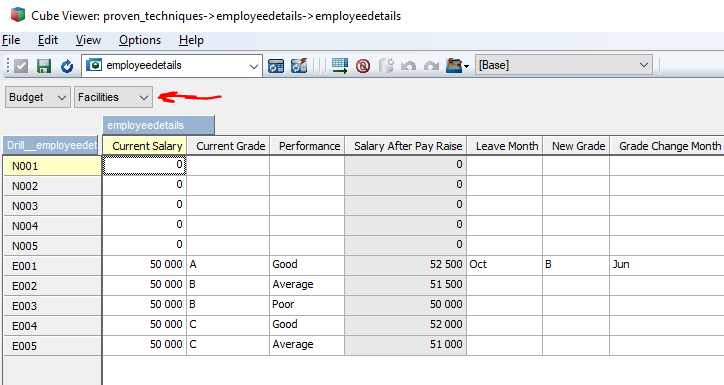
The view is shown (that is built by the TI process) – only value that change is the receivers dimension, as that parameter is used to build the view.

You can do a better solution by checking out below links.

More Information:

https://www.wimgielis.com/tm1_neatmdxtricks_EN.htm

http://yinsolutions.blogspot.com/search/label/7.%20Planning%20Analytics%20%2F%20TM1

https://pmsquare.com/analytics-blog/2020/4/13/pa-drilling-through-to-greater-detail

https://quebit.com/askquebit/ibm-planning-analytics-setting-up-basic-drill-through-functionality/

https://lodestarsolutions.com/tm1-drill-through-from-cube-to-cube-not-working/

https://blogs.perficient.com/2011/10/13/cognos-tm1-drill-through-3/

https://quebit.com/askquebit/creating-effective-source-and-zero-out-views-in-planning-analytics/

https://code.cubewise.com/ti-helper

https://www.bihints.com/book/export/html/68

https://exploringtm1.com/drill-through-processes/

Product:

Planning Analytics Workspace 88
Microsoft Windows 2019 server

Issue:

How setup the smtp mail function?

Solution:

Check that the port 25 is open from the TM1 server to the SMTP EXCHANGE server first.

Check that the SMTP EXCHANGE server accepts mail from the TM1 server – talk to the e-mail people at the company.

Update the bootstrap properties file located in folder D:\Program Files\ibm\cognos\tm1_64\paa_agent\wlp\usr\servers\kate-agent


Set these properties for un-encrypted mail internal at the company:

SMTP_EMAIL_PORT=25

SMTP_EMAIL_AUTH=FALSE

SMTP_EMAIL_HOST=smtp.servername.domain.com

SMTP_EMAIL_START_TLS_ENABLE=FALSE

SMTP_EMAIL_USERNAME=

SMTP_EMAIL_PASSWORD=

PAA_EMAIL_ADDRESS=donald@domain.com

SEND_GRID_API_KEY=""

SEND_GRID_EMAIL_URL=https\://api.sendgrid.com/v3/mail/send

After changes – you need to restart the windows service: IBM Planning Analytics Administration Agent

Then go to the PAW and the administration agent tab and click on the Test email button – enter your mail address at the company.

Then you can setup Alerts, so you will get a email when the disk is full.

To get the share book function to have a email option, you need to update the paw.ps1 file on the PAW server, with information like this:

$env:ENABLE_EMAIL="true"
$env:SENDGRID_API_KEY=""
$env:EMAIL_FROM="donald@domain.com"
$env:EMAIL_SMTP_URL="smtp://servername.domain.com:25"


You need to stop and start the PAW for the changes in paw.ps1 should take effect. run  .\paw.ps1 stop   ,then  .\paw.ps1  in the scripts folder.

if you get error – check the log file (app.log) in folder D:\PAW88\log\share-app on the PAW server.

Error [ERR_TLS_CERT_ALTNAME_INVALID]: Hostname/IP does not match certificate’s altnames:  can be that the EMAIL_SMTP_URL server name not match the DNS altnames. Change to other server name.

https://www.ibm.com/docs/en/planning-analytics/2.0.0?topic=2wnj12-enable-email-notifications-in-planning-analytics-workspace-local

https://www.ibm.com/support/pages/planning-analytics-agent-messagelog-email-configuration-properties-missing 

https://pmsquare.com/analytics-blog/2020/11/8/ibm-planning-analytics-system-alerts-via-email

From Declan, Tm1 champion:

Setup in paw server

The obvious starting points are to gather details of your SMTP server, the port it uses (for sending email) – it can often have multiple ports available in which case – find out the “preferred” one. Generally speaking:

  • 587 – for TLS
  • 465 – For SSL
  • 25 – This might work (it does for office 365 at least) but general consensus is to not use it as it’s often blocked due to SPAM.

Also, gather the relevant account’s email and password.

Relevant Material

Based on googling the examples provided in the documentation:

I believe that node.js is being used to send the emails, and nodemailer.com/smtp has documentation covering most of the parameters used in the examples (e.g. ?Secure=true)

This doesn’t cover the tls.rejectUnauthorized=false that is used in the example, but looking that up suggests that in the event that your server can’t be verified it will go ahead and send the email anyway… so that sounds like a parameter that I would be cautious about using!

What Worked

Gmail:

  • $env:EMAIL_SMTP_URL=”smtp://<MyUserName>:<MyPassword>@smtp.gmail.com:587″
  • $env:EMAIL_SMTP_URL=”smtps://<MyUserName>:<MyPassword>@smtp.gmail.com:465″
  • $env:EMAIL_SMTP_URL=”smtps://<MyUserName>:<MyPassword>@smtp.gmail.com:465?secure=true&tls.rejectUnauthorized=false”

In all cases:

  • $env:ENABLE_EMAIL=”true”
  • $env:SENDGRID_API_KEY=””
  • $env:EMAIL_FROM=”<An email address that the credentials used in $env:EMAIL_SMTP_URL have access to send from>”

Product:
Planning Analytics 2.0.9.18
Microsoft Windows 2019 server

Issue:
How make a TM1 Ti process who read values from a file and add them as alias to a dimension?

Solution:

Create a text file with the first column with the elements in the dimension names, then the second column with the text you want to have in the alias.

Above we have two alias that we want to add to each element.

Create a new TM1 TI process and load the file similar to this: (you have to upload the file first, and then in the TI code change to location from where the file is read)

In the data source tab, enter the Variables name and change to String type.

Enter the parameters you need, to make the process work with any dimension and alias name that you need in future. When you run the process, you change filename and path etc to the values that are correct for you.

Enter a script similar to above. You can add code to check for it the alias exist, and not delete the attribute and then only update the elements listed in the text file.  Run the process and enter your filename.

The alias attribute are listed in the dimension.

You can view an icon indicating the attribute type in column headers. Click Settings icon and enable the Attribute type option to see the attribute type on column headers. Disable this option to hide the attribute type on column headers.

More Information:

https://everanalytics.wordpress.com/2017/08/10/tm1_alias_attributes/ 

Accomplish Attibute Update in Cognos TM1 Smartly!

https://everanalytics.wordpress.com/2015/07/26/create-a-very-large-dimension-in-cognos-tm1-using-turbo-integrator-ti/ 

AttrPutS in TM1: How to Use and Syntax

https://cubewise.com/blog/tm1-attributes-things-to-be-aware/ 

https://www.ibm.com/docs/en/planning-analytics/2.0.0?topic=cdipawc-import-members-attributes-into-dimension-in-planning-analytics-workspace 

Product:
Planning Analytics 2.0.9.18
Microsoft Windows 2019 server

Issue:

Error in TI process when run at random times.

Suggested solution:

Error: Prolog procedure line (9): Unable to register subset
Can be that the destroy of the subset did not work, as a view is around using that subset.
Check what views you have open.

Error: Prolog procedure line (103): Subset “xxx” not found in dimension “Period”
Can be that the subset is not around anymore, the subset have already been deleted.
Can be if you use the SubsetCreate(‘Region’, ‘Northern Europe’, 1);
Change to 0 (zero) in the TI process and see if that helps.

SubsetCreate(DimName, SubName, [AsTemporary]);

AsTemporary
This is an optional argument that specifies whether the subset being created is temporary. 1 indicates a temporary subset, 0 indicates a permanent subset. If this argument is omitted, the subset is permanent.


More Information:

https://www.ibm.com/docs/en/planning-analytics/2.0.0?topic=smtf-subsetcreate

https://www.ibm.com/support/pages/unable-register-subset-error-when-creating-dynamic-subset-data-tab-ti 


Product:
Planning Analytics 2.0.9.18
Microsoft Windows 2019

Issue:
The time value in log file is not correct.

Solution:

Add

# Specify GMT or Local timezone
log4j.appender.S1.TimeZone=Local

to your tm1s-log.properties file that should be in the same folder as your tm1s.cfg file.

This should give you have logfiles with same time stamp as the clock on the server.

To test create a TI process with this in PROLOG:


In the log file you will see lines like this:

13972 [4a] INFO 2023-11-03 15:17:41.836 TM1.TILogOutput This is the end of the process !!!
13972 [4a] INFO 2023-11-03 15:17:41.836 TM1.Process Process “S. 10 Test of time value”: finished executing normally, elapsed time 0.02 seconds
When GMT is set, the time in the logfile will be ENGLISH TIME (GMT), and depending on time difference it will differ from the server time. Check https://24timezones.com/difference/gmt/stockholm
15296 [4a] INFO 2023-11-03 16:27:43.826 TM1.TILogOutput This is the end of the process !!!
15296 [4a] INFO 2023-11-03 16:27:43.826 TM1.Process Process “S. 10 Test of time value”: finished executing normally, elapsed time 0.00 seconds

With Local set in the file – the time in the logfile should be the same as the windows server clock.

In the text file will the time be shown as above – this is always the computer time of the server. Function NOW give the server time.

The Chore is run at local time when you select local. If UTC is selected it will run at the GMT time shown.

18032 [4] INFO 2023-11-04 07:14:29.923 TM1.Chore Registering chore: “S. 10 test of time” Start time: 2023/11/04 06:15:45 Frequency: 01:00:00:00
15736 [] INFO 2023-11-04 07:15:45.050 TM1.Chore Chore “S. 10 test of time” executed by scheduler

15736 [] INFO 2023-11-04 07:15:45.050 TM1.Process Process “S. 10 Test of time value” executed by chore “S. 10 test of time”
15736 [] INFO 2023-11-04 07:15:45.053 TM1.TILogOutput This is the end of the process !!!
15736 [] INFO 2023-11-04 07:15:45.053 TM1.Process Process “S. 10 Test of time value”: finished executing normally, elapsed time 0.00 seconds
15736 [] INFO 2023-11-04 07:15:45.053 TM1.Chore Chore “S. 10 test of time” time = 0.00 seconds
15736 [] INFO 2023-11-04 07:15:45.054 TM1.Chore Chore “S. 10 test of time” finished executing

Recommend to use Local time setting in chores, if you do not have servers in different time zones.

The line in log file for when you set the start time will always be in GMT time, like Registering chore: “S. 10 test of time” Start time: 2023/11/04 06:25:45 Frequency: 01:00:00:00, even do you have selected local server time in the chore and choose to start at 7:25 AM.

To setup a chore:

  1. In the Server Explorer, select the Chores icon beneath the server on which you want to create the chore.
  2. Choose ChoresCreate New Chore.

    The Chore Setup Wizard opens.

  3. In the Available list, select the process for which you want to create a chore.
  4. Click the right arrow icon.
  5. Click Next.
  6. Click a date on the calendar to specify a start date for the initial execution of the chore.
  7. Enter a time to specify the start time for the initial execution of the chore.
  8. Set the fields in the Chore Execution Frequency box to define the interval at which the chore is executed.
  9. Select a Run Chore Time option.
    • Local Server Time – Runs at the local server time, including during Daylight Saving Time/Summer Time periods.
    • UTC Time – Always runs at UTC, regardless of local Daylight Saving Time/Summer Time.
  10. Fill the Chore Schedule is Active box.
  11. Click Finish.

    The Save Chore As dialog box opens.

  12. Enter a name for the chore and click Save.


More Information:

https://exploringtm1.com/changing-tm1-server-log-time-zone-stamp/ 

https://everanalytics.wordpress.com/2015/07/23/write-to-tm1server-log-file-from-turbo-intergrator-ti-process-in-cognos-tm1/ 

https://www.ibm.com/docs/en/planning-analytics/2.0.0?topic=dtrf-timst 

https://exploringtm1.com/date-and-time-functions-for-easy-date-manipulation/ 

https://www.ibm.com/docs/el/planning-analytics/2.0.0?topic=turbointegrator-scheduling-process-automatic-execution-chores 

https://tm1up.com/9-chores-in-tm1.html 

How to set up Turbo Integrator Chores to run Advanced Scheduling

https://www.bihints.com/pushing-data-iseries-tm1 

Product:
Planning Analytics Workspace version 88

Issue:

How to select the lowest leaf members in the subset editor in workspace?

Suggested Solution:

On the left side, select all leaves to list only the members.

Click on replace icon, to move all selected on left to the right, and replace any previous values there.

Click Apply to update the view with the new subset.


More Information:

https://pmsquare.com/analytics-blog/2022/5/5/new-cube-viewer-set-editor-in-planning-analytics 

https://revelwood.com/ibm-planning-analytics-tips-tricks-new-parameters-for-turbo-integrator/ 

https://community.ibm.com/community/user/businessanalytics/blogs/stuart-king1/2021/12/13/planning-analytics-workspace-new-cube-viewer-and-s