Product:
Planning Analytics 2.0.5
Microsoft Windows 2016 Server

Problem:
How move NTFS and File Share security to a new server? We have shared a MANUALINPUT folder on the TM1 server, where selected users can update text files with data. This csv file are read into the TM1 application with use of a TI process. Now we setup a bigger Windows server and want to move over the windows security setup.

Suggested solution:
Test this steps in a test server first, to ensure they work in your environment.

You have created the folder d:\tm1app\manualinput
Login on your old TM1 server and open a command prompt as administrator.
Enter this command to save the security:
icacls d:\tm1app\manualinput /save ntfspermissions.txt /c
Copy the txt file over to the new PAL server
Enter this to restore the security:
icacls d:\tm1app /restore ntfspermissions.txt /c

/t parameter to icacls will include all subfolders in the security file.

The user that have access to the file share is stored in the registry, so on your old TM1 server you need to open REGEDIT.


Expand Regedit to the following location:
HKLM\SYSTEM\CurrentControlSet\Services\LanmanServer\Shares
Right-click the Shares registry key and select Export. Enter a file name like sharepermissions.reg.
Copy the reg file to the new PAL server.
Open the reg file in notepad, to ensure you only got the SHARES you want to be there.
If there are extra shares you do not want on the new server, erase this lines and save the file.

Open Regedit and go to HKLM\SYSTEM\CurrentControlSet\Services\LanmanServer\Shares
Right-click the Shares registry key and select Export. Enter a file name like backuppermissions.reg. This to have a backup of the settings in registry before you apply the new values.
Double click on the reg file from the other server, to import the values.


After the file is imported, you have to reboot the windows server to make the change take affect.

Note that the servers need to be in the same domain, for this to work, so the users are the same in both servers.

More information:
https://www.itechtics.com/backup-restore-ntfs-permissions/
http://woshub.com/how-to-backup-and-restore-ntfs-permissions-using-icacls/

Product:
Cognos Controller 10.3.1
Cognos Analytics 11.0.12
Planning Analytics 2.0.5

Problem:
What places should i change in Cognos in case i replace my Microsoft SQL database host to a new server?

First;
Stop all Cognos windows services.
Take a backup of the databases and copy them over to the new database server.
Ensure that the collation settings (sort order) is the same on old and new database instances.
Ensure that the SQL login have the correct dbowner rights on the database tables.
Start up the new database server.

Solution:
Cognos BI have connections to content store, and other databases you have setup from Cognos Configuration.
Start Cognos Configuration.
Go to Environment – Logging – Audit – Audit and change database server with port numbers value to the new SQL server.
Go to Data Access – Content Manager – Content Store, and change database server name value to the new SQL server.

Repeat the change for notification database,and any other database you have setup in Cognos configuration.
Save the changes and start the CA11 services, in case you have more than one BI server, start with the primary content manager first.

Surf to Cognos Connection, go to manage – administration console. Click on configuration tab. Go to Data Source Connections and in the right side click on the database link name. Then click on more in the right side.

Click on Set properties. Click on Connection tab. Click on pencil icon to edit the data source.

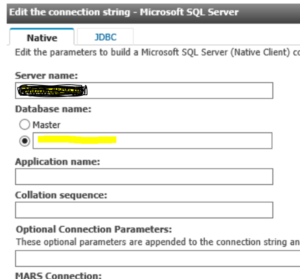
Change the server name to the new server, click on JDBC tab, and change Server name and port number to the new values. Click OK twice to save changes.
Test if the connection works.
Repeat for any data source you have here, that have changed database server.

Cognos Controller have database access that is stored in udl files, and is changed with IBM Cognos Controller Configuration program.
Start Controller Configuration on the Cognos Controller server.

Go to Database Connections – and for each database change the Data Source and click save.

Go to Report Server tab. Click on the check icon.
Press the REPAIR button, to update the data sources in Cognos Analytics.
Ensure that the windows user you are logged in to the Cognos Controller server, is system admin in CA11 Cognos connection, to make the update possible.

Go to Enhanced Reporting Optimizations tab – change the server name here. In most cases the file share for the ERO function is on the SQL server, and therefor need to be changed when you change your database server. Click save after each change, and you need to update each connection.

Ask the cognos controller users to test, by run a excel report with the ERO function active.

If the ERO share is on a file server (or the cognos controller server) you need to add the windows service account that the new SQL server is using to the file share, so the SQL server process have access to the files in this share.

The FAP service is configured in the C:\Program Files\ibm\cognos\ccr_64\server\FAP\FAPService.properties file. Open it in notepad++.
db=FAP
host=changethistothenewdbservername
dbType=sqlserver
user=cognos
passwd=xxxxxxx

Host should be servername\\instancename or servername:port if the port is correct.
http://www-01.ibm.com/support/docview.wss?uid=swg21417314
Save the FAPService.properties file and start the IBM Cognos FAP Service.
Check the C:\Program Files\ibm\cognos\ccr_64\server\FAP\error.log file for errors.

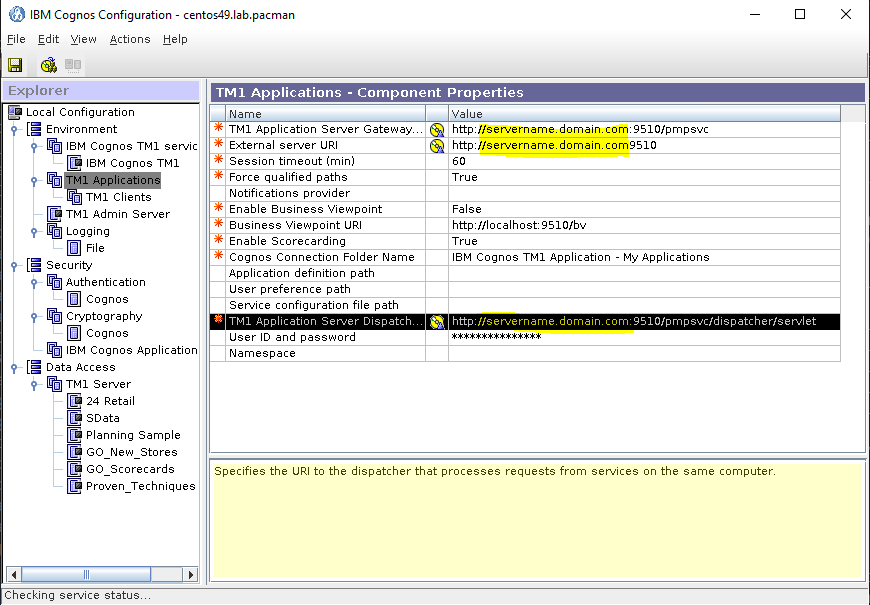
On the TM1 server there are ODBC connections to the SQL database, one is called FAP. All ODBC connections need to be updated to point to the new database server.
Export the values from registry and edit the server name in notepad.
Start Regedit program.
Go to HKEY_LOCAL_MACHINE – SOFTWARE – ODBC – ODBC.INI
Right click and select Export.
Save the file as ODBC_64.REG

Repeat the same for [HKEY_LOCAL_MACHINE\SOFTWARE\Wow6432Node\ODBC\ODBC.INI] to get the 32 bit ODBC drivers exported to a text file, like odbc_32.reg.
The file can look like below;
Windows Registry Editor Version 5.00
[HKEY_LOCAL_MACHINE\SOFTWARE\ODBC\ODBC.INI\FAP]
“Driver”=”C:\\Windows\\system32\\sqlncli11.dll”
“Server”=”roger2”
“Database”=”FAP_database”
“LastUser”=”cognos”
Open the file in notepad and change the server to the new database server, save the file.
Double click on the reg file to register the new value for the ODBC connection.

Start the FAP client connect, and enter the new server name and any new username or password, step through the database on the source tab to ensure it point correct. Edit as below if needed.


You need to edit the server for the cognos controller database, on the source tab.

You need to update the Controller Web to the new database. Stop the IBM Controller Web service.
Start a CMD prompt and go to folder; cd d:\Program Files\IBM\cognos\ccr_64\fcmweb
Enter the following command:
SyncDBConf.bat    ..\Data    wlp\usr\shared\config\datasources

Start the IBM Controller web service.
https://www-01.ibm.com/support/docview.wss?uid=swg21997329

More information:
https://www.ibm.com/software/reports/compatibility/clarity-reports/report/html/softwareReqsForProduct?deliverableId=13C73BD0195811E7A99D5014AD6C3D46&osPlatforms=Windows
https://www-01.ibm.com/support/docview.wss?uid=swg21882732&aid=3

https://mediacenter.ibm.com/media/IBM+Cognos+ControllerA+Introduction+to+IBM+Controller+Web+v10.3.1/1_wg5tg2t4/79354581

Product:
Planning Analytics Workspace 39
Linux Centos (similar to Red Hat)

Problem:
How upgrade PAW to version 39?

Solution:
https://cubewise.com/blog/planning-analytics-workspace-installation-guide/
Download the latest version of PAW from here
https://www-01.ibm.com/support/docview.wss?uid=swg27049597

Backup
Backup will restart the services.
Login to the Linux server with PUTTY
Change to the docker user with command sudo su – dockeruser
go to the paw folder, in our example that is /ibm/paw
cd /ibm/paw

go to the scripts folder, and run the backup script
cd scripts
./backup.sh

After the backup is done, the PAW should work as before.

The backup is stored in folders under /backup as shown above.

Create folders

To be able to change owner of file you need to be root, change to root user with command:
su –

Create the new folder for paw39 with command mkdir /ibm/paw39
Start WINSCP to copy the file to your linux server from windows.

https://winscp.net/eng/download.php
Move to the folder where the ipa file is stored, and to the folder where you want it. Drag the file over in the WINSCP program.

Set the rights for the file in the WINSCP program, so the others have access to the file.

Go back into PUTTY.

Go to the folder and unzip the file with command:
unzip ipa_workspace_local_2.0.39.1695.1.zip  -d /ibm/paw39

Go into the folder /ibm/paw39 and set the owner of all the files in the folder and sub-folders with this command
chown -R  dockeruser:docker ./*

Copy config files from old installation

Copy the <paw_install_location>/config/paw.env file from your current installation to the new
installation folder.
cd /ibm/paw/config
cp /ibm/paw/config/paw.env   /ibm/paw39/config/paw.env

Copy the certs folders files
cp /ibm/paw/config/certs/*.* /ibm/paw39/config/certs/

Copy the pa-workspace.pem file to the new folder
cd /ibm/paw39/config
mv pa-workspace.pem pa-org-workspace.pem
cp /ibm/paw/config/pa-workspace.pem /ibm/paw39/config/pa-workspace.pem

Copy the privatekey.pem to the new folder
cd /ibm/paw/
cp privatekey.pem /ibm/paw39/privatekey.pem

The files you copy depend on your installation.
Stop PAW services
Go to the scripts folder and enter command:
./paw.sh stop

Check that all is stopped with command:
docker ps

Rename folders

mv paw paw35
mv paw39 paw

Start paw
Change to dockeruser with command
sudo su – dockeruser

Update the paw.env file with the ip address that should be used

nano -w paw.env
export ADMINTOOL_IP = 192.168.1.29

Update the Start.sh file with the path to the docker-compose folder if it is not accessible as default

nano -w Start.sh
export PATH=$PATH:/ibm/comp/

Enter ctrl+o to save the file, press enter.
Enter ctrl+x to exit nano text editor.

Enter command below in PAW folder to start paw upgrade.

./Start.sh

Press Y to upgrade
Press Y to start IBM Planning Analytics Workspace Administration Tool.

Scroll down and and accept the IBM License and Non-IBM License to continue.

Check that the TM1 Application Server Gateway URI and the other values is correct, and press Validate.

Click on Status tab and click on Restart button.  Wait until all is started and test that it is working.

Stop the Administration Tool from PUTTY before you leave the Linux server.

To go into the linux container to run ping from inside the docker, enter this command:
docker exec -ti admintool bash

Install the new Agent

https://www.youtube.com/watch?v=Nel5Ovh0-7Q&list=PLfq0ST5X3p-QfZoNXSkDCP-zyblxXmzMZ&index=36

Surf to you new Planning Analytics Workspace and login. If you are administrator there is a new icon to administrate the TM1 instances. Click on the icon.

On the left lower corner you can see the version of PA Agent at your server. If you run TM1_version=TM1-AW64-ML-RTM-11.0.6.71-0 TM1_name=IBM Cognos TM1, you have agent 10.0.36.736.
Click on the download link to download the PA Agent that ships with PAW 39 to your computer.

https://www.ibm.com/support/knowledgecenter/SSD29G_2.0.0/com.ibm.swg.ba.cognos.tm1_prism_gs.2.0.0.doc/t_paw_download_paa_agent.html

Click on Download and save the file to a new folder on your computer.

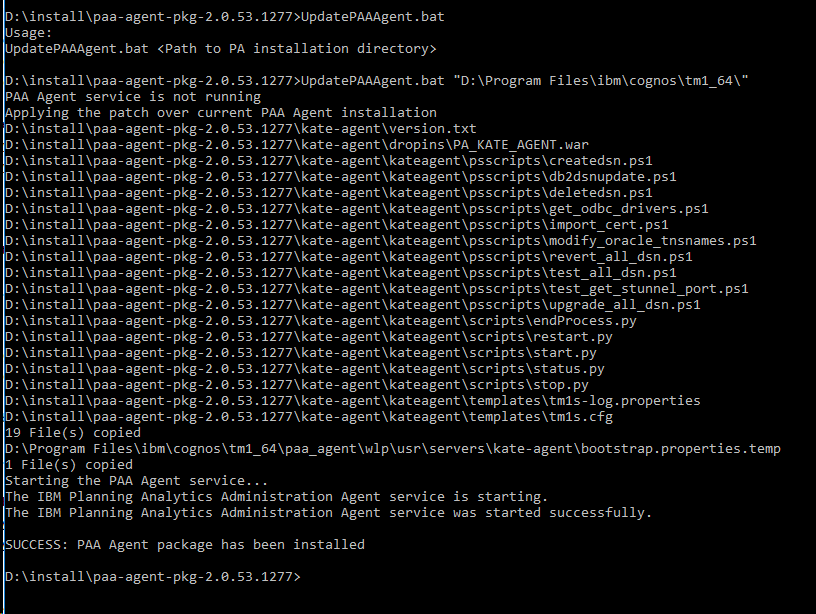
Copy the file to a folder on the PAL server and unzip it. Open a CMD window as administrator, and go to the folder where you have the new PAA Agent files. Enter this command to install the new agent:

UpdatePAAAgent.bat  “c:\program files\ibm\cognos\tm1_64\”

You need to add the path to your TM1 instances folders in the bootstrap.properties file, the TM1 samples work as they are already added at default.

To make mail notifications to work, you need to update this lines in above file;

SMTP_EMAIL_PORT=587
SMTP_EMAIL_AUTH=true
SMTP_EMAIL_HOST=example.com
SMTP_EMAIL_USERNAME=user@example.com
SMTP_EMAIL_PASSWORD=Analytics123
PAA_EMAIL_ADDRESS=noreply@example.com

Enter values for your SMTP server, also update the PAA_EMAIL_ADDRESS ( ) field.
Restart the “IBM Planning Analytics Administration Agent” to make the changes take affect.

More information:
How set a static ip address on Linux
http://www.mustbegeek.com/configure-static-ip-address-in-centos/

https://www.cyberciti.biz/faq/howto-setting-rhel7-centos-7-static-ip-configuration/

https://www.techrepublic.com/article/how-to-configure-a-static-ip-address-in-centos-7/

https://www.ibm.com/support/knowledgecenter/SSD29G_2.0.0/com.ibm.swg.ba.cognos.tm1_prism_gs.2.0.0.doc/c_install_paa_local_configure_event_notifications.html

How install docker on Linux
https://docs.docker.com/install/linux/docker-ce/centos/
To Install required packages before docker, enter this:
sudo yum install -y yum-utils device-mapper-persistent-data lvm2
sudo yum-config-manager –add-repo https://download.docker.com/linux/centos/docker-ce.repo

To download the latest version of docker download this:
sudo yum install docker-ce docker-ce-cli containerd.io

To start and make docker stay started after reboot enter this:
systemctl start docker
systemctl enable docker

To download docker-compose enter this exact command:
sudo curl -L “https://github.com/docker/compose/releases/download/1.23.2/docker-compose-$(uname -s)-$(uname -m)” -o /usr/local/bin/docker-compose

To change to execute, for this file:
sudo chmod +x /usr/local/bin/docker-compose

Check the version, with this command, to see that it works:
docker-compose version

Product:
Cognos Controller 10.4
https://www-01.ibm.com/support/docview.wss?uid=ibm10735239
Microsoft Windows 2016 Server

Problem:
After upgrade to a later version of Cognos Controller 10.4, where also BI 10 have been replaced by CA11, the PDF shown inside Cognos Controller client is small. HTML reports works fine.

Solution:
The user profile of the user executing the report is referencing a style (also known as skin) from IBM Cognos Business Intelligence 10.

In IBM® Cognos® Analytics, in the lower-left corner, click icon for administration, select Administration Console.
On the Security tab, click Users, Groups, and Roles.
Click the namespace that contains the user.
Find the user whose preferences you want to view or change. You can use the Search feature to find a user Searching for entries using name, description, and name or description.
For that user – in the Actions column, click More.
Click Set preferences.
Click the different tabs to view or change the settings.
In the Preferences tab, choose Style Corporate.
Make the change and click OK.

Test again to run a report in Cognos Controller as PDF.

More Information:
https://www-01.ibm.com/support/docview.wss?uid=ibm10739581
https://www.ibm.com/support/knowledgecenter/SSEP7J_11.0.0/com.ibm.swg.ba.cognos.ug_cra.doc/t_viewchange_userprofile.html

Product:
Planning Analytics 2.0.5
Cognos Analytics 11.0.13
Microsoft Windows 2016 server

Problem:
Inside the CA11 cognos connection you have a workspace widget that link to a TM1 Application web (contributor app) that is on a secure TM1WEB server (HTTPS), and your CA11 is not, it uses HTTP. Depending on the browser used, you can get the error “no permission to perform operation”.

This can be that you have no rights in the TM1 application, but can also be that the user credentials is not brought forward to the site.

Suggested solution:
In the case when you have the servers in different domains, this can be a solution;

When the TM1 Application Server is not accepting the request at all. You can add an additional header, so that pmpsvc accepts requests from certain domains. The header is described here:
https://developer.mozilla.org/en-US/docs/Web/HTTP/Headers/Referer

Login to tm1 server.
Open C:\Program Files\ibm\cognos\tm1_64\webapps\pmpsvc\WEB-INF\configuration\fpmsvc_config.xml in notepad++.
Find the line:

name=”X-Content-Type-Options” value=”nosniff”

Add the following after above line:

name=”Referer” value=”domain1.com;domain2.com”

Like this:

Restart TM1 Application Server

The setting will allow the pmpsvc URL to be called from any website within the domain1.com and domain2.com domain.

If a website is accessed from a HTTP Secure (HTTPS) connection and a link points to anywhere except another secure location, then the referrer field is not sent.

Product:
Planning Analytics Workspace version 38
Planning Analytics 2.0.5
Linux Red Hat 7

Problem:
A security scan show that the PAW on port 443 try to use old ciphers sets.

The server is configured to support ciphers known as static key ciphers. These ciphers don’t support “Forward Secrecy”. In the new
specification for HTTP/2, these ciphers have been blacklisted.
Negotiated with the following insecure cipher suites:
TLS 1.1 ciphers:
TLS_RSA_WITH_AES_128_CBC_SHA
TLS_RSA_WITH_AES_256_CBC_SHA
TLS_RSA_WITH_CAMELLIA_128_CBC_SHA
TLS_RSA_WITH_CAMELLIA_256_CBC_SHA
TLS 1.2 ciphers:
TLS_RSA_WITH_AES_128_CBC_SHA
TLS_RSA_WITH_AES_128_CBC_SHA256
TLS_RSA_WITH_AES_128_GCM_SHA256
TLS_RSA_WITH_AES_256_CBC_SHA
TLS_RSA_WITH_AES_256_CBC_SHA256
TLS_RSA_WITH_AES_256_GCM_SHA384
TLS_RSA_WITH_CAMELLIA_128_CBC_SHA
TLS_RSA_WITH_CAMELLIA_256_CBC_SHA

Possible Solution:
Configure the server to disable support for static key cipher suites.

Login to the PAW Linux server with PUTTY.
Change to the user who have access to the paw folder (e.g. dockeruser).
Go to the /ibm/paw/config folder.
Check the content of defaults.env with the command  more defaults.env  to see the current used values.
Open paw.env file with command  nano paw.env
Add below two rows;
export SSLCipherSuite=”ECDHE-RSA-AES128-GCM-SHA256:ECDHE-ECDSA-AES128-GCM-SHA256:ECDHE-RSA-AES256-GCM-SHA384:ECDHE-ECDSAAES256-
GCM-SHA384:DHE-RSA-AES128-GCM-SHA256:DHE-DSS-AES128-GCM-SHA256″
export SSLProtocol=”all -SSLv2 -SSLv3 -TLSv1 -TLSv1.1″
Save the file with ctrl+o
Exit nano program with ctrl+x
Restart the PAW server.

Check this link for what values to set in SSLCipherSuite:
https://mozilla.github.io/server-side-tls/ssl-config-generator/
If it does not work, revert back to the original settings shown below, by simple remove the two lines from the paw.env file.

export SSLProtocol=”all -SSLv2 -SSLv3 -TLSv1 -TLSv1.1″
above means all protocols except the one listed after the minus, so no SSLv2 or SSLv3 or TLSv1 or TLSv1.1, leaving only TLSv1.2 to show.

The way you created the certificate request when you setup SSL(TLS) for PAW, can affect the ciphers you can use.

More Information:
https://electricenergyonline.com/print_article.php?ID=779

http://www.nist.gov/manuscript-publication-search.cfm?pub_id=915295
https://wiki.mozilla.org/Security/Server_Side_TLS
http://support.microsoft.com/kb/245030/
https://tools.ietf.org/html/rfc7540/

https://github.com/OWASP/CheatSheetSeries/blob/master/cheatsheets/Transport_Layer_Protection_Cheat_Sheet.md

Product:
Planning Analytics 2.0.5
Microsoft Windows 2016 server

Problem:
A security audit list that the access to TM1 Admin service is not enough secure. Port 5498 and 5898 show this;
Negotiated with the following insecure cipher suites:
TLS 1.0 ciphers:
TLS_RSA_WITH_3DES_EDE_CBC_SHA
TLS_RSA_WITH_AES_128_CBC_SHA
TLS_RSA_WITH_AES_256_CBC_SHA
TLS 1.1 ciphers:
TLS_RSA_WITH_3DES_EDE_CBC_SHA
TLS_RSA_WITH_AES_128_CBC_SHA
TLS_RSA_WITH_AES_256_CBC_SHA

Vulnerability Solution:
Enable support for at least one of the ciphers listed below:
TLS_ECDHE_RSA_WITH_AES_128_GCM_SHA256
TLS_ECDHE_ECDSA_WITH_AES_128_GCM_SHA256
TLS_ECDHE_RSA_WITH_AES_256_GCM_SHA384
TLS_ECDHE_ECDSA_WITH_AES_256_GCM_SHA384
TLS_DHE_RSA_WITH_AES_128_GCM_SHA256
TLS_DHE_DSS_WITH_AES_128_GCM_SHA256
TLS_DHE_DSS_WITH_AES_256_GCM_SHA384
TLS_DHE_RSA_WITH_AES_256_GCM_SHA384

Possible solution:
Inside the Cognos Configuration the TM1 Admin server value for Support pre-TLS v1.2 clients are set to TRUE, this should be set to False to solve above issue.

Change to FALSE,
Save settings.
At the restart of the TM1 Admin Server, all the TM1 running instances will be restarted, this can take time. Do this at a planned date.

More information about ports:
http://www.practicallynetworked.com/sharing/app_port_list.htm
http://www.networksorcery.com/enp/protocol/ip/ports04000.htm

Ports used by CA11
https://www.ibm.com/support/knowledgecenter/en/SSEP7J_11.0.0/com.ibm.swg.ba.cognos.inst_cr_winux.doc/c_reviewthedefaultsettings.html

Ports used by PAL
https://www.ibm.com/support/knowledgecenter/en/SSD29G_2.0.0/com.ibm.swg.ba.cognos.tm1_inst.2.0.0.doc/c_tm1_inst_defaultvaluesfortm1installation.html


https://www.ibm.com/support/knowledgecenter/en/SSD29G_2.0.0/com.ibm.swg.ba.cognos.tm1_inst.2.0.0.doc/c_configuringthetm1adminservertousessl_n12010f.html

This can also help secure the TM1 Admin service;

TM1 Admin Server Certificate Version Specifies which version of the TM1 generated certificates to use.

By default, the 1024-bit encryption version of the TM1 generated certificates is used.

Change this property only if you want to use the new 2048-bit encryption version of the default certificates. You can use the new version with old and new TM1 clients, but you must configure the clients to use the new certificate authority file.

Note This property does not apply if you are using your own certificates.

Valid values include:

  • 1 – Enables certificate authority for 1024-bit encryption with sha-1 (default value)
  • 2 – Enables certificate authority for 2048-bit encryption with sha-256

Product:
Cognos Controller 10.4
Microsoft Windows 2016 server

Problem:
When doing currency conversation in a consolidation you get a error “ActiveX component can’t create object”.

When you check the Windows event log you find a error similar to this:
The application-specific permission settings do not grant Local Activation permission for the COM Server application with CLSID
{4DAC0D14-D942-47CD-9A74-CBFC5BBFA14E}
and APPID
{6591F1B8-A9EF-45FA-A403-2850BD72D910}
to the user DOMAIN\USERNAME SID (S-1-5-21-55472620-132315974-3481569866-49656) from address LocalHost (Using LRPC) running in the application container Unavailable SID (Unavailable). This security permission can be modified using the Component Service

Suggested Solution:
Login to the Cognos Controller Window server.
Go into IIS Manager
Go to the application pools.
Select the application pool for controller, can be NET v4.5 or Controller (depending what you have named it), and click advanced settings.

Under Process Model, change Identity from ApplicationPoolIdentity to LocalSystem.
Also ensure the Idle Time-out is 600 minutes, and not the default 20 minutes.
Click OK
Restart the IIS service.


You need also go into Controller Configuration
Change COM+ server to us Local System Account
Save the changes.

Retry the currency conversation.

More information:

https://www-01.ibm.com/support/docview.wss?uid=swg21608353
https://www-01.ibm.com/support/docview.wss?uid=swg21347488
https://www-01.ibm.com/support/docview.wss?uid=swg21459682

Product:
Planning Analytics 2.0.5
Planning Analytics Workspace 2.0.38

Problem:
Error message when I on some TI processes in PAW, right click and select Edit Process. Other process work fine to open in PAW.

Error Message:

{“errorMessage”. “Error: Internal Server Error\r\nSystemOutOfMemory\r\n\r\n”, “/api/v1/Cubes (‘cubename’)/Views(‘All’)/tm1.Execute”,”httpStatusCode”:500)

Background:
The paw is try to show a to large preview of the selection. If the process have a cube view as data source, and that is large, like All, then you can get this error. It will work for a smaller cube view. When you edit a TI process in TM1 Architect, this error does not show.
If you check the TM1SERVER.LOG you will find this message;
8024 [34] WARN 2019-03-04 09:30:44.083 TM1.Server.Memory al_Alloc() outOfMemory Exception <<< MEMORY_TEMP_POOL_EXCEEDED >>> MaximumViewSize memory exceeded – apifunc# “0” – pool# “0” – poolsize “201318656.000000”

You can get same behavior in TM1 Architect, if you open a cube, and try to view all content.
TM1 Error
All: Maximum memory for action exceeded.
View may be too large.
Operation aborted.

Then in TM1SERVER.LOG the error is like this:
4908 [22] WARN 2019-03-04 11:52:24.469 TM1.Server.Memory al_Alloc() outOfMemory Exception <<< MEMORY_TEMP_POOL_EXCEEDED >>> MaximumViewSize memory exceeded – apifunc# “326” – pool# “0” – poolsize “201318656.000000”

You can still edit the TI process, so this warning should not be of a concern.
Check your TM1S.CFG file so the value MaximumViewSize is not set to a low value. In most cases you should manage with the default values.

More Information:
https://www-01.ibm.com/support/docview.wss?uid=swg21380704
https://www-01.ibm.com/support/docview.wss?uid=swg21639609
https://www.ibm.com/support/knowledgecenter/en/SS9RXT_10.2.2/com.ibm.swg.ba.cognos.tm1_inst.10.2.2.1.doc/c_maximumviewsize_1.html

Product:
Cognos Analytics 11.0.12
Microsoft Windows 2016 server

Problem:
When you create a report and add a visualization you get a error.

Error message:

The web request failed.
404 – Not Found
URL: http://caservername.domain.com/ibmcognos/bi/common/palettes.json

Workaround in early versions of CA11
pallettes.json needs to be copied from /bi/common folder to the /common folder
https://www-01.ibm.com/support/docview.wss?uid=swg21992230

Solution:
Something is wrong in the IIS setup. Redo the setup from start. Below the steps copied from internet. You should not need to copy the file from /bi/common folder.

Clean the IIS setup:

https://www-01.ibm.com/support/docview.wss?uid=swg22011418

Here’s the guideline to follow before starting a fresh manual IIS installation or running the script

– Open IIS
– Click on Application Pools
– Select the Cognos 11 App Pool and stop it (mostly called ICAPool)
– Expand everything
– Select the ibmcognos -> sso application and remove it
– Select the ibmcognos application and remove it
– Click on Application Pools, select the Cognos app pool, and delete it
– Close IIS

Open your file explorer
– Navigate to the Cognos gateway install directory
– Delete the following web.config files:

  • cgi-bin\web.config
  • webcontent\web.config
  • webcontent\bi\web.config

Search your /ibmcognos folder and sub directories, to find more web.config files. Rename them to web.config.old.

Check also the C:\inetpub\wwwroot folder for web.config files. Most changes in IIS Manager is stored in web.config files.

Then setup the IIS manual:

https://www.ibm.com/support/knowledgecenter/en/SSEP7J_11.0.0/com.ibm.swg.ba.cognos.inst_cr_winux.doc/t_gateway_iis.html

The version we have here is from: 2019-02-14 = you should us the steps that are for your version of CA11.

   IIS Automated script is available here.

This topic describes the configuration for Microsoft Internet Information Services (IIS) to support IBM Cognos Analytics. When complete, IIS will be configured to serve static content (such as .js, .html, .css) directly from IIS while sending REST and other server requests to the back-end Cognos Analytics servers.

Procedure

  1. Install the IIS Application Request Routing extension.
    1. Install the Application Request Routing extension for IIS by going to the following URL: http://www.iis.net/downloads/microsoft/application-request-routing
    2. When presented with the Microsoft Web Page, click on the green “Install this extension” button.
      Follow instructions to download and run the ARR extension.
    3. To ensure that the ARR extension was installed successfully, launch the IIS Manager from the Windows Start\Administrative Tools\ menu. Once the IIS Manager launches, click on the server name at the top left-hand side of the screen to display the available features. Within the middle IIS pane, the URL Rewrite feature should now be visible; it is installed when ARR is installed.
  2. Create a new, dedicated application pool. For example, named CAPool.
    1. Right-click on Application Pools. Click Add Application Pool.
  3. Optionally, create a server farm to provide load-balancing and failover for Cognos Analytics service requests. Include all Cognos Analytics servers that have the Application server components installed and configured.
    1. Right-click on Server Farms in the left-hand tree and select Create Server Farm.
    2. Name the new server farm. For example, ca_servers.
    3. For each Cognos Analytics server, perform the following steps:
      • Enter the server address. For example, ca-host1.
      • Click Advanced settings, and expand applicationRequestRouting. Set the httpPort or httpsPort (if you’re using HTTPS). For example, 9300.
    4. Click Finish.
    5. Click No when prompted to allow IIS Manager to create a rewrite rule.
    6. Select your server farm in the left-hand tree and double-click Server Affinity.
    7. Select the Client Affinity check box.
    8. Click Apply.
    9. Select your server farm in the left-hand tree and double-click Caching.
    10. Change Query String Support to Include Query String.
    11. Click Apply.
    12. Select your server farm in the left-hand tree and double-click Health Test.
    13. In the URL Test section, enter the URL: http://ca_servers/bi/v1/ping
    14. Click Apply.
    15. Select your server farm in the left-hand tree and double-click Proxy.
    16. In the Time-out (seconds) field, change the value to 120.
    17. Click Apply.
  4. Right-click Default Web Site and then click Add Application.
    • Alias is ibmcognos.
    • Application pool is the one created in step 1.
    • Physical path is install_location\webcontent
    1. Enable Web Content expiry
      1. Select ibmcognos and double-click HTTP Response Headers.
      2. Click Set Common Headers.
      3. Check Expire Web Content and set an expiry that works best for you.
    2. Select ibmcognos and double-click Mime Types.

      Important Add the following mime types to your IIS configuration if they are not already present.

      • .svg : image/svg+xml
      • .woff : application/x-font-woff
      • .json : application/json
      • .woff2 : font/woff2
      • .template : text/html
      • .txt : text/plain
  5. If you are configuring single sign-on between IIS and Cognos, right-click ibmcognos and click Add Application.
    • Alias to sso.
    • Application pool is the one you created in step 1.
    • Physical path is install_location\cgi-bin
    1. Select sso and double-click Handler Mappings.
    2. Click Add Module Mapping in the right Actions pane.
      • Request path is cisapi.
      • Module is IsapiModule.
      • Executable is install_location\cgi-bin\cognosisapi.dll
      • Name is Cognos SSO.
      • Click Request Restrictions and ensure that Invoke Handler is unchecked.
      • Click OK twice.
      • On the Edit Script Map dialog, click Yes.
      • Select sso and double-click Modules. If the WebDAVModule appears in the list, remove it.
  6. Create URL-rewrite rules to map requests to the correct handlers.
    1. Click on bi directory under ibmcognos.
    2. Double-click URL Rewrite.
    3. Add a server variable to identify the Cognos Analytics location by clicking View Server Variables.
      • Click Add.
      • Name the variable HTTP_X_BI_PATH.
      • Click Back to Rules.
      • Click Add.
      • Name the variable HTTP_X_WEBCONTENTROOT
      • Click Back to Rules.
      • Click Add.
      • Name the variable HTTP_X_FORWARDED_HOST.
      • Click Back to Rules.
    4. Add a rule to pass the Cognos Analytics location to the ca-host machines by clicking Add Rules > Inbound Rules > Blank Rule.
      • Name is Headers.
      • Pattern is (.*)
      • Action type is none.
      • Expand Server variables and
        • Click Add. Select HTTP_X_BI_PATH and set the value to /ibmcognos/bi/v1.
        • Click Add. Select HTTP_X_FORWARDED_HOST and set the value to {HTTP_HOST}.
        • Click Add. Select HTTP_X_WEBCONTENTROOT and set the value to /ibmcognos.
      • Clear Stop processing of subsequent rules.
      • Click Apply and Back to Rules.
    5. If you configured the SSO application in a previous step, add rules to map login and legacy UI service requests to the SSO handler.
      1. Click Add Rules > Inbound Rules > Blank Rule.
        • Name is SSO Login.
        • Pattern is v1/login$
        • Action type is Rewrite.
        • Rewrite URL is /ibmcognos/sso/cisapi/bi/v1/login
        • Check Stop processing of subsequent rules.
        • Click Apply and Back to Rules.
      2. Click Add Rules > Inbound Rules > Blank Rule.
        • Name is Legacy SSO.
        • Pattern is (v1/disp(/.*)?)
        • Action type is Rewrite
        • Rewrite URL is /ibmcognos/sso/cisapi/bi/{R:1}
        • Check Stop processing of subsequent rules.
        • Click Apply and Back to Rules.
    6. Add a rule to map Cognos Analytics REST service requests to the backend Cognos Analytics servers.
      1. Click Add Rules > Inbound and Outbound Rules > Reverse Proxy .
        • If proxies are not already enabled, you are prompted to enable. Click OK.
        • Server name is ca-host:9300/bior if you have configured a server farm, http://ca_servers/bi

        Select the newly created rule and click Edit.

        • Pattern is (^$)|(^v1(/.*)?)|(^[^/]+\.jsp)
        • Action type is Rewrite.
        • Rewrite URL is http://ca-host:9300/bi/{R:0}or if you have configured a server farm, http://ca_servers/bi/{R:0}
        • Check Stop processing of subsequent rules.
        • Click Apply and Back to Rules.
      2. Click Add Rules > Inbound Rules > Blank Rule.
        • Name is Event Studio.
        • Pattern is ^(ags|cr1|prompting|ccl|common|skins|ps|cps4)/(.*)
        • Open the Conditions section.
        • Change the Logical Grouping to Match Any
        • Click Add.
          • Condition input is {HTTP_REFERER}
          • Check if input string is Matches the Pattern
          • Pattern is v1/disp
          • Check Ignore case.
        • Click Add
          • Condition input is {HTTP_REFERER}
          • Check if input string is Matches the Pattern
          • Pattern is (ags|cr1|prompting|ccl|common|skins|ps|cps4)/(.*)\.css
          • Check Ignore case.
        • Action type is Rewrite
        • Rewrite URL is /ibmcognos/{R:0}
        • Check Stop processing of subsequent rules.
        • Click Apply and Back to Rules.
      3. Click Add Rules > Inbound Rules > Blank Rule
        • Name is Report Viewer
        • Pattern is ^rv/(.*)
        • Action type is Rewrite
        • Rewrite URL is /ibmcognos/{R:0}
        • Check Stop processing of subsequent rules.
        • Click Apply and Back to Rules.
  7. Adjust request size limits.
    1. Select the bi directory under the ibmcognos application created earlier.
    2. Double-click Request Filtering.
    3. Click Edit Feature Settings… from the right-hand panel.
      • Set Maximum URL length (bytes) to 8192.
      • Set Maximum query string (bytes) to 8192.
      • Click OK.
    4. Double-click Request Filtering.
    5. Select Headers tab and click Add Header.
    6. In Header Box, type the header field name as Referer.
    7. In the Size Limit box, type 8192.
    8. Click OK.
    9. Repeat process for a header field name entitled Cookie with the Size Limit of 4096.
    10. Click OK.
    11. Click the ibmcognos virtual directory.
    12. In the Home view, Management section, double-click Configuration Editor.
    13. In the Section drop-down list, expand system.web, and select httpRuntime.
    14. Set the property maxQueryStringLength to 8192.
    15. Apply the configuration change.
  8. Configure IIS to allow to pass through the custom 441 errors that are used for recoverable exceptions from CAM. Otherwise, IIS can block these errors, and the customer sees the “Invalid Logon Response” error when trying to log on.
    1. Click the ibmcognos virtual directory.
    2. In the Home view, Management section, double-click Configuration Editor.
    3. In the Section drop-down list, expand system.webServer, and select httpErrors.
    4. Set the existingResponse property to PassThrough.
    5. Apply the configuration change.
  9. If you configured the SSO application in previous steps, enable Windows Authentication.
    1. Select the SSO application. For Microsoft Edge browser, select the ibmcognos application.
    2. Double-click Authentication. Disable Anonymous Authentication, and enable Windows Authentication.
    Cognos Analytics should now be available at: http://iis-host/ibmcognos.

NOTE: that above is tested for CA 11.0.13, and can behave different for other versions of CA11. Contact Cognos Support to get the correct instructions on how to setup CA Gateway in IIS.