Product:
Microsoft Azure Data Factory
Issue:
How schedule the ADF main pipeline to run every hour?

Solution:

Inside ADF  ( https://adf.azure.com/en/authoring/pipeline/Main ) under Factory Resources select you pipeline named “main”.
Click on the Trigger(1) icon to get the dropdown that show “New/Edit”, select that. (The number show how many triggers you got running)

Click the arrow at choose trigger to get the New icon to select.

Enter the name for your trigger.
Edit the start date to sometime next day – easy to only write the numbers in this field. It will start at the time specified, so set 1:00:00 AM to make it run at every whole hour. If you set it to 1:30:00 will make it run at 1:30 and then 2:30 etc.
Select a time zone that is the one you are in – otherwise it will run at for you unexpected time.

Set the Recurrence to 1 hour, if you want it to run each hour.
Note: that it is marked to Start.
And click OK.

You need to click OK one more time.

You need to click on the Publish All button in ADF, to make the change be uploaded and activated.

To check your trigger the next day, go to Monitor icon and Trigger runs. Here will be a list of the last 24 hours trigger runs and if they where successful.

To edit a existing Trigger – go to the pipeline and select again the Trigger drop-down and New/Edit link.

Click on your trigger name to get it up in Edit dialog. Here you can change the name and time it will run – select a start date and time in the future.

Ensure it is started, before you press OK.
Then you have to Publish your changes again to ADF, to make it happen.

As Azure change the layout all the time, the dialogs may look different when you read this.

More Information:

https://www.mssqltips.com/sqlservertip/6062/create-schedule-trigger-in-azure-data-factory-adf/ 

https://www.mssqltips.com/sqlservertutorial/9402/azure-data-factory-scheduling-and-monitoring/ 

https://www.sqlshack.com/how-to-schedule-azure-data-factory-pipeline-executions-using-triggers/ 

https://www.serverlessnotes.com/docs/schedule-azure-data-factory-pipeline-executions 

https://learn.microsoft.com/en-us/azure/data-factory/how-to-create-schedule-trigger?tabs=data-factory 

Product:
Azure Data Factory (ADF)

Issue:
Can not connect to SQL server from ADF in same subscription.

Cannot connect to SQL Database: ‘databaseservername.database.windows.net‘, Database: ‘databasename‘, Reason: Connection was denied since Deny Public Network Access is set to Yes. To connect to this server,
1. If you persist public network access disabled, please use Managed Virtual Network IR and create private endpoint. https://docs.microsoft.com/en-us/azure/data-factory/managed-virtual-network-private-endpoint; https://docs.microsoft.com/en-us/azure/data-factory/tutorial-copy-data-portal-private;
2. Otherwise you can enable public network access, set “Public network access” option to “Selected networks” on Auzre SQL Networking setting.

Solution:

Prompt yourself to Owner in the subscription and ADF.
Inside ADF you need first ensure that Integration Run-times are using a Managed Virtual Network. Create a new Integration runtime setup,
select Azure. self-hosted.
select Azure
set region to your needs, and click create.

When this use Managed Virtual Network, you can go and create the Linked Service.
Select Azure SQL database.
In connect drop-down select the above created integrationruntime2 that have managed virtual network.
Select your Azure Subscription.
Select your database server name from the drop-down.
Select the database name.
Select the Authentication type to be “System Assigned Managed Identity”
Click Test, and if there is OK, click Create.

Then you may inside SSMS add the ADF managed user to the database with command similar to this:

In master database:

CREATE login [adf_user] FROM EXTERNAL PROVIDER

CREATE USER [adf_user] FROM LOGIN [adf_user] WITH DEFAULT_SCHEMA=[dbo]

In user database:

CREATE USER [adf_user] FROM LOGIN [adf_user]

ALTER ROLE [db_owner] ADD MEMBER [adf_user]


More Information:

https://learn.microsoft.com/en-us/azure/data-factory/managed-virtual-network-private-endpoint

https://lazyadmin.nl/office-365/how-to-use-azure-managed-identity/ 

https://www.inthecloud247.com/configure-a-user-assigned-managed-identity-the-basics/ 

Product:

Planning Analytics Workspace 88
Microsoft Windows 2019 server

Issue:

How setup the smtp mail function?

Solution:

Check that the port 25 is open from the TM1 server to the SMTP EXCHANGE server first.

Check that the SMTP EXCHANGE server accepts mail from the TM1 server – talk to the e-mail people at the company.

Update the bootstrap properties file located in folder D:\Program Files\ibm\cognos\tm1_64\paa_agent\wlp\usr\servers\kate-agent


Set these properties for un-encrypted mail internal at the company:

SMTP_EMAIL_PORT=25

SMTP_EMAIL_AUTH=FALSE

SMTP_EMAIL_HOST=smtp.servername.domain.com

SMTP_EMAIL_START_TLS_ENABLE=FALSE

SMTP_EMAIL_USERNAME=

SMTP_EMAIL_PASSWORD=

PAA_EMAIL_ADDRESS=donald@domain.com

SEND_GRID_API_KEY=""

SEND_GRID_EMAIL_URL=https\://api.sendgrid.com/v3/mail/send

After changes – you need to restart the windows service: IBM Planning Analytics Administration Agent

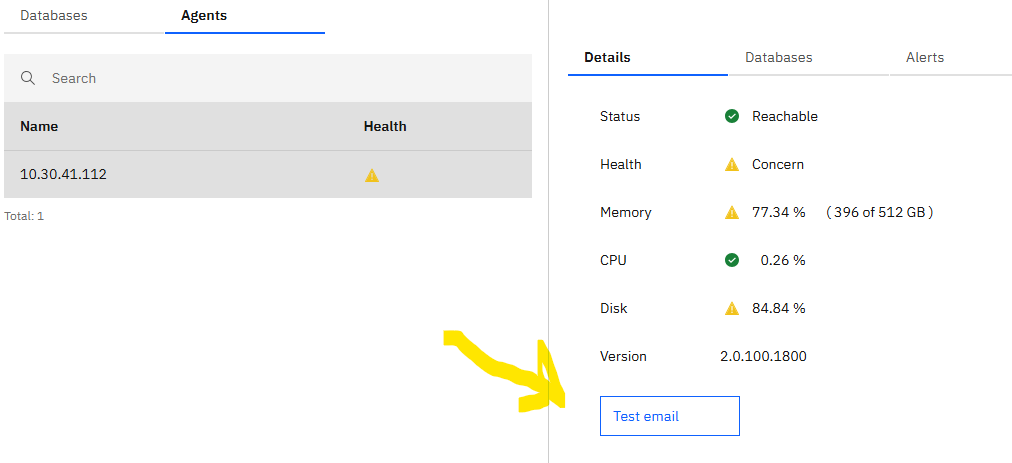
Then go to the PAW and the administration agent tab and click on the Test email button – enter your mail address at the company.

Then you can setup Alerts, so you will get a email when the disk is full.

To get the share book function to have a email option, you need to update the paw.ps1 file on the PAW server, with information like this:

$env:ENABLE_EMAIL="true"
$env:SENDGRID_API_KEY=""
$env:EMAIL_FROM="donald@domain.com"
$env:EMAIL_SMTP_URL="smtp://servername.domain.com:25"


You need to stop and start the PAW for the changes in paw.ps1 should take effect. run  .\paw.ps1 stop   ,then  .\paw.ps1  in the scripts folder.

if you get error – check the log file (app.log) in folder D:\PAW88\log\share-app on the PAW server.

Error [ERR_TLS_CERT_ALTNAME_INVALID]: Hostname/IP does not match certificate’s altnames:  can be that the EMAIL_SMTP_URL server name not match the DNS altnames. Change to other server name.

https://www.ibm.com/docs/en/planning-analytics/2.0.0?topic=2wnj12-enable-email-notifications-in-planning-analytics-workspace-local

https://www.ibm.com/support/pages/planning-analytics-agent-messagelog-email-configuration-properties-missing 

https://pmsquare.com/analytics-blog/2020/11/8/ibm-planning-analytics-system-alerts-via-email

From Declan, Tm1 champion:

Setup in paw server

The obvious starting points are to gather details of your SMTP server, the port it uses (for sending email) – it can often have multiple ports available in which case – find out the “preferred” one. Generally speaking:

  • 587 – for TLS
  • 465 – For SSL
  • 25 – This might work (it does for office 365 at least) but general consensus is to not use it as it’s often blocked due to SPAM.

Also, gather the relevant account’s email and password.

Relevant Material

Based on googling the examples provided in the documentation:

I believe that node.js is being used to send the emails, and nodemailer.com/smtp has documentation covering most of the parameters used in the examples (e.g. ?Secure=true)

This doesn’t cover the tls.rejectUnauthorized=false that is used in the example, but looking that up suggests that in the event that your server can’t be verified it will go ahead and send the email anyway… so that sounds like a parameter that I would be cautious about using!

What Worked

Gmail:

  • $env:EMAIL_SMTP_URL=”smtp://<MyUserName>:<MyPassword>@smtp.gmail.com:587″
  • $env:EMAIL_SMTP_URL=”smtps://<MyUserName>:<MyPassword>@smtp.gmail.com:465″
  • $env:EMAIL_SMTP_URL=”smtps://<MyUserName>:<MyPassword>@smtp.gmail.com:465?secure=true&tls.rejectUnauthorized=false”

In all cases:

  • $env:ENABLE_EMAIL=”true”
  • $env:SENDGRID_API_KEY=””
  • $env:EMAIL_FROM=”<An email address that the credentials used in $env:EMAIL_SMTP_URL have access to send from>”

Product:
Planning Analytics 2.0.9.18
Microsoft Windows 2019 server

Issue:
How make a TM1 Ti process who read values from a file and add them as alias to a dimension?

Solution:

Create a text file with the first column with the elements in the dimension names, then the second column with the text you want to have in the alias.

Above we have two alias that we want to add to each element.

Create a new TM1 TI process and load the file similar to this: (you have to upload the file first, and then in the TI code change to location from where the file is read)

In the data source tab, enter the Variables name and change to String type.

Enter the parameters you need, to make the process work with any dimension and alias name that you need in future. When you run the process, you change filename and path etc to the values that are correct for you.

Enter a script similar to above. You can add code to check for it the alias exist, and not delete the attribute and then only update the elements listed in the text file.  Run the process and enter your filename.

The alias attribute are listed in the dimension.

You can view an icon indicating the attribute type in column headers. Click Settings icon and enable the Attribute type option to see the attribute type on column headers. Disable this option to hide the attribute type on column headers.

More Information:

https://everanalytics.wordpress.com/2017/08/10/tm1_alias_attributes/ 

Accomplish Attibute Update in Cognos TM1 Smartly!

https://everanalytics.wordpress.com/2015/07/26/create-a-very-large-dimension-in-cognos-tm1-using-turbo-integrator-ti/ 

AttrPutS in TM1: How to Use and Syntax

https://cubewise.com/blog/tm1-attributes-things-to-be-aware/ 

https://www.ibm.com/docs/en/planning-analytics/2.0.0?topic=cdipawc-import-members-attributes-into-dimension-in-planning-analytics-workspace 

Product:

Microsoft SQL 2019 server standard
Microsoft Windows 2022 server datacenter

Issue:

How take a backup that does not affect the night differentiation backups etc ?

Solution:

Take a full backup and select copy-only backup in general.

In this example, a copy-only backup of the test database is backed up to disk at the default backup location.

  1. In Object Explorer, connect to an instance of the SQL Server Database Engine and then expand that instance.
  2. Expand Databases, right-click test, point to Tasks, and then select Back Up….
  3. On the General page in the Source section, check the Copy-only backup checkbox.
  4. Select OK.


More Information:

https://learn.microsoft.com/en-us/sql/relational-databases/backup-restore/copy-only-backups-sql-server?view=sql-server-ver16

https://www.mssqltips.com/sqlservertip/1772/copy-only-backup-for-sql-server/ 

https://www.ninjaone.com/blog/copy-only-backup-in-sql-servers-explained/ 

Product:
Planning Analytics 2.0.9.18
Microsoft Windows 2019 server

Issue:

Error in TI process when run at random times.

Suggested solution:

Error: Prolog procedure line (9): Unable to register subset
Can be that the destroy of the subset did not work, as a view is around using that subset.
Check what views you have open.

Error: Prolog procedure line (103): Subset “xxx” not found in dimension “Period”
Can be that the subset is not around anymore, the subset have already been deleted.
Can be if you use the SubsetCreate(‘Region’, ‘Northern Europe’, 1);
Change to 0 (zero) in the TI process and see if that helps.

SubsetCreate(DimName, SubName, [AsTemporary]);

AsTemporary
This is an optional argument that specifies whether the subset being created is temporary. 1 indicates a temporary subset, 0 indicates a permanent subset. If this argument is omitted, the subset is permanent.


More Information:

https://www.ibm.com/docs/en/planning-analytics/2.0.0?topic=smtf-subsetcreate

https://www.ibm.com/support/pages/unable-register-subset-error-when-creating-dynamic-subset-data-tab-ti 


Product:
Planning Analytics 2.0.9.18
Microsoft Windows 2019

Issue:
The time value in log file is not correct.

Solution:

Add

# Specify GMT or Local timezone
log4j.appender.S1.TimeZone=Local

to your tm1s-log.properties file that should be in the same folder as your tm1s.cfg file.

This should give you have logfiles with same time stamp as the clock on the server.

To test create a TI process with this in PROLOG:


In the log file you will see lines like this:

13972 [4a] INFO 2023-11-03 15:17:41.836 TM1.TILogOutput This is the end of the process !!!
13972 [4a] INFO 2023-11-03 15:17:41.836 TM1.Process Process “S. 10 Test of time value”: finished executing normally, elapsed time 0.02 seconds
When GMT is set, the time in the logfile will be ENGLISH TIME (GMT), and depending on time difference it will differ from the server time. Check https://24timezones.com/difference/gmt/stockholm
15296 [4a] INFO 2023-11-03 16:27:43.826 TM1.TILogOutput This is the end of the process !!!
15296 [4a] INFO 2023-11-03 16:27:43.826 TM1.Process Process “S. 10 Test of time value”: finished executing normally, elapsed time 0.00 seconds

With Local set in the file – the time in the logfile should be the same as the windows server clock.

In the text file will the time be shown as above – this is always the computer time of the server. Function NOW give the server time.

The Chore is run at local time when you select local. If UTC is selected it will run at the GMT time shown.

18032 [4] INFO 2023-11-04 07:14:29.923 TM1.Chore Registering chore: “S. 10 test of time” Start time: 2023/11/04 06:15:45 Frequency: 01:00:00:00
15736 [] INFO 2023-11-04 07:15:45.050 TM1.Chore Chore “S. 10 test of time” executed by scheduler

15736 [] INFO 2023-11-04 07:15:45.050 TM1.Process Process “S. 10 Test of time value” executed by chore “S. 10 test of time”
15736 [] INFO 2023-11-04 07:15:45.053 TM1.TILogOutput This is the end of the process !!!
15736 [] INFO 2023-11-04 07:15:45.053 TM1.Process Process “S. 10 Test of time value”: finished executing normally, elapsed time 0.00 seconds
15736 [] INFO 2023-11-04 07:15:45.053 TM1.Chore Chore “S. 10 test of time” time = 0.00 seconds
15736 [] INFO 2023-11-04 07:15:45.054 TM1.Chore Chore “S. 10 test of time” finished executing

Recommend to use Local time setting in chores, if you do not have servers in different time zones.

The line in log file for when you set the start time will always be in GMT time, like Registering chore: “S. 10 test of time” Start time: 2023/11/04 06:25:45 Frequency: 01:00:00:00, even do you have selected local server time in the chore and choose to start at 7:25 AM.

To setup a chore:

  1. In the Server Explorer, select the Chores icon beneath the server on which you want to create the chore.
  2. Choose ChoresCreate New Chore.

    The Chore Setup Wizard opens.

  3. In the Available list, select the process for which you want to create a chore.
  4. Click the right arrow icon.
  5. Click Next.
  6. Click a date on the calendar to specify a start date for the initial execution of the chore.
  7. Enter a time to specify the start time for the initial execution of the chore.
  8. Set the fields in the Chore Execution Frequency box to define the interval at which the chore is executed.
  9. Select a Run Chore Time option.
    • Local Server Time – Runs at the local server time, including during Daylight Saving Time/Summer Time periods.
    • UTC Time – Always runs at UTC, regardless of local Daylight Saving Time/Summer Time.
  10. Fill the Chore Schedule is Active box.
  11. Click Finish.

    The Save Chore As dialog box opens.

  12. Enter a name for the chore and click Save.


More Information:

https://exploringtm1.com/changing-tm1-server-log-time-zone-stamp/ 

https://everanalytics.wordpress.com/2015/07/23/write-to-tm1server-log-file-from-turbo-intergrator-ti-process-in-cognos-tm1/ 

https://www.ibm.com/docs/en/planning-analytics/2.0.0?topic=dtrf-timst 

https://exploringtm1.com/date-and-time-functions-for-easy-date-manipulation/ 

https://www.ibm.com/docs/el/planning-analytics/2.0.0?topic=turbointegrator-scheduling-process-automatic-execution-chores 

https://tm1up.com/9-chores-in-tm1.html 

How to set up Turbo Integrator Chores to run Advanced Scheduling

https://www.bihints.com/pushing-data-iseries-tm1 

Product:
Cognos Analytics 11.1.7
Microsoft Windows 2019

Problem:

User can not login to CA11, they get a blank page or spinning icon.

Possible Solution:

Ensure the user URL they enter in the web browser end with / and not only /bi

Valid URL for Cognos:

http://servername.domain.com/ibmcognos/bi/

http://servername.domain.com/ibmcognos/bi/v1/disp/

NOT valid URL:

http://servername.domain.com/ibmcognos/bi

The last word in the URL is considered a file, that need to exist, in that folder (D:\Program Files\ibm\cognos\analytics\webcontent) – if the URL does not end with /.


Clear the cache in the users web browser or try a different web browser like chrome.

If it does not help, check the cognos server log file for more information: D:\Program Files\ibm\cognos\analytics\logs\cognosserver.log

More Information:

https://www.ibm.com/support/pages/how-set-sample-custom-login-page-ca-112x 

https://www.ibm.com/docs/en/cognos-analytics/11.1.0?topic=settings-defining-authentication-parameters-login-urls 

https://pmsquare.com/analytics-blog/2023/6/13/the-ultimate-guide-to-cognos

https://www.ibm.com/docs/en/cognos-analytics/11.1.0?topic=gateway-configure-cognos-analytics-your-web-server

https://www.ibm.com/support/pages/blank-screen-when-logging-https-enabled-cognos-analytics-1117-environment

https://www.ibm.com/docs/en/cognos-analytics/11.1.0?topic=services-configuring-iis-in-cognos-analytics

Product:
Planning Analytics Workspace version 88

Issue:

How to select the lowest leaf members in the subset editor in workspace?

Suggested Solution:

On the left side, select all leaves to list only the members.

Click on replace icon, to move all selected on left to the right, and replace any previous values there.

Click Apply to update the view with the new subset.


More Information:

https://pmsquare.com/analytics-blog/2022/5/5/new-cube-viewer-set-editor-in-planning-analytics 

https://revelwood.com/ibm-planning-analytics-tips-tricks-new-parameters-for-turbo-integrator/ 

https://community.ibm.com/community/user/businessanalytics/blogs/stuart-king1/2021/12/13/planning-analytics-workspace-new-cube-viewer-and-s 

Product:

Microsoft SQL server Azure

Issue:

How to sum the amount in one column?

Solution:

Inside SSMS enter this, to sum column [amount] all rows that have active=”y’ and date = 20221201.

SELECT SUM(amount)
FROM [DM].[table1]
where [Active] = 'Y'
and [sDate] = '20221201'


To list all rows from two identical tables, including duplicates enter:

SELECT column_name(s) FROM table1
UNION ALL
SELECT column_name(s) FROM table2


List number of rows from a table, from a selection:

select count(*)
FROM [DM].[table1] WHERE [Active] = 'Y'


How copy a number of rows into a new table:

SELECT *
INTO [DM].[table1]
FROM [DM].[table2]
WHERE [active] = 'N';


More information:

https://www.w3schools.com/sql/sql_sum.asp

https://www.w3schools.com/sql/sql_union.asp

https://www.w3schools.com/sql/sql_update.asp