Product:

Linux Mint
Microsoft Windows 10

Problem:

How make a bootable usb to install a OS to old computer?  Old computer only have CDROM drive, and modern OS does not fit on that. They need GB of space.

Solution:

Download the ISO you need – for example Linux Mint from here:

https://www.linuxmint.com/download.php 

Download software to create USB drive, like

https://etcher.balena.io/#download-etcher 

https://rufus.ie/en/ 

How to do it:

https://youtu.be/764JLB13GjE?si=Gby6iZeC79FGZLll 

Start the program balenaEtcher.

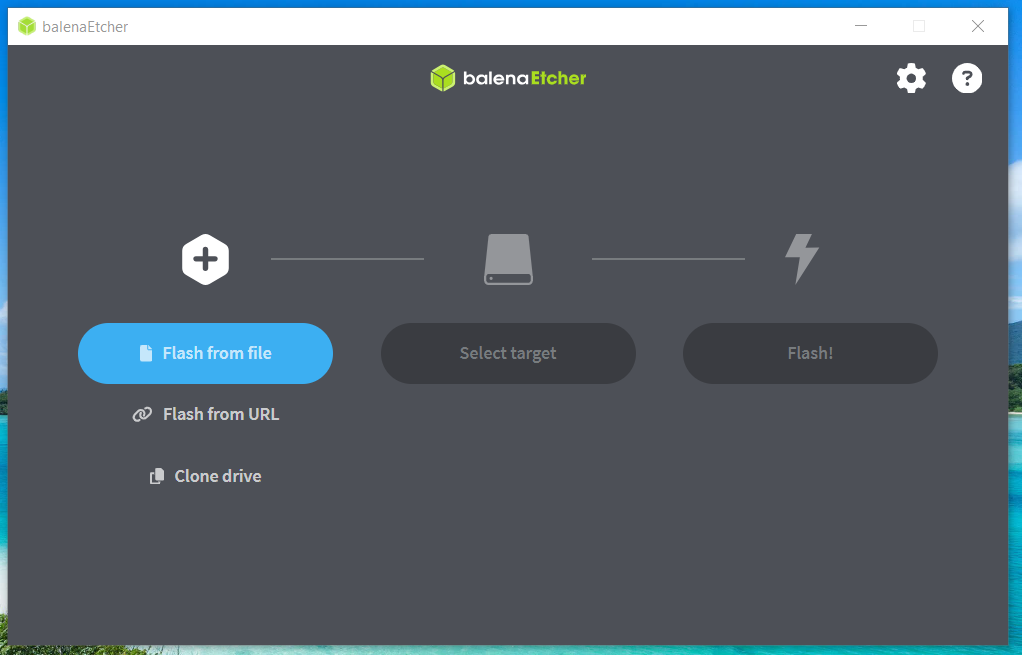
Select the iso file to use.

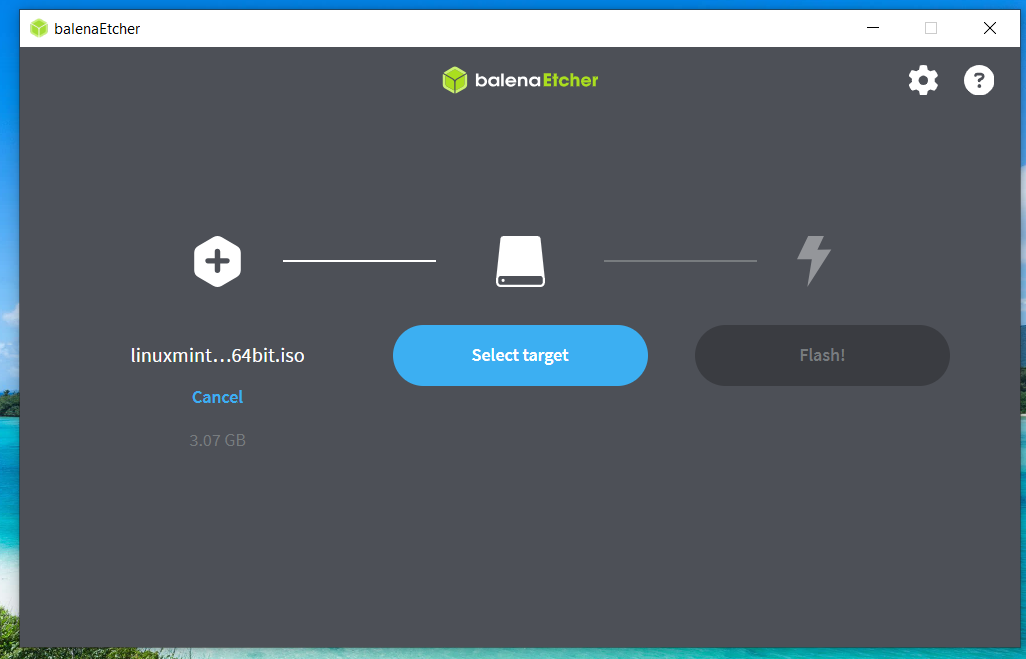
Select the USB stick to use.

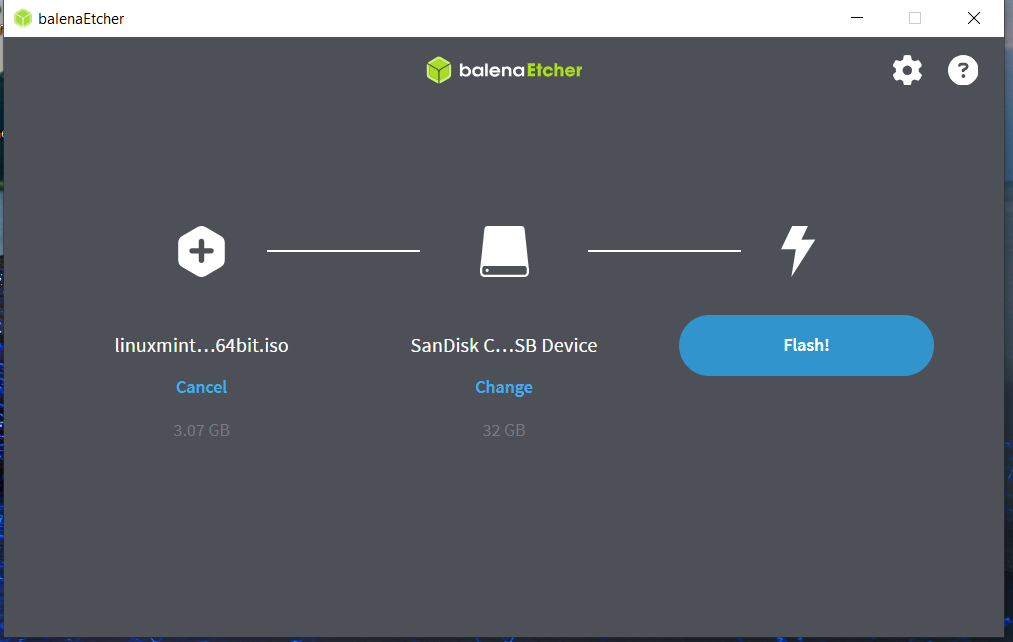
Click on Flash to create the usb media.

If you get error, reboot your laptop, and try again.

Ensure that the computer you are going to install Linux to, have in BOOT setup, that it will start from USB stick, before hard drive.

https://www.zdnet.com/article/how-to-install-linux-on-an-old-laptop/ 

https://itsfoss.com/install-linux-mint/ 


For old computers with 32 bit processor , you need to install the 32 version of linux.

https://www.linuxmint.com/edition.php?id=308 

https://www.debugpoint.com/32-bit-linux-distributions/


What does the name on Windows OS ISO file mean?

This post is not made to list every possible filename there is, only summarize what other have written about the subject. They iso code may vary slightly between products and editions.

We believe that J_CPRA_X64FRE is Windows 10 Pro 64 bit.

The coding does not seem to be formally or comprehensively documented, but you can assemble hints from various scattered observations around the web.

J_CPRA_X64F looks like a short form version designed to fit in the legacy 11 character disk label from the old FAT volume label limits. J is the Windows 10 release. CPRA is the Pro edition, where the “C” is for “client” (as opposed to “server”) “PR” is for “Professional” and “A” is the variant of the professional edition (most times there is only one). X64 is the CPU architecture. F is short for FRE is a final-released (checked) build as opposed to a CHK (checked) build, used for debugging. (source: https://forums.whirlpool.net.au/archive/2468594).

The typical full version of an ISO file name is longer, including the language and region, and sometimes the target medium. For example, JM1_CCSA_X64FRE_EN-US_DV9 was the Windows 10 Technical Preview install DVD (dual layer, 8.5GB aka DVD9) and JM1_CCSA_X64FRE_EN-US_DV5 is a Windows 10 install DVD (single layer, 4.7GB, aka DVD5). EN-US is US English. X64 is for the x86 64-bit version. JM1 is a pre-release of “Redstone” (Windows 10); CCSA is the “Windows Technical Preview Edition.”

Other Windows 10 edition examples include:

CENA (Client, ENterprise, “A”)
CEDA (Client, EDucational, “A”)

You can seem some historic product to volume label mapping at https://support.microsoft.com/en-us/help/889713/how-to-determine-the-channel-that-your-copy-of-windows-server-2003-was

and also

Original CD/DVD Volume Labels for Windows

Some of the Windows 7 media labels can be found at Get Windows 7 SP1-U Media Refresh MSDN/TechNet ISO (Download or Convert) « My Digital Life. and Official Windows 7 SP1 ISO from Digital River « My Digital Life.

Windows 7 releases started with the letter “G”.

Windows 8 releases started with the letter “H”. (Windows 8 Enterprise x86 Volume Licensing ISO Leaked « My Digital Life)

Windows 10 uses the letter “J”. I would presume that “I” was skipped to avoid confusion with “1”.

https://www.quora.com/How-do-I-determine-what-version-of-Windows-installation-is-on-my-USB-drive-like-J_CPRA_X64F 

The two Windows 7 ISO file names, can be explained like this:
——–
Image

  1. Language of the OS. Always two letters (with one exception). Example: en, en-gb, cs, da, no, sv.
  2. Minor version build of the OS.
  3. Compile date of the OS (not of the ISO). Indicates YYMMDD-HHMM.
  4. Platform architechture and target. x86 = 32bit 8086-based, x64 = 32bit 8086-based with 64bit AMD-64 extensions. fre = Free, for end user. chk = Checked, debug version. Examples: x86fre, x64chk.
  5. SKU version. Examples: enterprise, enterprisen, professional, starter.
  6. Full language tag of the OS. Must match (1). Examples: en-us, en-gb, sv-se.
  7. Volume license identifier. Optional.
  8. Upgrade identifier. Optional.
  9. Original equipment manufacturer identifier. Optional.
  10. Matches (5).
  11. Volume label of the mounted ISO volume. Contains various codes to identify language, SKU, volume/OEM and media.

——–
Image

  1. Language of the OS. Always two letters (with one exception). Example: en, en-gb, cs, da, no, sv.
  2. Product name. Examples: windows_7, windows_8, windows_server_2012.
  3. SKU version. Examples: enterprise, enterprisen, professional, starter.
  4. Integrated service pack level. Optional.
  5. Platform architechture and target. x86 = 32bit 8086-based, x64 = 32bit 8086-based with 64bit AMD-64 extensions. chk = Checked, debug version. Examples: x86, x64chk.
  6. Storage media
  7. Update flag. The ISO was updated with some critical patch.
  8. Unique MSDN/Technet image number ID.

——–
Image

  1. Language of the OS. Always two letters. Example: en, cs, da, no, sv.
  2. ?
  3. Single or double layer DVD. DVD5 = 4.7GB
  4. Product name. Win = Windows.
  5. SKU version. Examples: Pro, Pro KN, Ent.
  6. 7 With. Means it’s an integrated installation with a service pack. Combined with (7) for full service pack level information. Optional.
  7. Integrated service pack level. Optional.
  8. Platform target. 32BIT = x86, 64BIT = x64.
  9. Language of the OS.
  10. Updated ISO. Base ISO with added KB update.
  11. Microsoft Licensing Fulfillment
  12. Microsoft Part Number as it appears on the physical installation media.

https://www.betaarchive.com/forum/viewtopic.php?t=26026 

More information:

https://itsfoss.com/watch-tv-channels-on-ubuntu-or-linux-mint/ 

Downloads

https://kodi.tv/ 

https://www.tecmint.com/linux-media-center-distros/ 

https://www.computerhope.com/history/processor.htm 

Have fun!

Product:
PowerBI Portal service

Problem:
How to import a csv file to dataflow from sharepoint area.

If you use sharepoint connection, you may get error like this;

an exception occurred: DataSource.Error: Microsoft.Mashup.Engine1.Library.Resources.HttpResource: Request failed:
OData Version: 3 and 4, Error: The remote server returned an error: (404) Not Found. (Not Found)
OData Version: 4, Error: The remote server returned an error: (404) Not Found. (Not Found)

Solution:

There exist different solutions to this issue, they way that work for you can depend on how your company have set up the security.

Go to your power bi portal https://app.powerbi.com/home?experience=power-bi

Open up your workspace area where you have administrator rights.

Click NEW DATAFLOW

Click Add new tables

Select csv file, not SharePoint file.

From you SharePoint folder, where you have stored your file, copy the link.

Then edit the link in notepad, so you remove /:x:/r/ between  .sharepoint.com/  and  /teams, also remove all garbage after ?.

Then you get a “clean” url path that will work. Like this (replace with your company info):

https://company.sharepoint.com/teams/powerbiworkspacename/foldername/General/enkel.csv

Paste the adjusted url to link to file field.

You may need to select data gateway to be “none”.

Enter “Organizational account” at authentication kind, if your SharePoint are part of you company, you will be prompted with your company azure login. If you are not already logged in to azure in your web browser.

If all works, you get a preview of the file.  Change the file origin to ensure that the special characters are handled correctly in the file. UNICODE-7 (utf-7) will support Swedish characters.

Click on transform data.

You will now have a similar look to power-bi desktop transform, where you can change the data before it is loaded into the cache.

The code is similar to below:

Csv.Document(Web.Contents(“https://company.sharepoint.com/teams/powerbiworkspacename/foldername/General/enkel.csv”), [Delimiter = “,”, Columns = 2, Encoding = 65001, QuoteStyle = QuoteStyle.None])

More Information:

https://www.linkedin.com/pulse/analytics-tips-connecting-data-from-sharepoint-folder-diane-zhu

https://learn.microsoft.com/en-us/power-query/connectors/sharepoint-folder 

https://learn.microsoft.com/en-us/power-bi/transform-model/dataflows/dataflows-create 

https://www.phdata.io/blog/how-and-when-to-use-dataflows-in-power-bi/ 

Dataflow Gen2 (fabric) is indeed an enhancement over the original Dataflow. One of the key improvements is the ability to separate your Extract, Transform, Load (ETL) logic from the destination storage, providing more flexibility. Gen2 also comes with a more streamlined authoring experience and improved performance.

For a more detailed comparison, you can refer to this link:

Differences between Dataflow Gen1 and Dataflow Gen2 – Microsoft Fabric | Microsoft Learn

Datamart primarily utilizes data streaming technology to import data into Azure SQL Server. Datamart then automatically generates and links datasets. You can then actually create data streams that connect to the Datamart, which can be used for DirectQuery or import if the Advanced Compute Engine is enabled.

For a more detailed comparison, you can refer to this link:

Introduction to datamarts – Power BI | Microsoft Learn

Product:
Cognos Controller 11.0.1200
Windows Server 2022

Issue:

When press the excel icon in Cognos Controller, excel starts but there is no controller toolbar inside.

Solution:

Check that you have two lines for cognos controller in options-add in.

if not, ensure that one is not disabled.

1. Launch Excel

2. Click “File – Options”

3. Click “Add-ins”:

4. Change “Manage” to “Disabled Items” and click ‘Go’:

5. Highlight the Controller add-in (“cognos controller link for Microsoft excel (adxloader.Controller.ExcelLink.dll)”), and click “Enable“:

6. Test.

If that not helps, try to add the add-in manually.

More information:

https://www.ibm.com/support/pages/missing-menu-item-controller-excel-excel-add-not-visible-active-caused-com-add-inside-disabled-items 


Product:
Planning Analytics Workspace 95
Microsoft Windows 2019 server

Issue:

In PAW administration page, for the agents, the version number is not showing the PAA agent version installed.

Version 2.0.93.1280

When you have installed PAA_Agent version 95. By command similar to this:

UpdatePAAAgent.bat “D:\Program Files\ibm\cognos\tm1_64”

Solution:

This value is from the file D:\Program Files\ibm\cognos\tm1_64\paa_agent\paaAgentCache\serversInfo.json

Test to erase the folder D:\Program Files\ibm\cognos\tm1_64\paa_agent\paaAgentCache in your lab environment, before you install the paa-agent, to see if that solves the issue. In most cases this does not work, and you have to reinstall PAL.

Our guess is that the different version of PAA Agent use different scripts/folders and therefor this file is not correct updated.


More Information:

https://www.ibm.com/docs/en/planning-analytics/2.1.0?topic=components-planning-analytics-administration-agent-local-only 


Product:
Microsoft Azure

Issue:
You get a mail about that some of your subscriptions parts are expire in a few days like “Your Storage File Data Privileged Contributor role in the prod subscription will expire in 1 day(s)”

Solution:

Depending how your Azure accounts are setup and handled by your organisation, but it should be similar to this:

(you need to be owner of the subscription, to be able to extend the role for your self)

Go to azure  Home – Microsoft Azure

Search for PIM.  Click on Privileged Identity Management

Expand tasks and click on my roles.

Go to Azure Resources, and for the subscriptions you need to extend, go to owner line and activate you as owner.

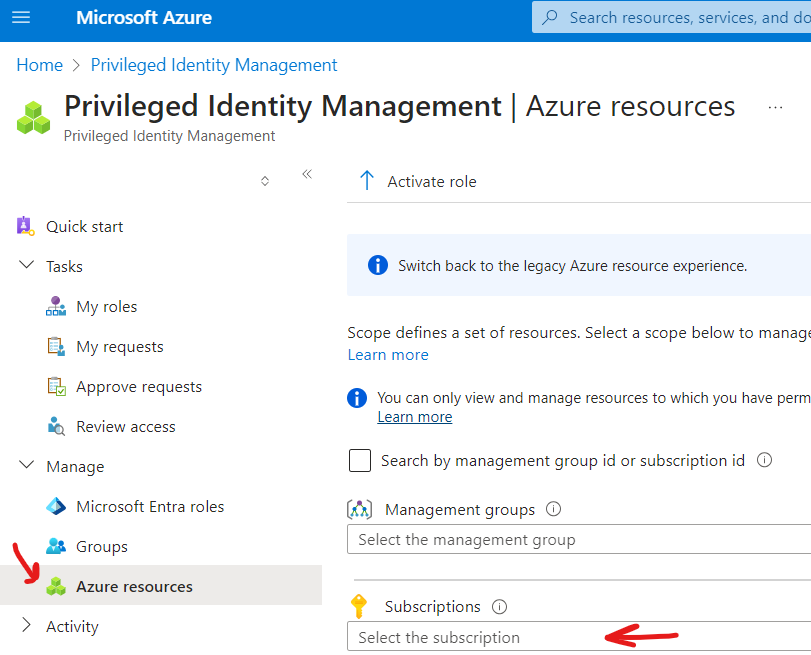
click on activate. After someone have approved, go to next step.

Click on Privileged Identity Management, to get back to the start page of PIM.

Click now on Azure resources under Manage, and from the new page drop down select the subscription you want to handled.

Click on Manage button, after you have selected a subscription.

Click on Assignments under Manage. Then browse the lines to the right, to find what roles you can extend. Click on extend link.

Set a date, at least a year in the future. Press save.  Repeat for all roles you need to extend.

If you do not find your role, check under the Expired assignments tab – to see if it is there, and you can extend it there.

Repeat for all subscriptions you have in Azure.


More Information:

Renew Azure resource role assignments in PIM – Microsoft Entra ID Governance | Microsoft Learn

Extend or renew PIM for groups assignments – Microsoft Entra ID Governance | Microsoft Learn

What is Privileged Identity Management? – Microsoft Entra ID Governance | Microsoft Learn