Product:
Planning Analytics Workspace
Microsoft Windows 2016 server

Problem:
PAW take long time to start when anti-virus software is running.
https://success.docker.com/article/endpoint-security-for-windows-containers

Suggested solution:
Depending on your anti virus program, the settings are different.

Please try this:
exclude this folders and sub-folders from scanning
c:\programdata\docker
c:\Program Files\ibm\cognos\tm1_64
c:\Program Files\ibm\cognos\analytics\temp\
c:\ProgramData\Microsoft\Windows\HNS
d:\ibm\paw
d:\docker
d:\tm1applications folder ( can be d:\tm1server\app1\data )

Folders name depend on the installation made of docker and PAW on your server.

For McAfee you can setup the exclude like this:
On-Access Default Processes Policies
**\Docker\*
**\ProgramData\Microsoft\Windows\HNS\*
**\Install\ipa_workspace_local_win*\*

Exclude also all “active scanning” and instead run a scan on the disk once a week, when you have stopped the PAW and Docker. Turn off Windows Defender Real-Time Protection.

Exclude scan of the processes used by docker and cognos, like java.exe.


Upgrade your anti virus software to latest version and see if that helps.

More information:
https://docs.docker.com/engine/security/antivirus/
https://ashleypoole.co.uk/2017/common-issue-pulling-windows-docker-images/
https://docs.microsoft.com/en-us/windows-hardware/drivers/ifs/anti-virus-optimization-for-windows-containers
Redundant scanning problem

There will likely be many containers depending on the same package layers. The same data stream of a given package file will provide the data for placeholders on multiple container system volumes. As a result, there is potential for redundant AV scans of the same data in every container. This has an unnecessary negative impact on the performance of containers. This is a signification cost given that containers are expected to start quickly and may be short-lived.

https://www.windowscentral.com/how-exclude-files-and-folders-windows-defender-antivirus-scans
https://github.com/moby/moby/issues/38582

https://docs.microsoft.com/en-us/windows-hardware/drivers/ifs/anti-virus-optimization-for-windows-containers

https://success.docker.com/article/endpoint-security-for-windows-containers

https://support.symantec.com/us/en/article.tech183201.html

https://support.symantec.com/us/en/article.tech246815.html

https://kc.mcafee.com/corporate/index?page=content&id=KB90041

https://www.ibm.com/support/pages/which-cognos-files-need-be-excluded-virus-scan

Product:
Planning Analytics 2.0.8
Microsoft Windows server 2016

Problem:
Open a tm1web view in the new PA version give error, it worked in the old TM1 server.

Error message:
Limits exceeded
The action has been terminated because it exceeds the configured maximum memory limit.

Solution:

Open tm1web_config.xml file in Notepad++. It is in folder C:\Program Files\IBM\cognos\tm1_64\webapps\tm1web\WEB-INF\configuration\

Having WorkbookMaxCellCount blank or setting it to less than 0 indicates that an unlimited cell count for workbooks is allowed.
Before IBM Planning Analytics version 2.0.7, the default value is -1, which indicates an unlimited number of cells are allowed in a workbook.
After IBM Planning Analytics version 2.0.7, the default value is 500000.
Setting this parameter to 0 indicates that workbooks cannot have any cells.
You must set it to above 0.

You must do a restart of the application server for the change to take affect.

If WorkbookMaxCellCount parameter is in tm1web_config.xml and it is not the default, when the user opens a workbook, the server validates its cell count against WorkbookMaxCellCount. If the cell count of the workbook exceeds WorkbookMaxCellCount, an error message is logged and the workbook is not opened.

Can also be other values that affect how tm1 show cells.

More information:
https://www.ibm.com/support/pages/tm1-error-maximum-memory-action-exceeded-view-may-be-too-large
https://www.ibm.com/support/knowledgecenter/SSD29G_2.0.0/com.ibm.swg.ba.cognos.tm1_inst.2.0.0.doc/c_tm1web_cfg_params_v10r2.html

Product:
Cognos Controller 10.3.1
Microsoft Windows 2012 server

Problem:
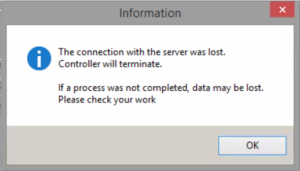
Several controller users are thrown out of the cognos controller client at reporting week.

Error message:

Solution:
Check the firewall between the servers, controller servers and citrix servers.
Is there any new rules that have been implemented?

Does other application that also use citrix servers have issues with connection losses?

Turn off aggressive Aging in your firewall.


Also check if the Windows SQL server demand TLS 1.2, and you need to update the Windows registry to not use TLS 1.2 communication on the cognos servers. Set this values on cognos server:

[HKEY_LOCAL_MACHINE\SYSTEM\CurrentControlSet\Control\SecurityProviders\SCHANNEL\Protocols\TLS 1.0\Client]

“DisabledByDefault”=dword:00000000

“Enabled”=dword:00000001


[HKEY_LOCAL_MACHINE\SYSTEM\CurrentControlSet\Control\SecurityProviders\SCHANNEL\Protocols\TLS 1.1\Client]

“DisabledByDefault”=dword:00000000

“Enabled”=dword:00000001


[HKEY_LOCAL_MACHINE\SYSTEM\CurrentControlSet\Control\SecurityProviders\SCHANNEL\Protocols\TLS 1.2\Client]

“DisabledByDefault”=dword:00000000

“Enabled”=dword:00000000

If it does not help, then also try to change the DoS attacks settings in Windows;

https://community.broadcom.com/symantecenterprise/communities/community-home/librarydocuments/viewdocument?DocumentKey=6859390e-7047-41d2-930e-a1ecd87ba3bb&CommunityKey=1ecf5f55-9545-44d6-b0f4-4e4a7f5f5e68&tab=librarydocuments

A change in TCP/IP service are going to enable DoS protection.

  1. Run regedit.exe
  2. Navigate to the HKEY_LOCAL_MACHINE\SYSTEM\CurrentControlSet\Services\Tcpip\Parameters registry subkey.
  3. From the Edit menu, select New, DWORD Value.
  4. Enter the name TcpMaxHalfOpen, then press Enter.
  5. Double-click the new value, set it to 100, then click OK.
  6. Enter the name TcpMaxHalfOpenRetried, then press Enter.
  7. Double-click the new value, set it to 80, then click OK.
  8. Enter the name SynAttackProtect, then press Enter.
  9. Double-click the new value, set it to 1, then click OK.
  10. Reboot the machine.

If above is set, try to remove it with SynAttackProtect value set to 0.

When SynAttackProtect value is 0, it offers no protection. Value 1 indicate to delay the response Notification untill three way handshake is complete by the received by the SYN packet. By default, this is not invoke untill it exceeds the TcpMaxHalfOpen and TcpMaxHalfOpenRetried values. The values TcpMaxHalfOpen and TcpMaxHalfOpenRetried could be changed, and I strongly recommend to test with different settings in your environment, then choose the best ones.

https://www.informit.com/articles/article.aspx?p=371702

More Information:
https://sc1.checkpoint.com/documents/R76/CP_R76_IPS_AdminGuide/12857.htm

Understanding Aggressive Aging

To increase gateway stability, aggressive Aging helps manage the capacity of the connection table and gateway memory consumption.

Aggressive Aging introduces a new set of short timeouts called aggressive timeouts. When a connection is idle for more than its aggressive timeout, it is marked as “eligible for deletion”. When the connections table or memory consumption reaches a user defined threshold, Aggressive Aging begins to delete “eligible for deletion” connections until memory consumption or connection capacity falls to the desired level.

Aggressive Aging lets the Security Gateway handle large amounts of unexpected traffic, for example during a Denial of Service attack.

If the defined threshold is exceeded, each incoming connection triggers the deletion of ten connections from the “Eligible for Deletion” list. An additional ten connections are deleted with every new connection until the memory consumption or the connections capacity falls below the enforcement limit. If there are no “Eligible for Deletion” connections, no connections are deleted but the list is checked for each subsequent connection that exceeds the threshold.

Timeout settings are a key factor in memory consumption configuration. When timeout values are low, connections are deleted faster from the table, enabling the firewall to handle more connections concurrently.

Best Practice: When memory consumption exceeds its threshold, work with shorter timeouts that can maintain the connectivity for the majority of the traffic.

In the Aggressive Aging Timeouts are enforced when section, select whether they will be enforced if the Connections table exceeds a limit, if Memory exceeds a limit, or if both exceed their limits.

If you select both, the values in the percentage fields of the other options are applied. Default is 80%, with connections from the “Eligible for Deletion” list being deleted if either the Connections table or Memory consumption passes this limit.

Note – The limits for the Connections table and Memory consumption are set for each profile. The Aggressive Aging timeouts are global. Therefore: different gateways may enforce the same timeouts at different thresholds.

Activate this protection in either Prevent or Detect mode.

Product:
Cognos TM1 10.2.2
Microsoft Windows 2008 server

Problem:
Can not connect to TM1 server from client TM1 Architect.
Error:  TM1 Perspectives cannot connect to TM1 Admin server

Solution:
Check that you have access to the TM1 admin server, by run telnet from the DOS prompt your client computer;

TELNET  servername  5498

if you get a black screen, and no error message, then you have a open connection.

Then check that you have the same version on you client as on the TM1 server.

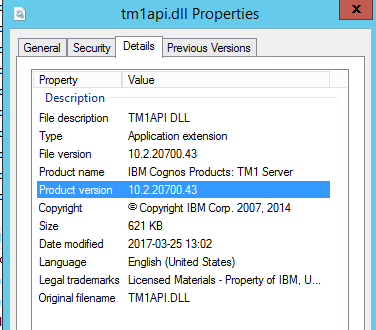
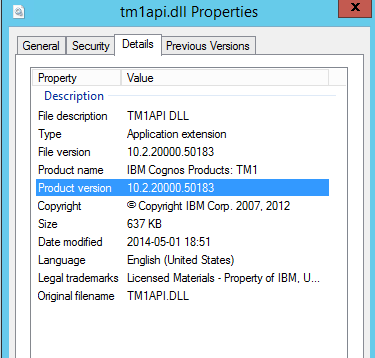
You can check the file tm1api.dll in folder C:\Program Files\ibm\cognos\tm1_64\bin

Above the 10.2.2 TM1 client in RTM version.

Above the TM1 10.2.2 fix pack 7 version.  Version number 10.2.20700

https://www.ibm.com/support/pages/how-determine-exact-version-tm1-installed

If you do not have correct version, uninstall the TM1 client from your computer.

Install the correct program and update, and try again.

Run tm1_64b_10.2.2_win_ml.tar.gz and then up_tm1client_win64_10.2.5270.109_ml.tar.gz to install the needed software.

More Information:

https://www.ibm.com/support/knowledgecenter/SSD29G_2.0.0/com.ibm.swg.ba.cognos.tm1_inst.2.0.0.doc/c_tm1_inst_defaultvaluesfortm1installation.html

https://www.ibm.com/support/pages/ibm-cognos-tm1-ssl-expiration-manual-fix-approach-landing-page

https://www.ibm.com/support/pages/node/553505

https://www.ibm.com/support/pages/e4-cannot-connect-admin-server-host-and-port-caused-expired-ssl-certificates

Product:
IBM Cognos Controller 10.3.1
Microsoft Windows 2008 R2 server
Microsoft Excel 2008

Problem:
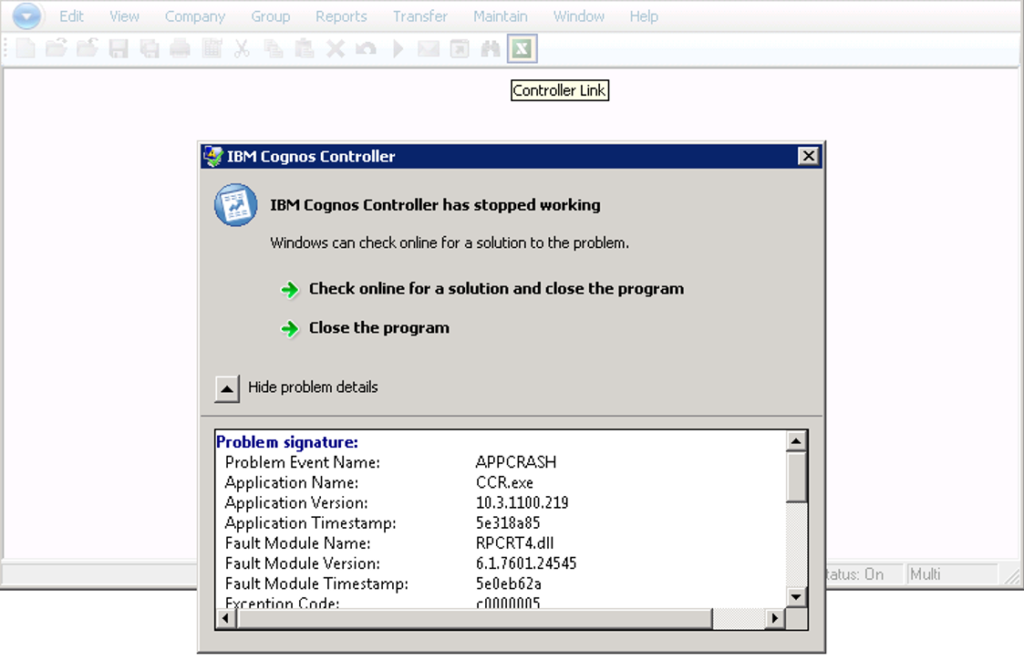
When inside Cognos Controller click on the icon to start excel, you get a error;
APPCRASH. CCR.exe

Error:

Solution:
Install a newer version of Excel.

Cognos Controller 10.3.1 only supports excel version 2010, 2013 and 2016.


https://www.ibm.com/support/pages/ibm-cognos-controller-1031-supported-software-environments


Product:
Cognos Analytics 11.1.5
Microsoft Windows 2016 server
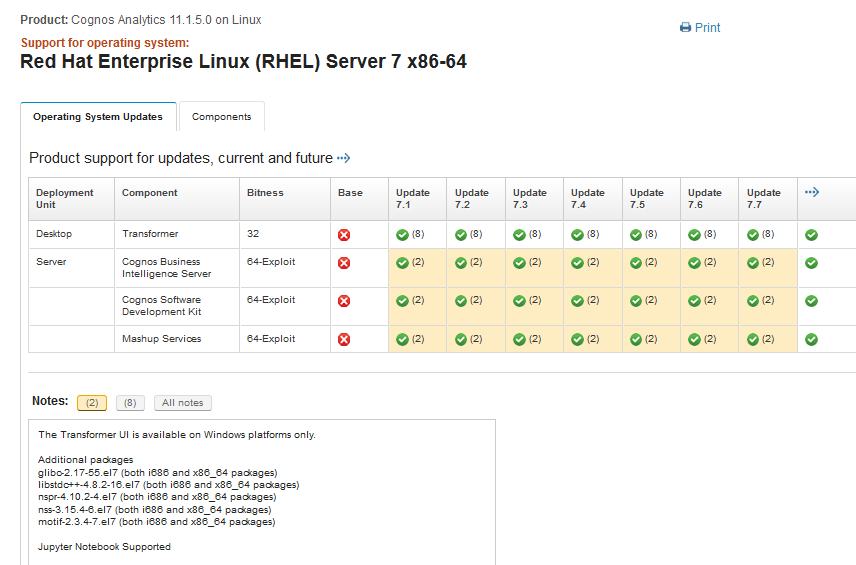
Linux red hat 7.7 or other flavor

Problem:
How install cognos jupyter notebook on linux?

Solution:
Download the file from IBM;
IBM Cognos Analytics for Jupyter Notebook 11.1.5 Linux x86-64 Multilingual CC4QEML
https://www.ibm.com/support/pages/downloading-ibm-cognos-analytics-11150

Install instructions:
https://www.ibm.com/support/knowledgecenter/SSEP7J_11.1.0/com.ibm.swg.ba.cognos.inst_cr_winux.doc/t_inst_jupyter.html
Check what linux version jupyter notebook is supported on.
Help for linux commands:
https://ss64.com/bash/

Login to your linux server with putty:
https://www.ssh.com/ssh/putty/windows

Change to root user
sudo su

Check free disk space on server with
df -h

Ensure you have 200 GB free for you IBM folder and 200 Gb free for you folder where you store the docker containers.

Install docker:
 sudo yum install -y docker
sudo systemctl enable docker.service
sudo systemctl start docker.service

Create the docker user:
groupadd docker
useradd -G docker dockeruser

Create the folders we need:
mkdir -p /ibm/jupyter
mkdir -p /ibm/install

Copy the media with WINSCP to linux box folder /ibm/install
https://www.doteasy.com/web-hosting-getting-started/uploading-your-web-files-using-winscp-windows

Create a text file in Notepad++ with below content:


#
# Replay feature output
# ———————
# This file was built by the Replay feature of InstallAnywhere.
# It contains variables that were set by Panels, Consoles or Custom Code.

#false
#—–
BISRVR_CA_INSTALL=0

#true
#—-
BISRVR_CA_TOOLS_INSTALL=1

#false
#—–
CA_FM=0
CA_LCM=0
CA_DCUBEMODEL=0
CA_DQA=0

#true
#—-
CA_JUPYTER=1

USER_INSTALL_DIR=/ibm/jupyter


Save the file as responsefile.properties in folder /ibm/install

Change the rights on the file, so dockeruser can access it
chown dockeruser:docker responsefile.properties

Run the unattended install:
Make dockeruser able to run docker commands
 chmod 666 /var/run/docker.sock

Change to dockeruser
sudo su dockeruser

Go to the /ibm/install folder
 cd /íbm/install

Enter this command
 ./ca_instl_lnxi38664_2.0.191205.bin -DREPO=/ibm/install/ca_jupyter_lnxi38664_11.1.5.zip -f responsefile.properties -i silent

Check the log file for errors – in folder /ibm/jupyter/uninstall/logs

Install jupyter:

Go to folder /ibm/jupyter/dist/scripts/unix

Enter ./install.sh to run the installation

When finish, test the notebook, from IE browse to it at http://linuxservername:8000

If above show, then you are a success, go then to Cognos Analytics.


If you get a error during install like;

Error step 3/12 : Copy –chown=ca_user:users pip.conf $HOME/.config/pip/ .
Unknown flag: chown

Above error is solved by replace the file “Dockerfile_server_instance” with this content:


# IBM Cognos Products: Notebook

FROM ca_jupyter_server_instance_original:installed

USER ca_user

WORKDIR $HOME

# copy additional_packages & install if not empty

# COPY –chown=ca_user:users pip.conf $HOME/.config/pip/.

# COPY –chown=ca_user:users additional_packages.txt .

# Change below

COPY additional_packages.txt  .

USER root

RUN chown ca_user:users additional_packages.txt

USER ca_user

WORKDIR $HOME

COPY pip.conf $HOME/.config/pip/.

USER root

RUN chown -R ca_user:users $HOME

USER ca_user

WORKDIR $HOME

# Stop change

RUN if [ -s additional_packages.txt ]; then \

pip install –user -r additional_packages.txt; \

fi \

&& rm additional_packages.txt

# install certificates for trusted external servers as root

USER root

WORKDIR /tmp

COPY build-tmp certificates

RUN if [ `ls -1 /tmp/certificates/*.crt 2>/dev/null | wc -l` -ne 0 ]; then \

cp /tmp/certificates/*.crt /usr/local/share/ca-certificates/; \

chmod 754 /usr/local/share/ca-certificates/*.crt; \

update-ca-certificates; \

fi \

&& rm -rf certificates

# switch to notebook user

USER ca_user

WORKDIR $HOME


Save the file as Dockerfile_server_instance2
Copy the file over to  /ibm/install/ folder on the linux server
Rename the Dockerfile_server_instance to Dockerfile_server_instance_org
Rename the Dockerfile_server_instance2 to Dockerfile_server_instance

Change access to the file
chmod 755  Dockerfile_server_instance

Run the install again from the unix folder
./install.sh


https://pypi.org/project/pixiedust/#files

If you get a error like Could not fetch URL https://pypi.org/simple/pixiedust/: There was a problem confirming the ssl certificate HTTPSConnectionPool (host=’pypi.org’, port=443): Max retries exceeded with url: /simple/pixiedust….

Then the Linux box have not access to internet, and can not download the software. Solve by temporary allow the Linux box Internet access during installation.

You can also try to do this steps:

Open IE on your laptop and paste this line, to download the tar file.

https://files.pythonhosted.org/packages/16/ba/7488f06b48238205562f9d63aaae2303c060c5dfd63b1ddd3bd9d4656eb1/pixiedust-1.1.18.tar.gz

Copy the pixiedust-1.1.18.tar.gz file over to /ibm/install folder on linux server with WINSCP program.

Change the user access
chown dockeruser:dockeruser pixiedust-1.1.18.tar.gz

Extract the file with command
  tar -xvf pixiedust-1.1.18.tar.gz

Change the owner of all files in folder with command
chown dockeruser:docker pixiedust-1.1.18

Go to folder /ibm//jupyter/dist/scripts

Edit the file additional_packages.txt

nano additional_packages.txt

Comment out all the lines and then add the following line:

–no-index –find-links=/ibm/install/pixiedust-1.1.18  pixiedust

Save the file and exit nano program

Go to the folder unix and run the install again;

cd /ibm/jupyter/dist/scripts/unix

 ./install.sh

Change on IIS server:

https://www.ibm.com/support/knowledgecenter/SSEP7J_11.1.0/com.ibm.swg.ba.cognos.inst_cr_winux.doc/t_gateway_iis.html

  • If you want to integrate Cognos Analytics for Jupyter Notebook Server, you must add a rule to map WebSocket requests from IBM Cognos Analytics notebooks to the back end Jupyter Notebook Server.

For more information, see Installing IBM Cognos Analytics for Jupyter Notebook Server.
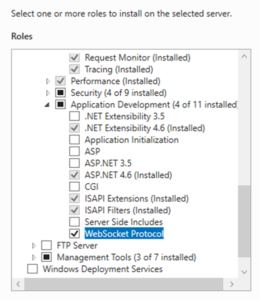
Important You must also install WebSocket Protocol support in IIS. For more information, see WebSocket <webSocket> (https://docs.microsoft.com/en-us/iis/configuration/system.webserver/web socket).

  1. Select the ibmcognos alias. Click on URL rewrite icon.
  2. Click Add Rules > Inbound Rules > Blank Rule .
    • If proxies are not already enabled, you are prompted to enable. Click OK.
    • The server name and port are defined in the config.conf file when you configure Jupyter Notebook Server.
    • Select the newly created rule and click Edit.
    • Pattern is v1/jupyter/(user/[^/]*)/(api/kernels/[^/]+/channels)
    • Action type is Rewrite.
    • Rewrite URL (for SSL configurations) is https://jupyter_host_name:jupyter_host_port/bi/v1/jupyter/{R:1}/{R:2}

Note For non-SSL configurations use the following rewrite URL: http://jupyter_host_name:jupyter_host_port/bi/v1/jupyter/{R:1}/{R:2}

    • Check Append query string.
    • Check Stop processing of subsequent rules.
    • Click Apply and Back to Rules.
  • exit iis manager.

If above step is missed you get above error.

Enable jupyter notebook in CA11

Login to CA11 as administrator


Go to Manage
Click on configuration
Click on system
Click on environment
At Jupyter service location enter linux server name as

 http://linuxservername.domain.com:8000

Click Apply
Refresh the web page in the web browser (IE)
Click on new
Click on notebook

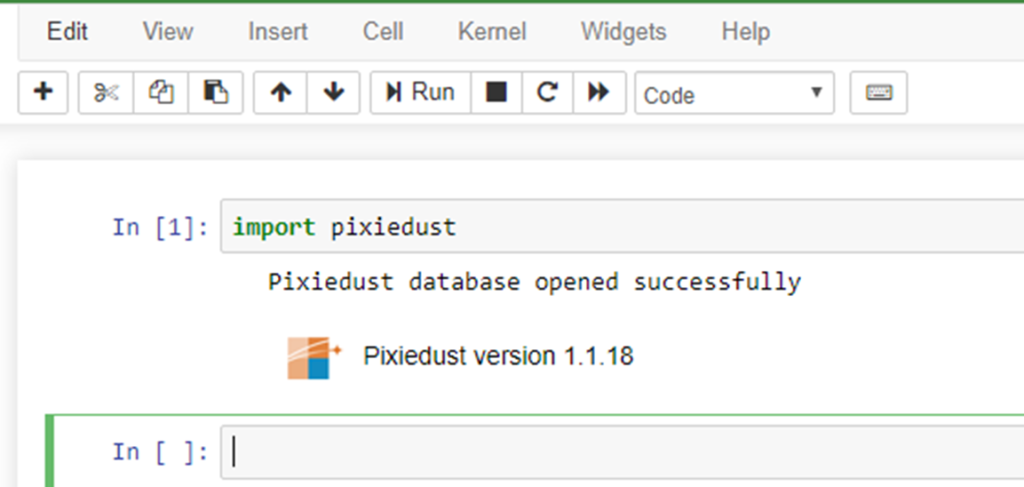
Enter import pixiedust to test
Import Samples to Cognos Analytics versions 11.1.5

  1. Copy the deployment archive, IBM_Cognos_Notebook_Samples.zip, for the notebook samples into the deployment folder: cognos_analytics_server_install_location\deployment.
  2. Go to Manage > Administration console and open IBM Cognos Administration.
  3. On the Configuration tab, click Content Administration.
  4. On the toolbar, click the New Import icon New import icon.
  5. Select IBM_Cognos_Notebook_Samples in the first step of the New Import wizard.
  6. At the Run with options screen, ensure that Do not Assign new IDs during import is selected. Click Run and complete process using default settings.
  7. After the import is complete, you can navigate to the notebook samples by clicking Team content > Samples > By feature > Notebooks.

https://www.ibm.com/support/knowledgecenter/SSEP7J_11.1.0/com.ibm.swg.ba.cognos.ig_smples.doc/c_jup_not_samples.html

https://www.ibm.com/support/pages/node/1125165 

The docker images are normally in folder /var/lib/docker/overlay2 folder

https://www.freecodecamp.org/news/where-are-docker-images-stored-docker-container-paths-explained/

More Information:

https://www.edx.org/course/fundamentals-of-red-hat-enterprise-linux

https://www.redhat.com/en/services/training/rh024-red-hat-linux-technical-overview

The folder dist/scripts/unix contains all the scripts that you need to run.

Script Purpose
build.sh Run this to rebuild the images, after you change config.
config.conf Edit this configuration file to change Jupyter parameters.
install.sh Run this to load and start the Docker containers.
prune.sh Run this to remove old Docker images.
start.sh Run this to start the Jupyter server.
stop.sh Run this to stop the Jupyter server.
uninstall.sh Run this to uninstall Jupyter server.

https://www.ibm.com/support/knowledgecenter/SSEP7J_11.1.0/com.ibm.swg.ba.cognos.inst_cr_winux.doc/t_inst_jupyter.html
Product:
Cognos Enterprise Planning 10.2.1
Microsoft Windows 2012 R2 Server

Problem:
When doing a large publish from inside Contributor Administration Console (CAC) to a SQL 2017 server an a different computer, you get a error at random times. It can work, but most of the time the publish fail.


The cognos planning publish process stop at different BCP jobs, and you can find the errors in the -out file. Best practice is to set the cognos planning services system path to a separate folder, then can you easy find the log files for cognos planning.

Error message:
Error Number: -2147220469
Line Number: 400
Description: Unable to execute Job Item
Execution failed after 1 attempt(s).
Unable to Bulk Load the data.
Error found in output.
SQLState = 08001, NativeError = 10054
Error = [Microsoft][ODBC Driver 17 for SQL Server]SSL Provider: An existing connection was forcibly closed by the remote host.
SQLState = 08001, NativeError = 10054
Error = [Microsoft][ODBC Driver 17 for SQL Server]Client unable to establish connection

Suggested Solution:
On both your SQL server and Cognos Planning server update the registry with this values, to turn off TLS 1.2 usage:

[HKEY_LOCAL_MACHINE\SYSTEM\CurrentControlSet\Control\SecurityProviders\SCHANNEL\Protocols\TLS 1.0]

[HKEY_LOCAL_MACHINE\SYSTEM\CurrentControlSet\Control\SecurityProviders\SCHANNEL\Protocols\TLS 1.0\Server]

“DisabledByDefault”=dword:00000000

“Enabled”=dword:00000001

[HKEY_LOCAL_MACHINE\SYSTEM\CurrentControlSet\Control\SecurityProviders\SCHANNEL\Protocols\TLS 1.0\Client]

“DisabledByDefault”=dword:00000000

“Enabled”=dword:00000001

[HKEY_LOCAL_MACHINE\SYSTEM\CurrentControlSet\Control\SecurityProviders\SCHANNEL\Protocols\TLS 1.1]

[HKEY_LOCAL_MACHINE\SYSTEM\CurrentControlSet\Control\SecurityProviders\SCHANNEL\Protocols\TLS 1.1\Server]

“DisabledByDefault”=dword:00000000

“Enabled”=dword:00000001

[HKEY_LOCAL_MACHINE\SYSTEM\CurrentControlSet\Control\SecurityProviders\SCHANNEL\Protocols\TLS 1.1\Client]

“DisabledByDefault”=dword:00000000

“Enabled”=dword:00000001

[HKEY_LOCAL_MACHINE\SYSTEM\CurrentControlSet\Control\SecurityProviders\SCHANNEL\Protocols\TLS 1.2]

[HKEY_LOCAL_MACHINE\SYSTEM\CurrentControlSet\Control\SecurityProviders\SCHANNEL\Protocols\TLS 1.2\Server]

“DisabledByDefault”=dword:00000000

“Enabled”=dword:00000000

[HKEY_LOCAL_MACHINE\SYSTEM\CurrentControlSet\Control\SecurityProviders\SCHANNEL\Protocols\TLS 1.2\Client]

“DisabledByDefault”=dword:00000000

“Enabled”=dword:00000000

TCP/IP Registry Values That Harden the TCP/IP Stack ( Windows 2003 Servers )

If that does not help then add this value on the SQL server in registry;

[HKEY_LOCAL_MACHINE\SYSTEM\CurrentControlSet\Services\Tcpip\Parameters]

“SycAttackProtect”=dword:00000000

This turn of DoS protection.
https://social.technet.microsoft.com/Forums/en-US/c55aa101-059d-491e-9fc2-73b5d8171eb8/protect-against-syn-attacks?forum=winservergen

You may need to reboot the servers to make the change take affect.

And if that does not help – install a later SQL driver on you cognos planning server, download from Microsoft and install.
https://www.microsoft.com/en-us/download/details.aspx?id=56567

https://docs.microsoft.com/en-us/sql/connect/odbc/download-odbc-driver-for-sql-server?view=sql-server-ver15

You can check the version of SQL driver you have, by going to the DOS prompt, and enter commando:
 bcp /v
to see version in use.

You may need to update the PATH on your windows server, to have the new driver folder first in path – so it is used by Cognos Planning.

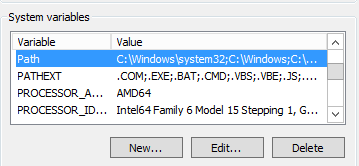
Go to control panel – system – advance system settings
Click on Advance tab – click on Environment Variables
In System variables select path and click Edit
Add the SQL driver path to beginning of the path like; %SystemRoot%\system32;%SystemRoot%;%SystemRoot%\System32\Wbem;%SYSTEMROOT%\System32\WindowsPowerShell\v1.0\;C:\Program Files\Microsoft SQL Server\Client SDK\ODBC\170\Tools\Binn\

More information:

https://support.microsoft.com/sv-se/help/3135244/tls-1-2-support-for-microsoft-sql-server

https://books.google.se/books?id=VaS1U0gmiKoC&pg=PT233&lpg=PT233&dq=Value+name:+SynAttackProtect&source=bl&ots=RG8Vw1G676&sig=ACfU3U3St9O7S3H3F16RuePtgtNUoJL_YA&hl=sv&sa=X&ved=2ahUKEwiDiafAuszoAhUwwqYKHf0GDqUQ6AEwAXoECAsQLA#v=onepage&q=Value%20name%3A%20SynAttackProtect&f=false

https://docs.microsoft.com/en-us/sql/relational-databases/errors-events/mssqlserver-17832-database-engine-error?view=sql-server-ver15

https://community.hostek.com/t/ssl-security-error-for-microsoft-sql-driver/348

Server Hardening