Product:
Cognos Analytics 11.0.13 fix pack 2
Microsoft Windows Server 2016

Problem:
Only a spinning circle when i surf to http://caservername.domain.com/ibmcognos/bi/v1/disp after we have applied a fix pack to CA11.

Solution:
Clear the Internet explorer cache.
Launch IE (not chrome)
Tools – Internet Options – under ‘General’ tab click on “Settings” under ‘Browsing History’
Select ‘Every Time I visit the webpage’
Click OK
Clear out the cache by click Delete button
Remove mark for “Preserv Favorites website data”
Click Delete
Click OK
Close IE and launch IE then try again.

More information:
https://www.ibm.com/support/pages/cognos-analytics-11013-fix-pack-2

Product:
Cognos Analytics 11.0.12
Microsoft Windows 2016 server

Problem:
When i run a cognos report with TM1 data, i get a error;
DPR-ERR-2079 Firewall Security Rejection. Your request was rejected by the security firewall.

Solution:
In this case, close the internet browser, and login to CA11 again. The session have timed out, so you where not logged in.

Other solutions could be;
That the TM1 server or the users domain is not listed in the CAF setup. Please add them.

Ensure that CAP is setup the same on all servers.
Steps:Repeat the following on all servers:
1. Open Cognos Configuration.
2. Expand to Security, Cognos Application Firewall: ‘Enable CAF validation’ and ensure the setting TRUE/FALSE is consistent across all configurations.

More Information:
https://www.ibm.com/communities/analytics/cognos-analytics-blog/cognos-analytics-and-planning-analytics-integration-walkthrough-part-1/

Product:
Planning Analytics 2.0.5
Cognos Analytics 11.0.13
Microsoft Windows 2016 server

Problem:
Inside the CA11 cognos connection you have a workspace widget that link to a TM1 Application web (contributor app) that is on a secure TM1WEB server (HTTPS), and your CA11 is not, it uses HTTP. Depending on the browser used, you can get the error “no permission to perform operation”.

This can be that you have no rights in the TM1 application, but can also be that the user credentials is not brought forward to the site.

Suggested solution:
In the case when you have the servers in different domains, this can be a solution;

When the TM1 Application Server is not accepting the request at all. You can add an additional header, so that pmpsvc accepts requests from certain domains. The header is described here:
https://developer.mozilla.org/en-US/docs/Web/HTTP/Headers/Referer

Login to tm1 server.
Open C:\Program Files\ibm\cognos\tm1_64\webapps\pmpsvc\WEB-INF\configuration\fpmsvc_config.xml in notepad++.
Find the line:

name=”X-Content-Type-Options” value=”nosniff”

Add the following after above line:

name=”Referer” value=”domain1.com;domain2.com”

Like this:

Restart TM1 Application Server

The setting will allow the pmpsvc URL to be called from any website within the domain1.com and domain2.com domain.

If a website is accessed from a HTTP Secure (HTTPS) connection and a link points to anywhere except another secure location, then the referrer field is not sent.

Product:
Cognos Analytics 11.0.12
Microsoft Windows 2016 server

Problem:
When you create a report and add a visualization you get a error.

Error message:

The web request failed.
404 – Not Found
URL: http://caservername.domain.com/ibmcognos/bi/common/palettes.json

Workaround in early versions of CA11
pallettes.json needs to be copied from /bi/common folder to the /common folder
https://www-01.ibm.com/support/docview.wss?uid=swg21992230

Solution:
Something is wrong in the IIS setup. Redo the setup from start. Below the steps copied from internet. You should not need to copy the file from /bi/common folder.

Clean the IIS setup:

https://www-01.ibm.com/support/docview.wss?uid=swg22011418

Here’s the guideline to follow before starting a fresh manual IIS installation or running the script

– Open IIS
– Click on Application Pools
– Select the Cognos 11 App Pool and stop it (mostly called ICAPool)
– Expand everything
– Select the ibmcognos -> sso application and remove it
– Select the ibmcognos application and remove it
– Click on Application Pools, select the Cognos app pool, and delete it
– Close IIS

Open your file explorer
– Navigate to the Cognos gateway install directory
– Delete the following web.config files:

  • cgi-bin\web.config
  • webcontent\web.config
  • webcontent\bi\web.config

Search your /ibmcognos folder and sub directories, to find more web.config files. Rename them to web.config.old.

Check also the C:\inetpub\wwwroot folder for web.config files. Most changes in IIS Manager is stored in web.config files.

Then setup the IIS manual:

https://www.ibm.com/support/knowledgecenter/en/SSEP7J_11.0.0/com.ibm.swg.ba.cognos.inst_cr_winux.doc/t_gateway_iis.html

The version we have here is from: 2019-02-14 = you should us the steps that are for your version of CA11.

   IIS Automated script is available here.

This topic describes the configuration for Microsoft Internet Information Services (IIS) to support IBM Cognos Analytics. When complete, IIS will be configured to serve static content (such as .js, .html, .css) directly from IIS while sending REST and other server requests to the back-end Cognos Analytics servers.

Procedure

  1. Install the IIS Application Request Routing extension.
    1. Install the Application Request Routing extension for IIS by going to the following URL: http://www.iis.net/downloads/microsoft/application-request-routing
    2. When presented with the Microsoft Web Page, click on the green “Install this extension” button.
      Follow instructions to download and run the ARR extension.
    3. To ensure that the ARR extension was installed successfully, launch the IIS Manager from the Windows Start\Administrative Tools\ menu. Once the IIS Manager launches, click on the server name at the top left-hand side of the screen to display the available features. Within the middle IIS pane, the URL Rewrite feature should now be visible; it is installed when ARR is installed.
  2. Create a new, dedicated application pool. For example, named CAPool.
    1. Right-click on Application Pools. Click Add Application Pool.
  3. Optionally, create a server farm to provide load-balancing and failover for Cognos Analytics service requests. Include all Cognos Analytics servers that have the Application server components installed and configured.
    1. Right-click on Server Farms in the left-hand tree and select Create Server Farm.
    2. Name the new server farm. For example, ca_servers.
    3. For each Cognos Analytics server, perform the following steps:
      • Enter the server address. For example, ca-host1.
      • Click Advanced settings, and expand applicationRequestRouting. Set the httpPort or httpsPort (if you’re using HTTPS). For example, 9300.
    4. Click Finish.
    5. Click No when prompted to allow IIS Manager to create a rewrite rule.
    6. Select your server farm in the left-hand tree and double-click Server Affinity.
    7. Select the Client Affinity check box.
    8. Click Apply.
    9. Select your server farm in the left-hand tree and double-click Caching.
    10. Change Query String Support to Include Query String.
    11. Click Apply.
    12. Select your server farm in the left-hand tree and double-click Health Test.
    13. In the URL Test section, enter the URL: http://ca_servers/bi/v1/ping
    14. Click Apply.
    15. Select your server farm in the left-hand tree and double-click Proxy.
    16. In the Time-out (seconds) field, change the value to 120.
    17. Click Apply.
  4. Right-click Default Web Site and then click Add Application.
    • Alias is ibmcognos.
    • Application pool is the one created in step 1.
    • Physical path is install_location\webcontent
    1. Enable Web Content expiry
      1. Select ibmcognos and double-click HTTP Response Headers.
      2. Click Set Common Headers.
      3. Check Expire Web Content and set an expiry that works best for you.
    2. Select ibmcognos and double-click Mime Types.

      Important Add the following mime types to your IIS configuration if they are not already present.

      • .svg : image/svg+xml
      • .woff : application/x-font-woff
      • .json : application/json
      • .woff2 : font/woff2
      • .template : text/html
      • .txt : text/plain
  5. If you are configuring single sign-on between IIS and Cognos, right-click ibmcognos and click Add Application.
    • Alias to sso.
    • Application pool is the one you created in step 1.
    • Physical path is install_location\cgi-bin
    1. Select sso and double-click Handler Mappings.
    2. Click Add Module Mapping in the right Actions pane.
      • Request path is cisapi.
      • Module is IsapiModule.
      • Executable is install_location\cgi-bin\cognosisapi.dll
      • Name is Cognos SSO.
      • Click Request Restrictions and ensure that Invoke Handler is unchecked.
      • Click OK twice.
      • On the Edit Script Map dialog, click Yes.
      • Select sso and double-click Modules. If the WebDAVModule appears in the list, remove it.
  6. Create URL-rewrite rules to map requests to the correct handlers.
    1. Click on bi directory under ibmcognos.
    2. Double-click URL Rewrite.
    3. Add a server variable to identify the Cognos Analytics location by clicking View Server Variables.
      • Click Add.
      • Name the variable HTTP_X_BI_PATH.
      • Click Back to Rules.
      • Click Add.
      • Name the variable HTTP_X_WEBCONTENTROOT
      • Click Back to Rules.
      • Click Add.
      • Name the variable HTTP_X_FORWARDED_HOST.
      • Click Back to Rules.
    4. Add a rule to pass the Cognos Analytics location to the ca-host machines by clicking Add Rules > Inbound Rules > Blank Rule.
      • Name is Headers.
      • Pattern is (.*)
      • Action type is none.
      • Expand Server variables and
        • Click Add. Select HTTP_X_BI_PATH and set the value to /ibmcognos/bi/v1.
        • Click Add. Select HTTP_X_FORWARDED_HOST and set the value to {HTTP_HOST}.
        • Click Add. Select HTTP_X_WEBCONTENTROOT and set the value to /ibmcognos.
      • Clear Stop processing of subsequent rules.
      • Click Apply and Back to Rules.
    5. If you configured the SSO application in a previous step, add rules to map login and legacy UI service requests to the SSO handler.
      1. Click Add Rules > Inbound Rules > Blank Rule.
        • Name is SSO Login.
        • Pattern is v1/login$
        • Action type is Rewrite.
        • Rewrite URL is /ibmcognos/sso/cisapi/bi/v1/login
        • Check Stop processing of subsequent rules.
        • Click Apply and Back to Rules.
      2. Click Add Rules > Inbound Rules > Blank Rule.
        • Name is Legacy SSO.
        • Pattern is (v1/disp(/.*)?)
        • Action type is Rewrite
        • Rewrite URL is /ibmcognos/sso/cisapi/bi/{R:1}
        • Check Stop processing of subsequent rules.
        • Click Apply and Back to Rules.
    6. Add a rule to map Cognos Analytics REST service requests to the backend Cognos Analytics servers.
      1. Click Add Rules > Inbound and Outbound Rules > Reverse Proxy .
        • If proxies are not already enabled, you are prompted to enable. Click OK.
        • Server name is ca-host:9300/bior if you have configured a server farm, http://ca_servers/bi

        Select the newly created rule and click Edit.

        • Pattern is (^$)|(^v1(/.*)?)|(^[^/]+\.jsp)
        • Action type is Rewrite.
        • Rewrite URL is http://ca-host:9300/bi/{R:0}or if you have configured a server farm, http://ca_servers/bi/{R:0}
        • Check Stop processing of subsequent rules.
        • Click Apply and Back to Rules.
      2. Click Add Rules > Inbound Rules > Blank Rule.
        • Name is Event Studio.
        • Pattern is ^(ags|cr1|prompting|ccl|common|skins|ps|cps4)/(.*)
        • Open the Conditions section.
        • Change the Logical Grouping to Match Any
        • Click Add.
          • Condition input is {HTTP_REFERER}
          • Check if input string is Matches the Pattern
          • Pattern is v1/disp
          • Check Ignore case.
        • Click Add
          • Condition input is {HTTP_REFERER}
          • Check if input string is Matches the Pattern
          • Pattern is (ags|cr1|prompting|ccl|common|skins|ps|cps4)/(.*)\.css
          • Check Ignore case.
        • Action type is Rewrite
        • Rewrite URL is /ibmcognos/{R:0}
        • Check Stop processing of subsequent rules.
        • Click Apply and Back to Rules.
      3. Click Add Rules > Inbound Rules > Blank Rule
        • Name is Report Viewer
        • Pattern is ^rv/(.*)
        • Action type is Rewrite
        • Rewrite URL is /ibmcognos/{R:0}
        • Check Stop processing of subsequent rules.
        • Click Apply and Back to Rules.
  7. Adjust request size limits.
    1. Select the bi directory under the ibmcognos application created earlier.
    2. Double-click Request Filtering.
    3. Click Edit Feature Settings… from the right-hand panel.
      • Set Maximum URL length (bytes) to 8192.
      • Set Maximum query string (bytes) to 8192.
      • Click OK.
    4. Double-click Request Filtering.
    5. Select Headers tab and click Add Header.
    6. In Header Box, type the header field name as Referer.
    7. In the Size Limit box, type 8192.
    8. Click OK.
    9. Repeat process for a header field name entitled Cookie with the Size Limit of 4096.
    10. Click OK.
    11. Click the ibmcognos virtual directory.
    12. In the Home view, Management section, double-click Configuration Editor.
    13. In the Section drop-down list, expand system.web, and select httpRuntime.
    14. Set the property maxQueryStringLength to 8192.
    15. Apply the configuration change.
  8. Configure IIS to allow to pass through the custom 441 errors that are used for recoverable exceptions from CAM. Otherwise, IIS can block these errors, and the customer sees the “Invalid Logon Response” error when trying to log on.
    1. Click the ibmcognos virtual directory.
    2. In the Home view, Management section, double-click Configuration Editor.
    3. In the Section drop-down list, expand system.webServer, and select httpErrors.
    4. Set the existingResponse property to PassThrough.
    5. Apply the configuration change.
  9. If you configured the SSO application in previous steps, enable Windows Authentication.
    1. Select the SSO application. For Microsoft Edge browser, select the ibmcognos application.
    2. Double-click Authentication. Disable Anonymous Authentication, and enable Windows Authentication.
    Cognos Analytics should now be available at: http://iis-host/ibmcognos.

NOTE: that above is tested for CA 11.0.13, and can behave different for other versions of CA11. Contact Cognos Support to get the correct instructions on how to setup CA Gateway in IIS.

Product:
Cognos Analytics 11.0.12
Microsoft Windows 2016 Server

Problem:
When you surf direct to the CA11 gateway server IIS, you get a error, but if you add /ibmcognos/bi it works fine.

Error Message in web browser (IE):
Service Unavailable
HTTP Error 503. The service is unavailable.

Solution:
Inside the IIS manager, the DefaultAppPool is stopped. Start it from Internet Information Services (IIS) Manager.
expand Application Pools
select the DefaultAppPool and click Start on the Right side.

The ICAPool is often setup for the /ibmcognos/ application, and that is therefor it works to surf direct to http://servername.domain.com/ibmcognos

A restart of IIS with the command iisreset, does not start the Applications pools that are stopped.

A redirect on the Default Web Site will not work, if the Application pool is not started, but you can set that up to make users who only enter the server name to be sent to the CA11 solution.  Best is to use a DNS alias for the server if it exist.

You can also enter HTTPS, if you have setup the IIS to use HTTPS, so users who surf to IIS server direct are rerouted to HTTPS as above.

How setup SSL

https://docs.microsoft.com/en-us/iis/manage/configuring-security/how-to-set-up-ssl-on-iis

https://support.microsoft.com/en-us/help/324069/how-to-set-up-an-https-service-in-iis

https://www.ibm.com/support/knowledgecenter/en/SSEP7J_11.0.0/com.ibm.swg.ba.cognos.inst_cr_winux.doc/c_configureawebserver_single.html

Product:
Cognos Analytics 11.0.12
Microsoft Windows 2016 server

Problem:
After apply stronger TLS security demand with the tool IIS Crypto, to apply to VISA and MASTERCARD data regulation ( PCI DSS ), on a IIS server for Cognos, users of Firefox or Chrome can not surf to it with HTTPS. IE is still working fine.

Error message:
NS_ERROR_NET_INADEQUATE_SECURITY or ERR_SPDY_INADEQUATE_TRANSPORT_SECURITY

Background:
https://www.nartac.com/Products/IISCrypto
The IIS Crypto 2 tool is run on the server to apply the settings, using a template file.  Here is a example how you can do it https://gist.github.com/JimWolff/fc35d863db8971b2a73c96f90c5002e4

Part of the template file is this cipher settings listed as below:
<cipherSuites>
<cipherSuiteItem name=”TLS_ECDHE_RSA_WITH_AES_256_CBC_SHA384_P521″ state=”Enabled” />
<cipherSuiteItem name=”TLS_ECDHE_RSA_WITH_AES_256_CBC_SHA384_P384″ state=”Enabled” />
<cipherSuiteItem name=”TLS_ECDHE_RSA_WITH_AES_256_CBC_SHA384_P256″ state=”Enabled” />
<cipherSuiteItem name=”TLS_ECDHE_RSA_WITH_AES_128_CBC_SHA256_P521″ state=”Enabled” />
<cipherSuiteItem name=”TLS_ECDHE_RSA_WITH_AES_128_CBC_SHA256_P384″ state=”Enabled” />
<cipherSuiteItem name=”TLS_ECDHE_RSA_WITH_AES_128_CBC_SHA256_P256″ state=”Enabled” />
<cipherSuiteItem name=”TLS_ECDHE_RSA_WITH_AES_256_CBC_SHA_P521″ state=”Enabled” />
<cipherSuiteItem name=”TLS_ECDHE_RSA_WITH_AES_256_CBC_SHA_P384″ state=”Enabled” />
<cipherSuiteItem name=”TLS_ECDHE_RSA_WITH_AES_256_CBC_SHA_P256″ state=”Enabled” />
<cipherSuiteItem name=”TLS_ECDHE_RSA_WITH_AES_128_CBC_SHA_P521″ state=”Enabled” />
<cipherSuiteItem name=”TLS_ECDHE_RSA_WITH_AES_128_CBC_SHA_P384″ state=”Enabled” />
<cipherSuiteItem name=”TLS_ECDHE_RSA_WITH_AES_128_CBC_SHA_P256″ state=”Enabled” />
<cipherSuiteItem name=”TLS_ECDHE_ECDSA_WITH_AES_256_GCM_SHA384_P521″ state=”Enabled” />
<cipherSuiteItem name=”TLS_ECDHE_ECDSA_WITH_AES_256_GCM_SHA384_P384″ state=”Enabled” />
<cipherSuiteItem name=”TLS_ECDHE_ECDSA_WITH_AES_128_GCM_SHA256_P521″ state=”Enabled” />
<cipherSuiteItem name=”TLS_ECDHE_ECDSA_WITH_AES_128_GCM_SHA256_P384″ state=”Enabled” />
<cipherSuiteItem name=”TLS_ECDHE_ECDSA_WITH_AES_128_GCM_SHA256_P256″ state=”Enabled” />
<cipherSuiteItem name=”TLS_ECDHE_ECDSA_WITH_AES_256_CBC_SHA384_P521″ state=”Enabled” />
<cipherSuiteItem name=”TLS_ECDHE_ECDSA_WITH_AES_256_CBC_SHA384_P384″ state=”Enabled” />
<cipherSuiteItem name=”TLS_ECDHE_ECDSA_WITH_AES_128_CBC_SHA256_P521″ state=”Enabled” />
<cipherSuiteItem name=”TLS_ECDHE_ECDSA_WITH_AES_128_CBC_SHA256_P384″ state=”Enabled” />
<cipherSuiteItem name=”TLS_ECDHE_ECDSA_WITH_AES_128_CBC_SHA256_P256″ state=”Enabled” />
<cipherSuiteItem name=”TLS_ECDHE_ECDSA_WITH_AES_256_CBC_SHA_P521″ state=”Enabled” />
<cipherSuiteItem name=”TLS_ECDHE_ECDSA_WITH_AES_256_CBC_SHA_P384″ state=”Enabled” />
<cipherSuiteItem name=”TLS_ECDHE_ECDSA_WITH_AES_256_CBC_SHA_P256″ state=”Enabled” />
<cipherSuiteItem name=”TLS_ECDHE_ECDSA_WITH_AES_128_CBC_SHA_P521″ state=”Enabled” />
<cipherSuiteItem name=”TLS_RSA_WITH_AES_256_GCM_SHA384″ state=”Disabled” />
<cipherSuiteItem name=”TLS_RSA_WITH_AES_128_GCM_SHA256″ state=”Disabled” />
<cipherSuiteItem name=”TLS_RSA_WITH_AES_256_CBC_SHA256″ state=”Disabled” />
<cipherSuiteItem name=”TLS_RSA_WITH_AES_128_CBC_SHA256″ state=”Disabled” />
<cipherSuiteItem name=”TLS_RSA_WITH_AES_256_CBC_SHA” state=”Disabled” />
<cipherSuiteItem name=”TLS_RSA_WITH_AES_128_CBC_SHA” state=”Disabled” />
<cipherSuiteItem name=”TLS_RSA_WITH_3DES_EDE_CBC_SHA” state=”Disabled” />
<cipherSuiteItem name=”TLS_DHE_RSA_WITH_AES_256_GCM_SHA384″ state=”Disabled” />
<cipherSuiteItem name=”TLS_DHE_RSA_WITH_AES_128_GCM_SHA256″ state=”Disabled” />
<cipherSuiteItem name=”TLS_DHE_DSS_WITH_AES_256_CBC_SHA256″ state=”Disabled” />
<cipherSuiteItem name=”TLS_DHE_DSS_WITH_AES_128_CBC_SHA256″ state=”Disabled” />
<cipherSuiteItem name=”TLS_DHE_DSS_WITH_AES_256_CBC_SHA” state=”Disabled” />
<cipherSuiteItem name=”TLS_DHE_DSS_WITH_AES_128_CBC_SHA” state=”Disabled” />
<cipherSuiteItem name=”TLS_DHE_DSS_WITH_3DES_EDE_CBC_SHA” state=”Disabled” />
<cipherSuiteItem name=”TLS_RSA_WITH_RC4_128_SHA” state=”Disabled” />
<cipherSuiteItem name=”TLS_RSA_WITH_RC4_128_MD5″ state=”Disabled” />
<cipherSuiteItem name=”TLS_RSA_WITH_NULL_SHA256″ state=”Disabled” />
<cipherSuiteItem name=”TLS_RSA_WITH_NULL_SHA” state=”Disabled” />
<cipherSuiteItem name=”SSL_CK_RC4_128_WITH_MD5″ state=”Disabled” />
<cipherSuiteItem name=”SSL_CK_DES_192_EDE3_CBC_WITH_MD5″ state=”Disabled” />
</cipherSuites>

Templates can be found here https://gist.github.com/JimWolff

Suggested Solution:
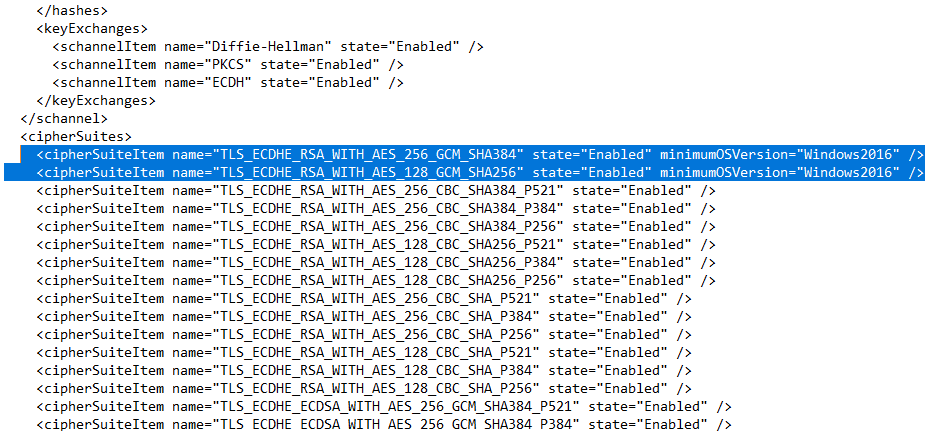
Add two cipher suites to the template file, and reboot the server to apply the new settings.

<cipherSuiteItem name=”TLS_ECDHE_RSA_WITH_AES_256_GCM_SHA384″ state=”Enabled” minimumOSVersion=”Windows2016″ />
<cipherSuiteItem name=”TLS_ECDHE_RSA_WITH_AES_128_GCM_SHA256″ state=”Enabled” minimumOSVersion=”Windows2016″ />

Should make the file to look like this

After this change, and you have applied it with the IIS Crypto 2 program, test if it works in Firefox or Chrome.

If you inspect the certificate in Firefox – you can see above information about the SSL in use.

Some of The changes are stored in the registry key [HKEY_LOCAL_MACHINE\SYSTEM\CurrentControlSet\Control\SecurityProviders\SCHANNEL]

More information:
https://social.technet.microsoft.com/Forums/windowsserver/en-US/5e17d836-39f7-4246-a382-b073d1130079/ssl-cipher-suite-order-best-practice?forum=winserversecurity
https://docs.microsoft.com/en-us/windows-server/security/tls/tls-schannel-ssp-changes-in-windows-10-and-windows-server
https://docs.microsoft.com/en-us/windows-server/security/tls/tls-registry-settings#ciphersuites
https://docs.microsoft.com/en-us/powershell/module/tls/?view=win10-ps

https://tls.mbed.org/supported-ssl-ciphersuites

A Cipher Best Practice: Configure IIS for SSL/TLS Protocol

https://support.microsoft.com/en-ph/help/3140245/update-to-enable-tls-1-1-and-tls-1-2-as-default-secure-protocols-in-wi

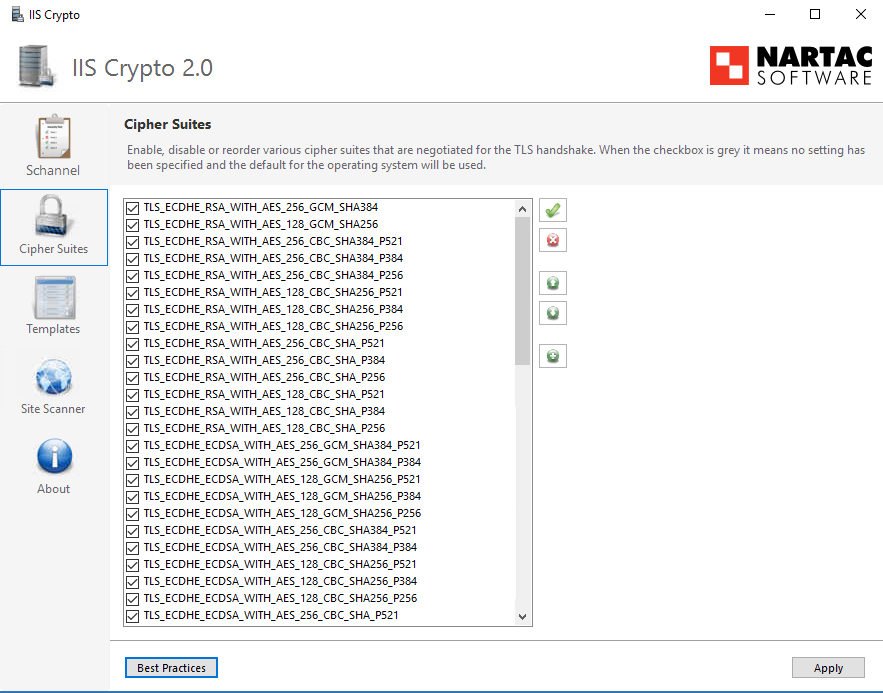
The Best Practices setup by the IIS Crypto 2 tool is:

<?xml version=”1.0″ encoding=”utf-16″?>
<iisCryptoTemplate xmlns:xsi=”http://www.w3.org/2001/XMLSchema-instance” xmlns:xsd=”http://www.w3.org/2001/XMLSchema” version=”0″>
<header>
<name>Best Practices</name>
<author>Nartac Software</author>
<lastUpdated>2019-01-21T13:47:28.1977801Z</lastUpdated>
<description>This template sets your server to use the best practices for TLS. It aims to be compatible with as many browsers as possible while disabling weak protocols and cipher suites.</description>
<builtIn>false</builtIn>
</header>
<schannel setClientProtocols=”true”>
<clientProtocols>
<schannelItem name=”Multi-Protocol Unified Hello” state=”Disabled” />
<schannelItem name=”PCT 1.0″ state=”Disabled” />
<schannelItem name=”SSL 2.0″ state=”Disabled” />
<schannelItem name=”SSL 3.0″ state=”Disabled” />
<schannelItem name=”TLS 1.0″ state=”Enabled” />
<schannelItem name=”TLS 1.1″ state=”Enabled” minimumOSVersion=”Windows2008R2″ />
<schannelItem name=”TLS 1.2″ state=”Enabled” minimumOSVersion=”Windows2008R2″ />
</clientProtocols>
<serverProtocols>
<schannelItem name=”Multi-Protocol Unified Hello” state=”Disabled” />
<schannelItem name=”PCT 1.0″ state=”Disabled” />
<schannelItem name=”SSL 2.0″ state=”Disabled” />
<schannelItem name=”SSL 3.0″ state=”Disabled” />
<schannelItem name=”TLS 1.0″ state=”Enabled” />
<schannelItem name=”TLS 1.1″ state=”Enabled” minimumOSVersion=”Windows2008R2″ />
<schannelItem name=”TLS 1.2″ state=”Enabled” minimumOSVersion=”Windows2008R2″ />
</serverProtocols>
<ciphers>
<schannelItem name=”NULL” state=”Disabled” />
<schannelItem name=”DES 56/56″ state=”Disabled” />
<schannelItem name=”RC2 40/128″ state=”Disabled” />
<schannelItem name=”RC2 56/128″ state=”Disabled” />
<schannelItem name=”RC2 128/128″ state=”Disabled” />
<schannelItem name=”RC4 40/128″ state=”Disabled” />
<schannelItem name=”RC4 56/128″ state=”Disabled” />
<schannelItem name=”RC4 64/128″ state=”Disabled” />
<schannelItem name=”RC4 128/128″ state=”Disabled” />
<schannelItem name=”Triple DES 168″ state=”Enabled” />
<schannelItem name=”AES 128/128″ state=”Enabled” />
<schannelItem name=”AES 256/256″ state=”Enabled” />
</ciphers>
<hashes>
<schannelItem name=”MD5″ state=”Enabled” />
<schannelItem name=”SHA” state=”Enabled” />
<schannelItem name=”SHA 256″ state=”Enabled” minimumOSVersion=”Windows2008R2″ />
<schannelItem name=”SHA 384″ state=”Enabled” minimumOSVersion=”Windows2008R2″ />
<schannelItem name=”SHA 512″ state=”Enabled” minimumOSVersion=”Windows2008R2″ />
</hashes>
<keyExchanges>
<schannelItem name=”Diffie-Hellman” state=”Enabled” />
<schannelItem name=”PKCS” state=”Enabled” />
<schannelItem name=”ECDH” state=”Enabled” />
</keyExchanges>
</schannel>
<cipherSuites>
<cipherSuiteItem name=”TLS_ECDHE_RSA_WITH_AES_256_GCM_SHA384″ state=”Enabled” minimumOSVersion=”Windows2016″ />
<cipherSuiteItem name=”TLS_ECDHE_RSA_WITH_AES_128_GCM_SHA256″ state=”Enabled” minimumOSVersion=”Windows2016″ />
<cipherSuiteItem name=”TLS_ECDHE_RSA_WITH_AES_256_CBC_SHA384″ state=”Enabled” minimumOSVersion=”Windows2016″ />
<cipherSuiteItem name=”TLS_ECDHE_RSA_WITH_AES_128_CBC_SHA256″ state=”Enabled” minimumOSVersion=”Windows2016″ />
<cipherSuiteItem name=”TLS_ECDHE_RSA_WITH_AES_256_CBC_SHA” state=”Enabled” minimumOSVersion=”Windows2016″ />
<cipherSuiteItem name=”TLS_ECDHE_RSA_WITH_AES_128_CBC_SHA” state=”Enabled” minimumOSVersion=”Windows2016″ />
<cipherSuiteItem name=”TLS_ECDHE_ECDSA_WITH_AES_256_GCM_SHA384″ state=”Enabled” minimumOSVersion=”Windows2016″ />
<cipherSuiteItem name=”TLS_ECDHE_ECDSA_WITH_AES_128_GCM_SHA256″ state=”Enabled” minimumOSVersion=”Windows2016″ />
<cipherSuiteItem name=”TLS_ECDHE_ECDSA_WITH_AES_256_CBC_SHA384″ state=”Enabled” minimumOSVersion=”Windows2016″ />
<cipherSuiteItem name=”TLS_ECDHE_ECDSA_WITH_AES_128_CBC_SHA256″ state=”Enabled” minimumOSVersion=”Windows2016″ />
<cipherSuiteItem name=”TLS_ECDHE_ECDSA_WITH_AES_256_CBC_SHA” state=”Enabled” minimumOSVersion=”Windows2016″ />
<cipherSuiteItem name=”TLS_ECDHE_ECDSA_WITH_AES_128_CBC_SHA” state=”Enabled” minimumOSVersion=”Windows2016″ />
<cipherSuiteItem name=”TLS_RSA_WITH_AES_256_GCM_SHA384″ state=”Enabled” />
<cipherSuiteItem name=”TLS_RSA_WITH_AES_128_GCM_SHA256″ state=”Enabled” />
<cipherSuiteItem name=”TLS_RSA_WITH_AES_256_CBC_SHA256″ state=”Enabled” />
<cipherSuiteItem name=”TLS_RSA_WITH_AES_128_CBC_SHA256″ state=”Enabled” />
<cipherSuiteItem name=”TLS_RSA_WITH_AES_256_CBC_SHA” state=”Enabled” />
<cipherSuiteItem name=”TLS_RSA_WITH_AES_128_CBC_SHA” state=”Enabled” />
<cipherSuiteItem name=”TLS_RSA_WITH_3DES_EDE_CBC_SHA” state=”Enabled” />
<cipherSuiteItem name=”TLS_DHE_RSA_WITH_AES_256_GCM_SHA384″ state=”Disabled” />
<cipherSuiteItem name=”TLS_DHE_RSA_WITH_AES_128_GCM_SHA256″ state=”Disabled” />
<cipherSuiteItem name=”TLS_DHE_DSS_WITH_AES_256_CBC_SHA256″ state=”Disabled” />
<cipherSuiteItem name=”TLS_DHE_DSS_WITH_AES_128_CBC_SHA256″ state=”Disabled” />
<cipherSuiteItem name=”TLS_DHE_DSS_WITH_AES_256_CBC_SHA” state=”Disabled” />
<cipherSuiteItem name=”TLS_DHE_DSS_WITH_AES_128_CBC_SHA” state=”Disabled” />
<cipherSuiteItem name=”TLS_DHE_DSS_WITH_3DES_EDE_CBC_SHA” state=”Disabled” />
<cipherSuiteItem name=”TLS_RSA_WITH_RC4_128_SHA” state=”Disabled” />
<cipherSuiteItem name=”TLS_RSA_WITH_RC4_128_MD5″ state=”Disabled” />
<cipherSuiteItem name=”TLS_RSA_WITH_NULL_SHA256″ state=”Disabled” />
<cipherSuiteItem name=”TLS_RSA_WITH_NULL_SHA” state=”Disabled” />
<cipherSuiteItem name=”SSL_CK_RC4_128_WITH_MD5″ state=”Disabled” />
<cipherSuiteItem name=”SSL_CK_DES_192_EDE3_CBC_WITH_MD5″ state=”Disabled” />
<cipherSuiteItem name=”TLS_DHE_RSA_WITH_AES_256_CBC_SHA” state=”Disabled” />
<cipherSuiteItem name=”TLS_DHE_RSA_WITH_AES_128_CBC_SHA” state=”Disabled” />
<cipherSuiteItem name=”TLS_PSK_WITH_AES_256_GCM_SHA384″ state=”Disabled” />
<cipherSuiteItem name=”TLS_PSK_WITH_AES_128_GCM_SHA256″ state=”Disabled” />
<cipherSuiteItem name=”TLS_PSK_WITH_AES_256_CBC_SHA384″ state=”Disabled” />
<cipherSuiteItem name=”TLS_PSK_WITH_AES_128_CBC_SHA256″ state=”Disabled” />
<cipherSuiteItem name=”TLS_PSK_WITH_NULL_SHA384″ state=”Disabled” />
<cipherSuiteItem name=”TLS_PSK_WITH_NULL_SHA256″ state=”Disabled” />
</cipherSuites>
</iisCryptoTemplate>

Workaround in firefox

Open Firefox and type about:config in the address bar
Click on I Accept The Risk
Search for network.http.spdy.enabled.http2
Change the value to False
Restart your browser

Product:
Cognos Analytics 11.0.12
Planning Analytics 2.0.5
Microsoft Windows 2016 Server

Problem:
When create a new report on a FM package that points to a Planning Analytics data source, you get a error message.

Test of data source works fine.
http://biservername.domain.com:9300/p2pd IBM Planning Analytics / Dynamic Succeeded XQE-DS-0015 TM1 Server Name: planning_sample: “11.3.00003.1”.

Error message:
Firewall Security Rejection. Your request was rejected by the security firewall.
DPR-ERR-2079 – Internal Server Error
URL:/v1/metadata/fmmodels
{
“severity”: “error”, “faultcode”: “Server”, “faultstring”: “The server did something wrong”,
“errorCode”: “CAF_VALIDATION_FAILURE”, “messages”: [ “DPR-ERR-2079 Firewall Security Rejection. Your request was rejected by the security firewall.” ]
}

or

XQE-MD-0007 Unable to establish a metadata connection to data source

Possible solution:
The user in CA11 does not have needed rights inside the TM1 application, login with TM1 Architect and give the user who try to create a report more Admin access inside the TM1 solution. Then test to create a report again.

Can also be that the DOMAIN name is not correct listed inside Cognos Configuration for CAF at Valid domains or hosts field.

– Open Cognos Configuration.
– In the left pane, click on the Cognos Application Firewall node.
– Select the “Valid domains or hosts” property and click the edit button.
– Add additional webserver hostname:port entries as required.

*.domain.com
*.userdomain.com

More Information:

http://www-01.ibm.com/support/docview.wss?uid=swg21965323
https://www-01.ibm.com/support/docview.wss?uid=swg21339461

Product:
Cognos Analytics 11.0.x
Microsoft Windows Server 2016 Standard

Issue:
Users are prompted with login during there session with Cognos Analytics and some icons are missing from the main page.
SSO is setup and working, but you still get a windows login dialog now and then.
To ensure SSO is correct check this:
http://www-01.ibm.com/support/docview.wss?uid=swg21993357

Error message when you try to create a new report:
Error: Startup Request Failed: Webbegäran misslyckades.:401 – unauthorized
URL: ../images/common_icons.svg

Suggested Solution:
On the CA11 web server (gateway) go to the file manager and go to folder c:\Program Files\ibm\cognos\analytics\webcontent\bi\images
Right click on Images folder and select properties
Click on security tab
Ensure that the following groups at least are there:
SYSTEM
Administrators
Users

If a group is missing, add it.

In one case the group Users where missing, meaning that a person that did not belong to the Administrator group on the server got above issues when surfing to Cognos Analytics portal. Adding the local server Users group solved the problem.

Product:
Cognos Analytics 11.0.12
Microsoft Windows server 2016

Problem:
When user create a new report and want to add a picture, the default folder is the old /samples/images, but in CA11 the new folder is /webcontent/bi/images in most cases.

Suggested solution:
The default value of the Image picker tool in report studio of CA11, is stored in a JS file.
For version 11.0.12 that file is _WEK_async.js
Copy the file _WEK_async.js from the gateway server at c:\Program Files\ibm\cognos\analytics\webcontent\bi\pat\dialogs to your laptop.
Open the file _WEK_async.js in NOTEPAD++


Change the first occurrence of “../sample/images/” to “../images/” and save the file.
Rename the original _WEK_async.js to _WEK_async.js.org
Copy your new _WEK_async.js file to the folder on the gateway server c:\Program Files\ibm\cognos\analytics\webcontent\bi\pat\dialogs

Start a new browser session from you laptop.
Under internet options clear the cache and cookies, before you test again.

Surf to you https://cognosanalyticsserver/ibmcognos/bi/v1/disp
Start a new report
Choose the blank Layout template.
Expand to image tool on left side and double click it, to add it to the report.
Double click the icon and the default folder should be ../images.

If it does not work – try by restarting the Internet Information Server;
Go to the windows gateway server via RDP.
Start a DOS prompt as administrator
Enter IISRESET to restart the IIS services.

How find the json file
In future versions of CA11 this location of value is in a different file.
You have to start a IE browser, hit F12 and select NETWORK and start to capture. Surf to your CA11 website and create a new report.
Then when you open the image dialog, you will find in the first lines the file that it is using – in the list of files in the DEBUG IE Window.

More information:
https://www.ibm.com/mysupport/s/question/0D55000005IbHW0CAN/default-imgae-picker-url?language=en_US

Product:
Cognos Analytics 11.0.12
Microsoft Windows Server 2016

Issue:
When open up the administration tab from Cognos connection in CA11. You click on the system link on the left in IBM Cognos Administration. You see only the spinning wheel and the text “Working…” for a long time….

Error message:

badgateway

Suggested solution:
Stop the IBM Cognos services, and start them in correct order slowly.
To make sure that they come up correct.


More information:
http://www-01.ibm.com/support/docview.wss?uid=swg21496531

Order to Restart Cognos and TM1 Servers