Product:
Planning Analytics 2.0.9 TM1_version=TM1-AW64-ML-RTM-11.0.97.6-0
Cognos Analytics 11.1.7 Product_version=11.1 R7 (LTS)
Microsoft Windows 2019 server with CA11 and PA
Red Hat Linux with PAW
Issue:
How add SSL certificates to the Cognos servers?
Use the official documentation in the first place, this is only a suggestion.
This instruction may not cover all the steps you need to do.
ADD TM1 CERT TO CA11:
The TM1 certificate need to be added to the CA11 keystore once, to be able to run reports on TM1 data.
https://www.ibm.com/support/pages/configure-datasource-ibm-planning-analytics-20x-ibm-cognos-analytics-1106
Go to <Cognos Analytics installation>\jre\bin and execute ikeyman.exe as administrator
Select Open a key database file, and navigate to the cacerts keystore located in <Cognos Analytics installation>\jre\lib\security. As type select JKS.
On prompt enter password changeit
In the drop down, switch from Personal Certificates to Signer Certificates
On the right select Add
Browse for the certificate file ibmtm1.arm located in <Planning Analytics Install>\bin64\ssl.
On prompt enter an alias for the certificate in the keystore, exempli gratia: TM1Server.
Click OK
Exit ikeyman.
Suggested Solution:
Backup configuration and ssl and security folders before you do any changes.
SETUP CERTIFICATE FOR IIS:
Go to Internet Information Service Manager.
Select the server and click on Server Certificates icon.
Click Create Certificate Request.
Fill in the Distinguished Name properties, important that COMMON NAME is the servername.
Select “Microsoft RSA SChannel Cryptographic Provider” and Bit Length: 2048
Save the result in a request.txt file.
Send this request to your Certificate Authority, or if you use Microsoft CA, go to the website and click Certificate Request link. Mostly named “Request a certificate”.
Select Submit a certificate request by using a base-64-encoded CMC or PKCS #10 file, or submit a renewal request by using a base-64-encoded PKCS #7 file.
Copy the text from you request.txt file and paste it into the Saved Request field.
Select “Web Server” in the Certificate Template dropdown.
Enter the DNS servername in Additional attributes, like SAN:dns=servername.domain.com
Click Submit.
Requesting for certificate in Windows 2012 – Deep Security (trendmicro.com)
In the Certificate Issued dialog you select Base 64 encoded.
Download the certificate (certnew.cer) and the certificate chain.
In IIS manager go to “complete certificate request”
Select the cer file you got.
Enter the Friendly name to your servername: servername.domain.com
Leave certificate store to be personal and click OK.
If this is a new server, you need to import the root and issuing certificates to the Trusted Root Certification Authorities tab inside Certificate Manager. To access Certificate Manager, click the Start button, type certmgr.msc in the search field, and click the Enter key. More info in link;
https://www.sslshopper.com/article-installing-an-ssl-certificate-in-windows-server-2008-iis-7.0.html
BIND CERT TO WEBSITE
Go to IIS Manager, select “Default Web site” and click on Bindings.
Click Add.
Select Type HTTPS and select your server certificate.
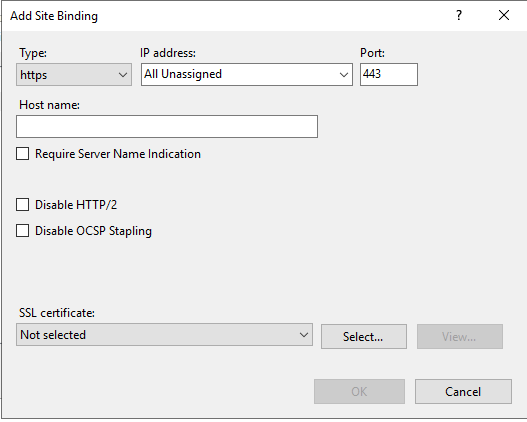
Click OK.
Remove the HTTP binding and any old HTTPS certificates.
Click Close.
Inside Cognos Configuration change Gateway URI to point to https://servername.domain.com:443/ibmcognos/bi/v1/disp
Inside TM1S.CFG file change ClientCAMURI to be the same (https://servername.domain.com:443/ibmcognos/bi/v1/disp)
Inside C:\ProgramData\Applix\TM1\tm1p.ini you may need to update; CognosGatewayURI = https://servername.domain.com:443/ibmcognos/bi/v1/disp
You may need to export a pfx file with the key value from inside Certificate Manager on your windows server, right click on servername in Server Certificate and select export.
CHANGE CA11 TO USE INTERNAL SSL
Stop the cognos service.
Inside Cognos Configuration, change to HTTPS on all points under environment tab.
Click on save in Cognos Configuration, this will create the new cert and place it in CA keystore.
Open a command prompt as administrator.
Go to folder d:\Program Files\ibm\cognos\analytics\bin and enter below command, to export the cert:
ThirdPartyCertificateTool.bat -E -T -p NoPassWordSet -r ca.cer
Go to certmgr.msc, go to Trusted Root Certification Authorities tab, right click to import the ca.cer certificate.
If you not already have done so, you need to export the root and indeterminate certificates from your IIS Cognos website. Open a web browser, and on the certificate click – view and then export for each cert.
IIS 10 Exporting/Importing SSL Certificates | digicert.com
Rename the certificate files to not have space in there names.
Copy the certificate files to your Cognos server folder d:\Program Files\ibm\cognos\analytics\bin
Open a command prompt as administrator and go to folder C:\Program Files\ibm\cognos\analytics\bin
Enter command to import (the order of import is crucial)
ThirdPartyCertificateTool.bat -i -T -r Root.cer -p NoPassWordSet
ThirdPartyCertificateTool.bat -i -T -r Issuing.cer -p NoPassWordSet
ThirdPartyCertificateTool.bat -i -T -r Servername.cer -p NoPassWordSet
Start Cognos BI.
Go to IIS Manager, select \ibmcognos\bi folder.
Click on URL Rewrite.
Click on Reverse Proxy rule.
Edit the rule to use HTTPS instead of HTTP.
https://servername.domain.com:9300/bi/{R:0}
Click apply in top right corner.
Exit IIS manager.
CHANGE TM1 TO USE SSL
Stop TM1 services.
Change TM1S.CFG to have;
ServerCAMURI=https://servername.domain.com:9300/p2pd/servlet/dispatch
ClientCAMURI=https://servername.domain.com:443/ibmcognos/bi/v1/disp
UseSSL=T
CAMUseSSL=T
Copy your ca.cer file to the Planning Analytics folder d:\Program Files\ibm\cognos\tm1_64\bin64\ssl;
Open a command prompt as administrator and go to folder C:\Program Files\ibm\cognos\tm1_64\bin64
Import to Tm1 admin server with command:
gsk8capicmd_64 -cert -add -db “d:\Program Files\ibm\cognos\tm1_64\bin64\ssl\ibmtm1.kdb” -stashed -label caRoot -file “d:\Program Files\ibm\cognos\tm1_64\bin64\ssl\ca.cer” -format ascii -trust enable
Open a command prompt as administrator and go to folder C:\Program Files\ibm\cognos\tm1_64\jre\bin
Import to Tm1 App Web (PMPSVC) server with command:
keytool.exe -import -trustcacerts -file “d:\Program Files\ibm\cognos\tm1_64\bin64\ssl\ca.cer” -keystore “d:\Program Files\ibm\cognos\tm1_64\bin64\ssl\tm1store” -alias caRoot -storepass applix
Change the file D:\Program Files\ibm\cognos\tm1_64\webapps\pmpsvc\WEB-INF\configuration\fpmsvc_config.xml to have https at 3 places:
<external uri=”https://servername.domain.com:9510″/>
<gateway uri=”https://servername.domain.com:443/ibmcognos/bi/v1/disp”/>
<dispatcher uri=”https://servername.domain.com:9300/p2pd/servlet/dispatch”/>
Save the file.
Go to d:\program files\ibm\cognos\tm1_64\jre\bin and execute ikeyman.exe as administrator.
Open D:\Program Files\ibm\cognos\tm1_64\configuration\certs\CAMkeystore file as PKC$12 type.
Enter password NoPassWordSet.
Rename encryption to encryptionold.
Click Export/import button:
Mark Import Key.
Select your server pfx file and click OK.
Enter the password you got at the export of the pfx file.
Change label to encryption and click apply.
Switch to Signer Certificates.
Click Add.
Select your root.cer file from the file system and click OK.
Enter a name e.g. rootcert
Repeat for any intermediate certificates
Click Add.
Select your issuing.cer file from the file system and click OK.
Enter a name e.g. issuingcert
Click Add.
Select D:\Program Files\ibm\cognos\tm1_64\bin64\ssl\ibmtm1.arm file.
On prompt enter an alias for the certificate in the keystore, e.g. TM1Server.
Exit ikeyman program.
Use IKeyMan to Configure Custom SSL Certificates for TM1Web (ibm.com)
Open Cognos Configuration for TM1 (planning analytics).
Add the StandaloneCertificateAuthority property under the Local Configuration > Advanced Properties
section and set it to True.
Under Environment change Gateway URI to
https://servername.domain.com:443/ibmcognos/bi/v1/disp
and Content Manger URI to
https://servername.domain.com:9300/p2pd/servlet
Under TM1 Applications change TM1 Application Server gateway URI to
https://servername.domain.com:9510/pmpsvc
and change External server URI to
https://servername.domain.com:9510
and change TM1 Application Server Dispatcher URI to
https://servername.domain.com:9510/pmpsvc/dispatcher/servlet
Under Security > Cryptography > Cognos set Use third party CA? to True.
Save and start TM1 services.
If this is a new installation, you need to update the d:\Program Files\ibm\cognos\analytics\webcontent\bi\planning.html and d:\Program Files\ibm\cognos\analytics\webcontent\bi\tm1\web\tm1web.html files with HTTPS.
SETUP OF SSL FOR NEW TM1WEB
Copy your previous created pfx file (that contain the hole chain of certificates) to folder d:\Program Files\ibm\cognos\tm1web\bin64\ssl.
Stop the IBM Planning Analytics Spreadsheet Service.
Open d:\Program Files\ibm\cognos\tm1web\wlp\usr\servers\tm1web\server.xml.new in notepad++.
Update this row to set your https port
<httpEndpoint id=”defaultHttpEndpoint” httpPort=”-1″ httpsPort=”9511″ host=”*” removeServerHeader=”true”>
</httpEndpoint>
Add this row to point out the certificate pfx file to use
<keyStore id=”defaultKeyStore” location=”${wlp.user.dir}/../../bin64/ssl/cert.pfx” password=”cognos” />
Change cognos to the password you have for your pfx file.
Save the file as server.xml
In a command prompt go to folder d:\Program Files\ibm\cognos\tm1web\jre\bin
Enter this command to import the standard TM1 server cert to the new keystore
keytool -importcert -keystore ..\..\bin64\ssl\cert.pfx -storepass cognos -storetype pkcs12 -noprompt -alias ibmtm1 -file ..\..\bin64\ssl\ibmtm1.arm
Copy your Root and Intermediate certificate files to your \tm1web\bin64\ssl\ directory
Import the Root and Intermediate certificates with this command:
keytool.exe -import -trustcacerts -file “..\..\bin64\ssl\root.cer” -keystore “..\..\bin64\ssl\tm1store” -alias ca -storepass applix
keytool.exe -import -trustcacerts -file “..\..\bin64\ssl\issuing.cer” -keystore “..\..\bin64\ssl\tm1store” -alias intca -storepass applix
CER or PEM files should both work.
Start your IBM Planning Analytics Spreadsheet Service.
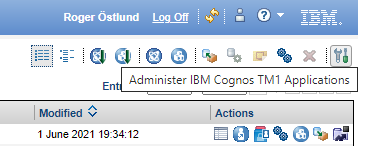
You need to browse to you TM1 APP WEB (https://servername.domain.com:9510/pmpsvc) application, and click on Administration icon. Mark the TM1 Application Web client row, and click on edit.
Change the thinclient URL to be https://servername.domain.com:9511/tm1web/Contributor.jsp.
Click OK and OK, to exit the settings.
REQUEST SSL FROM LINUX PAW
Connect to your Linux server with PUTTY program.
Stop your paw with command: sudo ./paw.sh stop
Go to your /data/ibm/paw63 folder.
Run below command to request a certificate:
sudo openssl req -newkey rsa:2048 -nodes -keyout privatekey.pem -out paw.csr
Answer the questions, and you have your file.
Copy the paw.csr file to your CA authority, or IIS website, and repeat previous process to get a certificate. Save the file as Base 64 encoded certificate chain.
SETUP SSL FOR PAW
Copy your certnew.p7b file to linux server folder /data/ibm/paw63.
Copy your private key to a new pem file:
sudo cp privatekey.pem pa_workspace.pem
Change access to files with command:
sudo chmod 777 pa_workspace.pem
Add the certificates to the pem file:
sudo openssl pkcs7 -print_certs -in certnew.p7b >> pa_workspace.pem
Erase the not needed lines, with servernames etc, in the pem file:
sudo nano pa_workspace.pem
-----END CERTIFICATE-----
-----BEGIN CERTIFICATE-----
Copy the pa_workspace.pem file to the config folder:
sudo cd /data/ibm/paw63/config
sudo mv pa-workspace.pem pa-old-workspace.pem
sudo cp /data/ibm/paw63/pa_workspace.pem pa-workspace.pem
Add lines to paw.env file:
sudo nano paw.env
add this lines
export EnableSSL=true
export ServerName=pawservername.domain.com
also change to HTTPS instead of HTTP, in lines like export TM1ApplicationsLocation=”https://servername.domain.com:9511″
Save the file.
Copy the ca.cer, issuing.cer and root.cer files to folder /data/ibm/paw63/config/certs.
Go to the scripts folder
sudo cd /data/ibm/paw63/scripts
Run the process to import the certificate in the paw keystore:
sudo ./process_certs.sh
Start paw with command:
sudo ./paw.sh
If this is a new installation, you need to update D:\Program Files\ibm\cognos\analytics\webcontent\bi\pmhub.html file with HTTPS values.
// Update the following to point to the location of the pmhub service(s)
var pmhubURLs = [“https://pawservername”,”https://pawservername.domain.com”];
IMPORT CA CERT TO FRAMEWORK MANAGER
Open a cmd prompt as administrator.
Go to “C:\Program Files (x86)\ibm\cognos\fm\bin\” folder.
Copy the ca.cer file to the same folder.
Enter this command:
ThirdPartyCertificateTool.bat -i -T -r ca.cer -p NoPassWordSet
More information:
Securing Jupyter Notebook Server – IBM Documentation