Product:
Microsoft Windows 2019 server
Issue:
Your security scan software report that you have a issue on the Windows server with ciphers.
TLS/SSL Birthday attacks on 64-bit block ciphers (SWEET32)
Negotiated with the following insecure cipher suites:
* TLS 1.2 ciphers:
* TLS_RSA_WITH_3DES_EDE_CBC_SHA
Configure the server to disable support for 3DES suite.
Solution:
Check that the application software you use on the server does not need this cipher.
Login to the Windows server as local administrator.
Then run this powershell command to remove the support for the cipher:
Disable-TlsCipherSuite -Name 'TLS_RSA_WITH_3DES_EDE_CBC_SHA'
Reboot the windows server for the change to take affect.
Get list of cipher that is 3DES:
Get-TlsCipherSuite -name “3DES”
Get list of all cipher on server:
Get-TlsCipherSuite | Format-Table Name
Get list of curves:
certutil.exe –displayEccCurve
More Information:
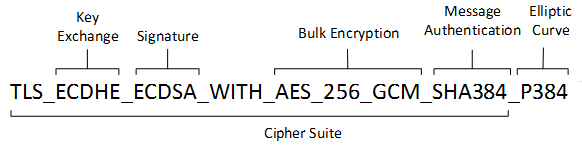
A cipher suite is a set of cryptographic algorithms. The schannel SSP implementation of the TLS/SSL protocols use algorithms from a cipher suite to create keys and encrypt information. A cipher suite specifies one algorithm for each of the following tasks:
- Key exchange
- Bulk encryption
- Message authentication
Key exchange algorithms protect information required to create shared keys. These algorithms are asymmetric (public key algorithms) and perform well for relatively small amounts of data.
Bulk encryption algorithms encrypt messages exchanged between clients and servers. These algorithms are symmetric and perform well for large amounts of data.
Message authentication algorithms generate message hashes and signatures that ensure the integrity of a message.
Developers specify these elements by using ALG_ID data types. For more information, see Specifying Schannel Ciphers and Cipher Strengths.
In earlier versions of Windows, TLS cipher suites and elliptical curves were configured by using a single string:
https://learn.microsoft.com/en-us/windows/win32/secauthn/cipher-suites-in-schannel
https://learn.microsoft.com/en-us/powershell/module/tls/?view=windowsserver2022-ps