Product:
Cognos Analytics 11.1.7
Cognos Controller 10.4.2
Microsoft Windows 2016 server
Issue:
How setup SSL(TLS1.2) with Cognos Analytics, when i only got a PFX file from my company?
Solution:
This is not the recommended way – you should use the IBM guides instead.
https://www.ibm.com/support/pages/how-configure-force-controller-use-tls-12
(This instructions will fail as the next time you start Cognos Configuration and click save, the CAMkeystore file is overwritten)
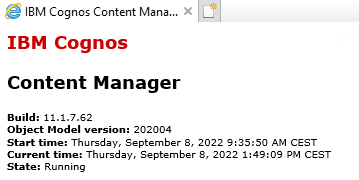
First, ensure Cognos Analytics is working with out issues. Check this log files and solve all errors before you start.
D:\Program Files\ibm\cognos\analytics\logs\p2pd_messages.log
D:\Program Files\ibm\cognos\analytics\logs\cognosserver.log
D:\Program Files\ibm\cognos\analytics\wlp\usr\servers\cognosserver\logs\messages.log
Second, always backup this folders – by copy them to a different folder like d:\temp
D:\Program Files\ibm\cognos\analytics\bin64\ssl
D:\Program Files\ibm\cognos\analytics\configuration\certs
D:\Program Files\ibm\cognos\analytics\ibm-jre\jre\lib\security
and for cognos controller backup this folders
D:\Program Files\ibm\IBM Cognos Controller Local Client\Integration\jre\lib\security
D:\Program Files\ibm\cognos\ccr_64\bin64\jre\8.0\lib\security
You should export a text file of the configuration in Cognos Configuration and create screen dumps of your setup in Cognos Controller Configuration, so you can apply them back in case something goes wrong. Use Select File – Export as.
Download OPENSSL to your windows laptop, with this program you can convert and check certificates. Download GIT for Windows to easy also get the OPENSSL tool. Download from https://git-scm.com/download/win
Run Git-2.37.3-64-bit.exe (with all defaults) to install GIT on you laptop. Then you find openssl in folder: C:\Program Files\Git\mingw64\bin
IMPORTANT: Add a rule in the local windows defender firewall to allow inbound traffic on both port 80 and 443 on all cognos servers.
How install PFX in Windows (IIS)
Copy your PFX file to your server, place it in a folder like c:\cert
Right click on PFX file and select Install PFX
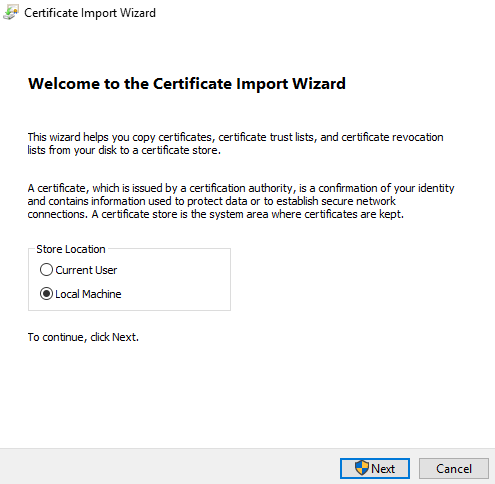
Select Local Machine and click Next
Click next on file to import.
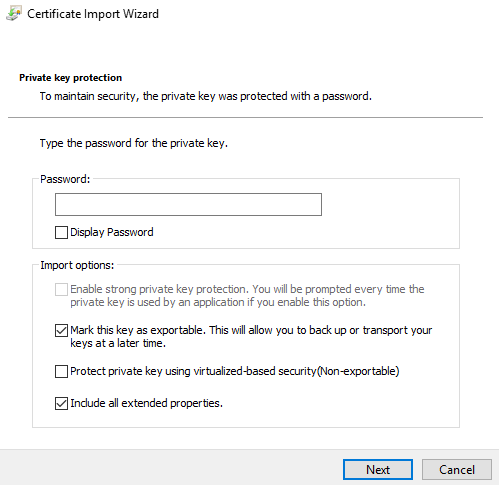
Enter the password you got with the PFX file and click Next.
Click next on Certificate store, and let it be automatically selected.
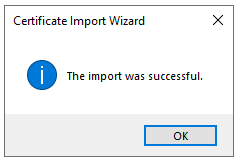
Click Finish.
Start IIS (Internet Information Services Manager)
Click on the servername (home) and click on Server Certificates, to view that you have valid certificates. Check the Expiration Date to know witch one you can use.
In IIS manager, expand Sites, and mark Default Web Site. Click on bindings link on the right side.
Click ADD button.
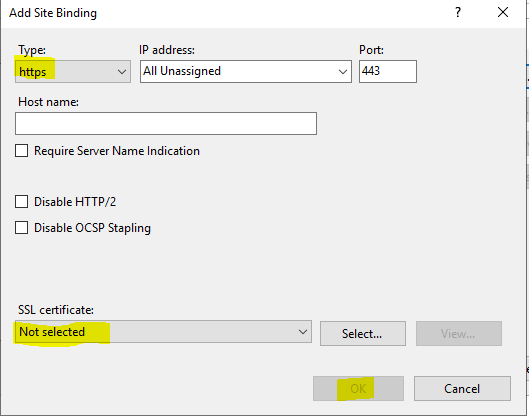
Select HTTPS as type.
Select your certificate from the drop-down list SSL certificate, and press OK.
Later, when it is working, remove the support for port 80 in the bindings dialog.
Go to default web site\ibmcognos\bi folder and click on URL Rewrite icon
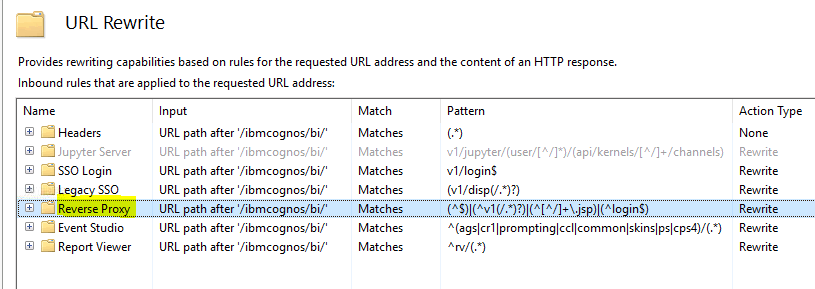
Double click on Reverse Proxy, to change it values.
Scroll down and edit the ReWrite URL to: https://ca_servers/bi/{R:0}
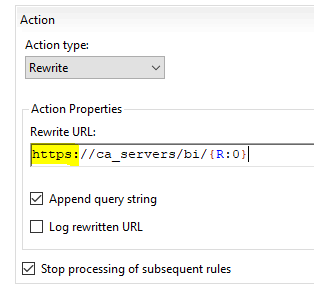
Click Apply on the right side.
Restart IIS.
If you have had the Cognos BI site running HTTP before, you must change in IIS webfarm to use the new HTTPS, and also update the port in use. Otherwise you will get 404 or 502 errors in Web browser.
Clear the IIS setup. https://www.ibm.com/support/pages/node/301009
Update the CA_IIS_Config.bat file with HTTPS and correct port.
Run CA_IIS_Config.bat as a administrator in Command prompt.
How export the root and intermediate cer files from IIS
Go to server certificates, double click on your certificate.
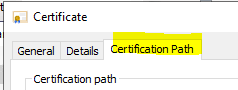
Select Certificate Path tab, and select the middle certificate in the list, and click View Certificate button.
A new windows will open, in there go to the Details tab.
Select Subject row, and copy the CN line to the clipboard.
Click on the Copy to File button.
Click Next in the Certificate Export Wizard.
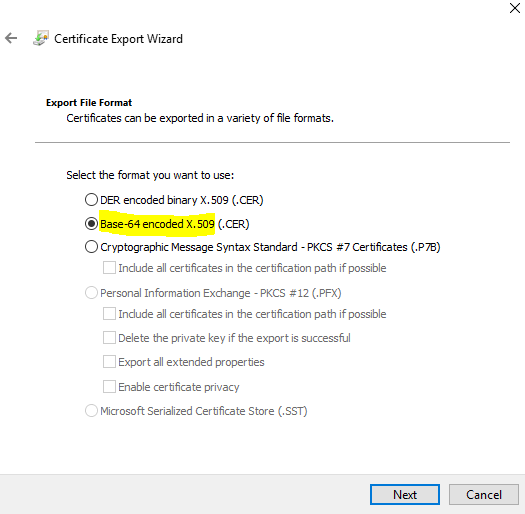
Mark Base-64 encoded X.509 and click next.
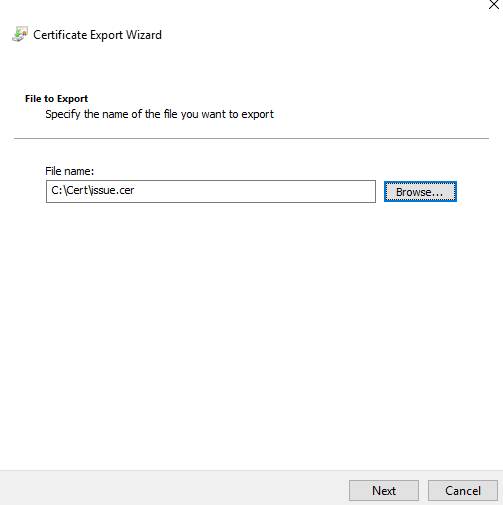
Enter a name and path, suggest use the CN name as name of the cer file. Click Next.
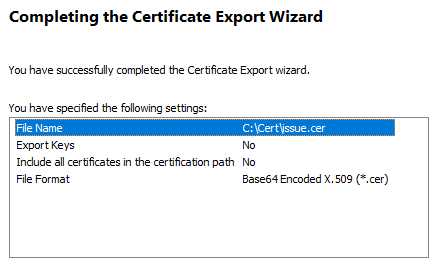
Click Finish.
Now, you need to repate this for the root certificate.
Click on Certificate path tab.
Click on top root cert and click on View Certificate button.
Go to Details tab and select Subject line.
Copy CN line to clipboard.
Click Copy to File button.
Click next in the Certification Export Wizard.
Mark Base-64 encoded X.509 and click Next.
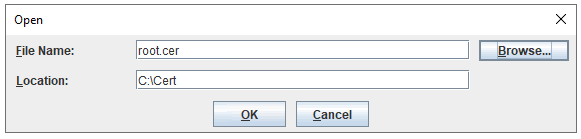
Enter a file name like c:\cert\root.cer and click Next.
Click Finish to create the file.
Now you should have two cer files in your c:\cert folder.
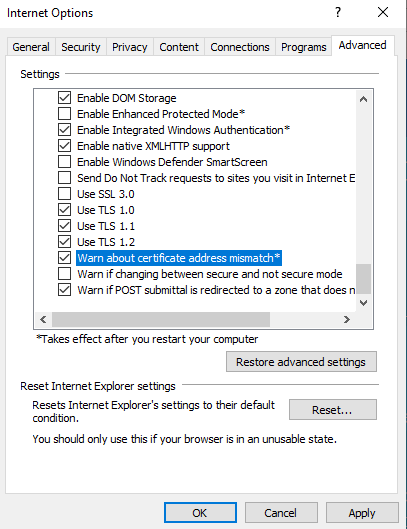
You can test the certificate, by browse to your server at https://servername to see if you get errors in Internet Explorer.
Under Internet Options – Advance – you can uncheck “warn about certificate address mismatch” to suppress error messages.
Update the CAMstore
Before you change the certificate store in Cognos, stop all IBM Cognos services and java process.
Go to folder D:\Program Files\ibm\cognos\analytics\ibm-jre\jre\bin
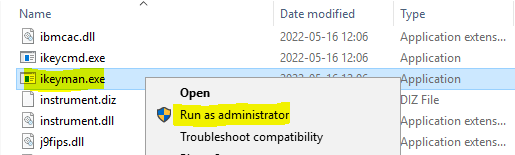
Right click on IKEYMAN.EXE and select “run as administator”.
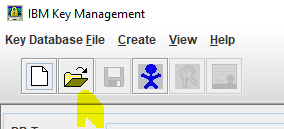
Click on the open icon.
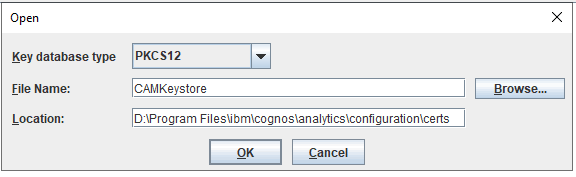
Browse to D:\Program Files\ibm\cognos\analytics\configuration\certs folder and select CAMkeystore file.
Set Key database type to PKC$12 and press OK.
Enter the password: NoPassWordSet

Mark encryption, and click rename, to change it to encryptionold.
Click on Export/import button.
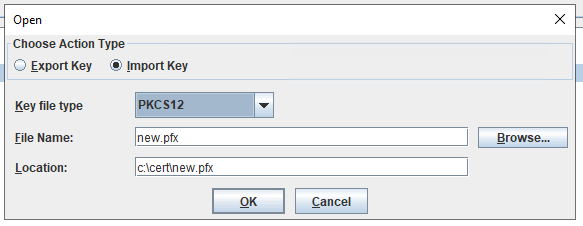
Browse to your PFX file.
Select type to be PKCS12 and press OK.
Enter the password you got with the PFX file.
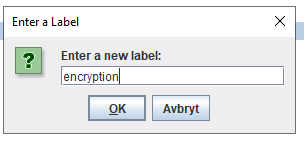
Click OK on the question to change labels.
Mark the new line, and click rename button. Change the name to encryption.
Press OK.
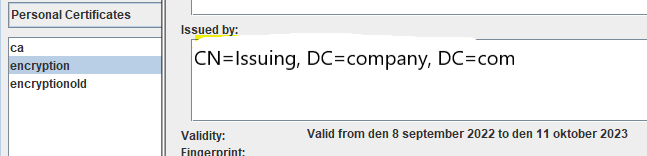
Double click on encryption to check that the certificate is valid. Check the date and the DNS name is the same as your servername.
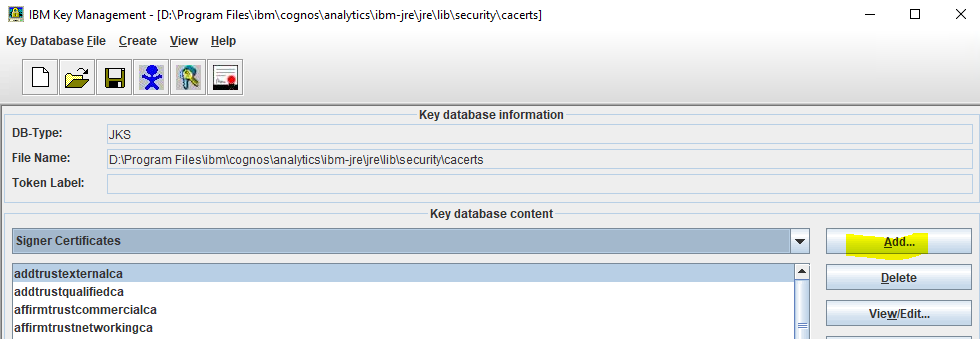
Select Signer Certificates in the drop down list.
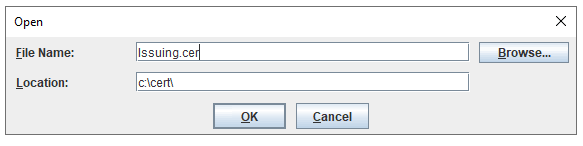
Check that the root and issuing certificate for your company is in the list, if not then click on ADD button, and select the two cer files we created before and import them.
Exit IKEYMAN. All changes in IKEYMAN are saved directly to your key store file. That is why you need to backup the key store file before you open IKEYMAN program.
Add root cert to java key store
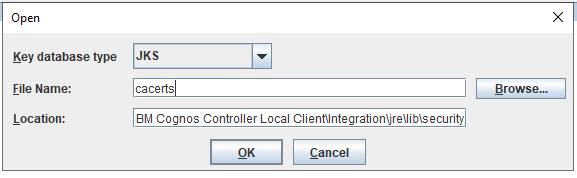
Start IKEYMAN program with Run as Administrator
Click on Open icon.
Browse to D:\Program Files\ibm\cognos\analytics\ibm-jre\jre\lib\security and open cacerts as Type JKS.
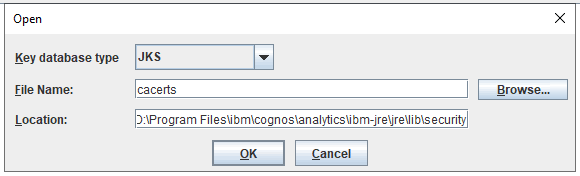
Click OK and enter the password: changeit
Click on ADD button.
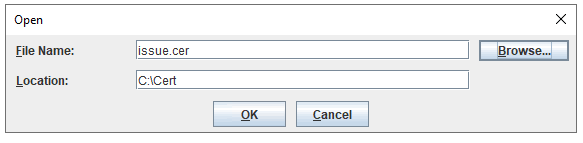
Find your issue cer file and import it.
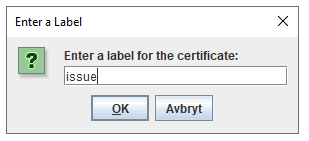
Enter a name that describe the certificate and press OK.
Click on ADD button again, and import the root cer file.
Select the cer file and press OK.
Enter it a name and press OK.
Close IKEYMAN program.
Change CA11 to use custom certificate
Start Cognos Configuration program as Administrator.
At Local configuration, click on Advance properties.
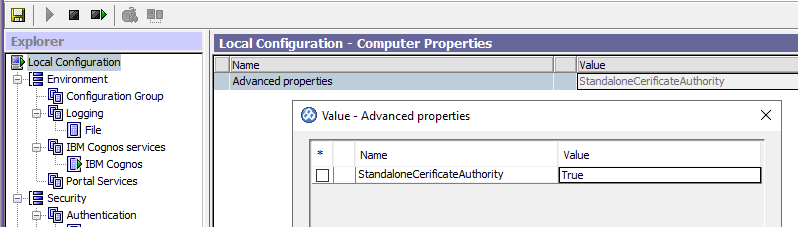
Add the value StandaloneCerificateAuthority = True
Click OK
Go to Environment and change all HTTP to HTTPS.
Update the port number 80 to 443.
Keep the port-number 9300 for the other rows. We will use SSL over the port 9300.
Gateway should be: https://servername.domain.com:443/ibmcognos/bi/v1/disp
Controller URI for gateway should be: https://servername.domain.com:443/ibmcognos/controllerServer
Content Manager URI should be: https://servername.domain.com:9300/p2pd/servlet
Go to Cryptography – Cognos

Change Use Third Party CA? to True.
Save the configuration (this will update some key store files for WebSphere Liberty Profile).
Start the IBM Cognos service from inside Cognos Configuration. This take around 10 minutes.
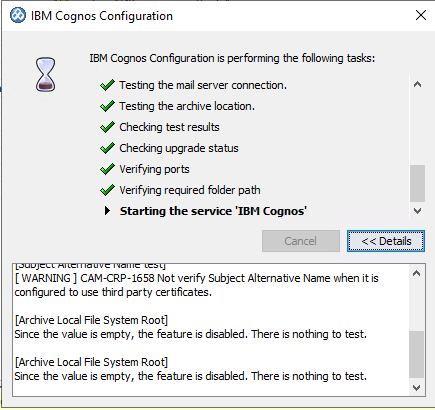
There should be no errors, when starting Cognos Analytics.
To test the certificate inside Cognos Analytics, start a web browser and go to https://servername.domain.com:9300/p2pd/servlet
There should be no errors, and the padlock should be secure in the web browser.
Add the trusted ca root cert to java store
On the cognos controller client computer, start IKEYMAN from D:\Program Files\ibm\IBM Cognos Controller Local Client\Integration\jre\bin folder.
Click on OPEN icon and go to D:\Program Files\ibm\IBM Cognos Controller Local Client\Integration\jre\lib\security folder
Select file cacerts mad key database type JKS. Click on OK.
Enter the password: changeit
Select Signer Certificates from the drop down list.
Click on ADD button, to add the root.cer and issuing.cer files you have created before from IIS.
After you have added both certs, exit IKEYMAN program.
Copy now the cacerts file to all cognos controller installations, and place the file in folder D:\Program Files\ibm\IBM Cognos Controller Local Client\Integration\jre\lib\security.
If you are using ccrRemoteServer in file D:\Program Files\ibm\cognos\ccr_64\ControllerProxyServer\web.config
<add key=”ccrRemoteServer” value=”https://servername.domain.com/ibmcognos/controllerserver” />
That need to be updated with https, and the server need to be restarted.
Update Cognos Controller to support TLS 1.2
Go to the folder: d:\Program Files\ibm\cognos\ccr_64\server\
Open CCRProxy.options in NOTEPAD++
Add the following lines (at the end):
-Dcom.ibm.jsse2.overrideDefaultTLS=true
-Dcom.ibm.jsse2.overrideDefaultProtocol=TLSv12

Save the file.
2. Navigate to the following path: [HKEY_LOCAL_MACHINE\SOFTWARE\Microsoft\.NETFramework\v4.0.30319]
3. Right-click on v4.0.30319 and select New –> DWORD (32-bit)
- Set the name to: SchUseStrongCrypto
- Set the value to 00000001
Go into Cognos Controller Configuration and update the Report Server dialog to use HTTPS instead of HTTP.
Report server should be: https://servername.domain.com/ibmcognos/bi/v1/disp
Dispatcher URI should be: https://servername.domain..com:9300/p2pd/servlet/dispatch
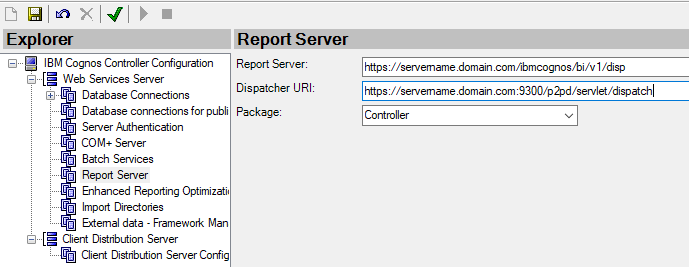
Important to also update the Cognos Controller Client Distribution Server Configuration. All should use HTTPS.
When you change cognos controller configuration to HTTPS, you must also stop and start the Batch service from inside controller configuration, to update all files correct.
WSSUrl should be: https://servername.domain.com/ibmcognos/controllerserver
Save the changes in Controller Configuration.
To test that the SSL is working on the server, from the cognos controller client start a web browser and browse to
https://myservername.mycompany.com/ibmcognos/controllerserver/ccrws.asmx
There should be no errors.
(Please do not use this instructions – as they will not work – when you change in Cognos Configuration, the certificate store is replaced with the cognos default certificate – and the system will break)
Use this instructions instead:
More Information:
https://www.ibm.com/support/pages/how-configure-main-controller-client-ccrexe-use-https-ssl
https://www.ibm.com/support/pages/how-configure-force-controller-use-tls-12