Product:
Planning Analytics 2.0.9.3
Microsoft Windows 2019 server
Problem:
How setup SSL (TLS) in Planning Analytics Spreadsheet Services?
Get a custom pfx file from your certification authority for your server.
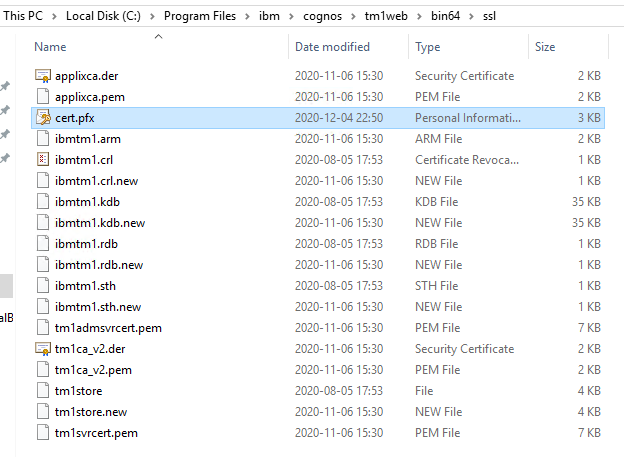
Go to your PA TM1WEB server and place the file in folder C:\Program Files\ibm\cognos\tm1web\bin64\ssl
Stop the IBM Planning Analytics Spreadsheet Service.
Open C:\Program Files\ibm\cognos\tm1web\wlp\usr\servers\tm1web\server.xml.new in notepad++
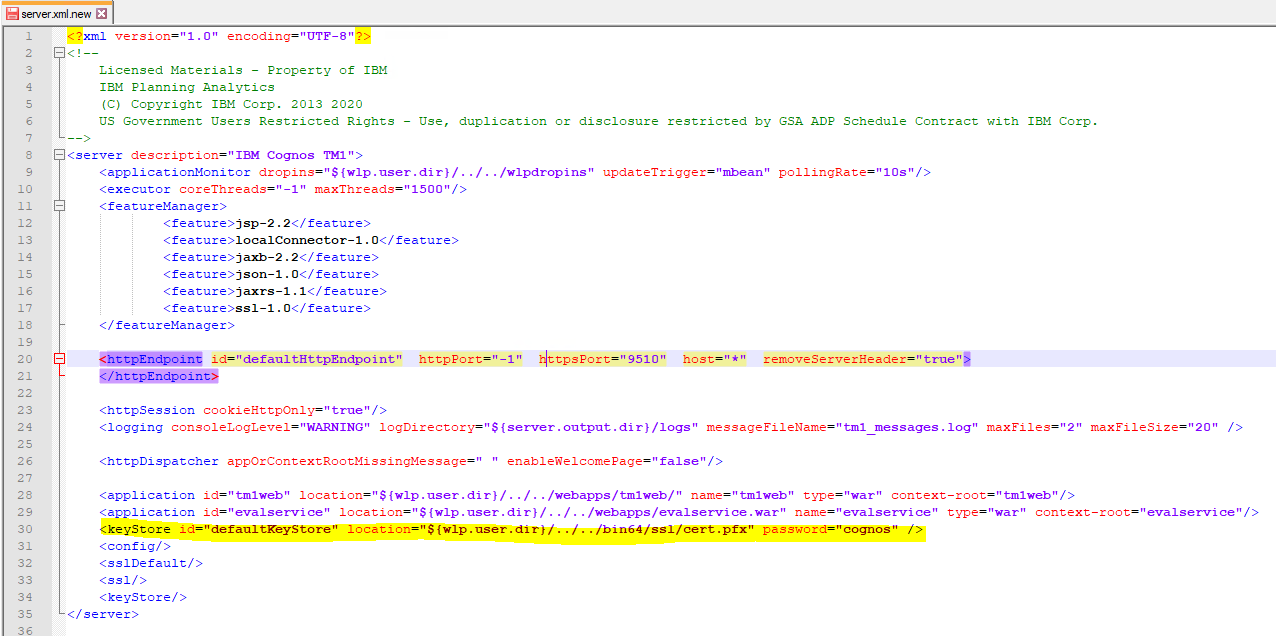
Update this row to set your https port
<httpEndpoint id=”defaultHttpEndpoint” httpPort=”-1″ httpsPort=”9510″ host=”*” removeServerHeader=”true”>
</httpEndpoint>
Add this row to point out the certificate pfx file to use
<keyStore id=”defaultKeyStore” location=”${wlp.user.dir}/../../bin64/ssl/cert.pfx” password=”cognos” />
Change cognos to your password.
Save the file as server.xml
In a command prompt go to folder C:\Program Files\ibm\cognos\tm1web\jre\bin
Enter this command to import the standard TM1 server cert to the new keystore
keytool -importcert -keystore ..\..\bin64\ssl\cert.pfx -storepass cognos -storetype pkcs12 -noprompt -alias ibmtm1 -file ..\..\bin64\ssl\ibmtm1.arm

Start IBM Planning Analytics Spreadsheet Services
Update the C:\Program Files\ibm\cognos\analytics\webcontent\bi\tm1\web\tm1web.html file on your Cognos Analytics server to have the new HTTPS value:

Save the file.
If you miss above step you get the error:
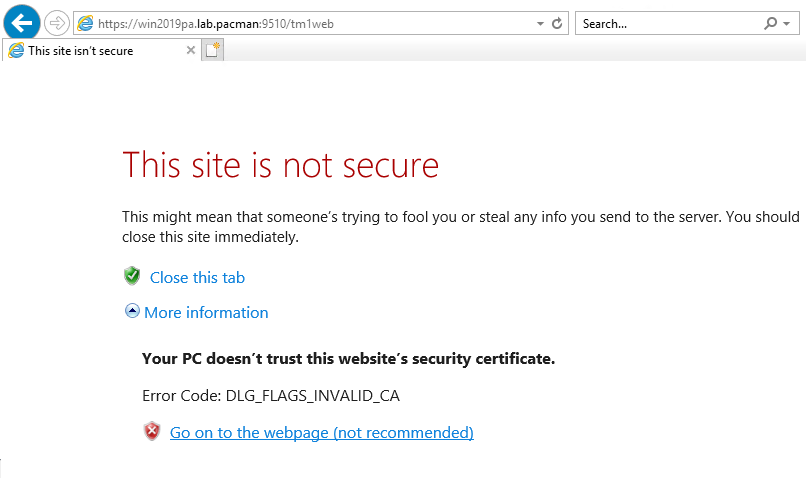
Test from Chrome web browser by go to https://yourservername.domain.com:9510/tm1web
If it works, you have done a good job.
If you use the self sign test certificate you get below screen, as the certificate is not trusted by the browser. Self signed certificate works best with TM1 native security.
Do this https://www.ibm.com/support/pages/node/879929 to get away from above error in testing.
To encrypt the password in the server.xml file do this steps:
Ensure that the cert.pfx file is in folder C:\Program Files\ibm\cognos\tm1web\bin64\ssl
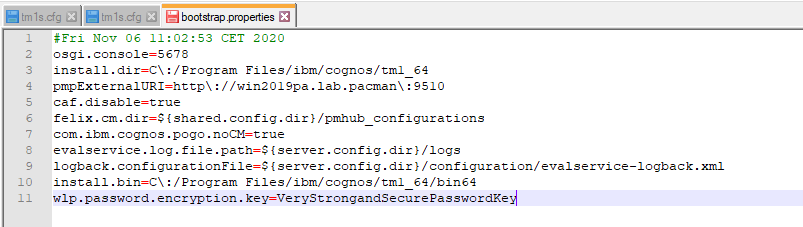
Open C:\Program Files\ibm\cognos\tm1web\wlp\usr\servers\tm1web\bootstrap.properties in Notepad++
Add the line (with your own key password):
wlp.password.encryption.key=VeryStrongandSecurePasswordKey
Start a command prompt as administrator.

Run set JAVA_HOME=C:\Program Files\ibm\cognos\tm1web\jre\ to temporary set the JAVA_HOME for next command
Move to folder C:\Program Files\ibm\cognos\tm1web\wlp\bin
Run command (to encrypt the value in key-store)
securityUtility.bat encode –encoding=aes –key=VeryStrongandSecurePasswordKey cognos
(you add the -key password you defined in bootstrap file, and then the password used today to access the cert.pfx file)

Copy the response to notepad
Open C:\Program Files\ibm\cognos\tm1web\wlp\usr\servers\tm1web\server.xml in notepad++
Update the line (to include the new password)
<keyStore id=”defaultKeyStore” location=”${wlp.user.dir}/../../bin64/ssl/cert.pfx” password=”{aes}AIm6d2W+Hk0JBXaWVrJSvq+AGyBDkec/kdUiXAu5nKoI” />

Save the file and restart Planning Analytics Spreadsheet Services.
Now the password to the keystore (pfx) is not in cleartext in the server.xml file.
You can check for errors in file C:\Program Files\ibm\cognos\tm1web\wlp\usr\servers\tm1web\logs\console.log
Launching tm1web (WebSphere Application Server 20.0.0.7/wlp-1.0.42.cl200720200625-0300) on IBM J9 VM, version 8.0.6.15 – pwa6480sr6fp15-20200724_01(SR6 FP15) (sv_SE)
[AUDIT ] CWWKE0001I: The server tm1web has been launched.
[err] log4j:WARN No appenders could be found for logger (org.apache.axis.transport.http.AxisServlet).
[err] log4j:WARN Please initialize the log4j system properly.
[err] log4j:WARN See http://logging.apache.org/log4j/1.2/faq.html#noconfig for more info.
How to create a keystore for testing:
One your laptop install openssl from here https://github.com/git-for-windows/git/releases/tag/v2.23.0.windows.1 – get the file Git-2.23.0-64-bit.exe. Run the installation with all default values.
Create a new folder (c:\workarea)
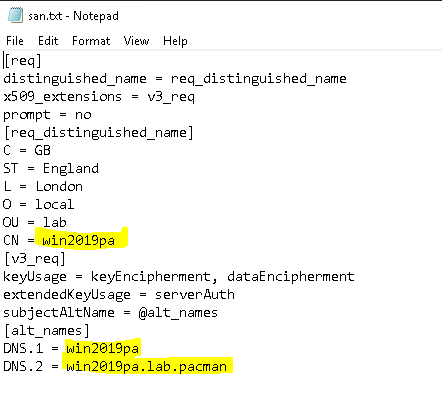
Create text file with above content, replace with your servername and location.
Save the file in c:\workarea folder.
Start a command prompt as administrator. Go to folder C:\Program Files\Git\mingw64\bin
Enter to create the self signed certificate:
openssl.exe req -x509 -nodes -days 1095 -newkey rsa:2048 -keyout C:\workarea\cert.pem -out C:\workarea\cert.pem -config C:\workarea\san.txt

Enter to create the pfx file:
openssl.exe pkcs12 -export -out C:\workarea\cert.pfx -in C:\workarea\cert.pem -name “win2019pa” -passout pass:cognos

Replace win2019pa with your servername, and cognos with your password of choice.
Copy the cert.pfx file to your PA server and place in folder C:\Program Files\ibm\cognos\tm1web\bin64\ssl, then do the rest at top of this page.
-x509
This option outputs a self signed certificate instead of a certificate request.
Enter this to check a pfx for its content:
keytool -v -list -storetype pkcs12 -keystore cert.pfx
More information:
https://www.ibm.com/support/pages/how-configure-ssl-ibm-planning-analytics-spreadsheet-services-using-existing-keystore
https://www.ibm.com/support/pages/how-disable-port-9080-planning-analytics
https://www.ibm.com/support/pages/planning-analytics-ssl-configuration-tm1web-or-any-web-tier-components-does-not-work-expected
https://www.phildev.net/ssl/opensslconf.html
https://geekflare.com/san-ssl-certificate/
TM1s.cfg & How to Create a TM1 Model – A Best Practice Guide