Product:
Cognos Tm1 10.2.2 fix pack 4
Microsoft Windows 2012 R2 server
Cognos TM1 SSL certificate expiration Interim Fix
How to upgrade the cert with the new cert files from Cognos Support. This doc will show the steps for one version of Cognos, in your environment other steps and paths are maybe needed.
This post is only valid a few days, until IBM comes with a Fix Pack that solves the issue. It looks like the Fix Pack 7 contains this certificate. So instead of all this, you can try to install TM1 10.2.2 fix pack 7 on a new install of TM1 10.2.2 – it will not update certs for a running tm1 server, then you need to do below steps. Download fix pack 7 from here:
http://www-01.ibm.com/support/docview.wss?uid=swg24043388
Download the updated TM1 SSL Certificates from the following location: http://www.ibm.com/support/fixcentral/quickorder?product=ibm%2FInformation+Management%2FCognos+TM1&fixids=BA-CTM1-SSL-ZIP-IF001
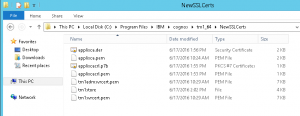
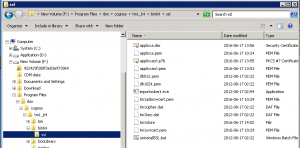
Extract the downloaded file/archive and extract it to any directory. For the purpose of this document, our files will be extracted in to <tm1_client_install_dir>\tm1_64\NewSSLCerts\
Here you get the latest instructions:
http://www-01.ibm.com/support/docview.wss?uid=swg21991653
You need to check version of TM1 to define the route to go. Check your CMPLST file here
C:\Program Files\IBM\cognos\tm1_64. In it check below [Product Update Information] for
PLANANALYTICS_Update_version=PLANANALYTICS-AW64-ML-RTM-10.2.5240.167-0
PLANANALYTICS_Update_name=IBM Cognos TM1
Above is Cognos TM1 10.2.2 fix pack 4. Below steps are for this version of TM1.
There is different steps to perform depending on the version of TM1 10.2.2 you have installed.
Text is copied from this site: http://www.ibm.com/support/docview.wss?uid=swg21991546
How to update the server:
Stop all IBM Cognos TM1 Services in the environment you are updating
Extract the downloaded file/archive and extract it to any directory. For the purpose of this document, our files will be extracted in to <tm1_install_dir>\tm1_64\NewSSLCerts\
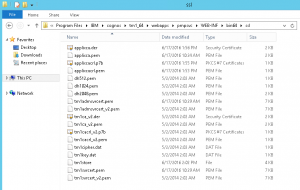
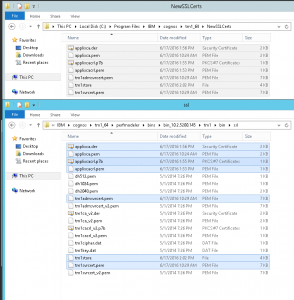
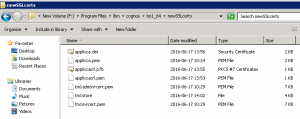
After extracting the files, look inside of your extracted folder <tm1_install_dir>\tm1_64\NewSSLCerts\ . The following files should be present.
applixca.der
applixca.pem
applixcacrl.p7b
applixcacrl.pem
tm1admsvrcert.pem
tm1store
tm1svrcert.pem
Back up the following directories in your <tm1_install_dir>
<tm1_install_dir>\tm1_64\bin\ssl
<tm1_install_dir>\tm1_64\bin64\ssl
<tm1_install_dir>\tm1_64\webapps\pmpsvc\WEB-INF\bin64\ssl
Create a separate folder for each folder and copy the files to these new folders so you have a backup.
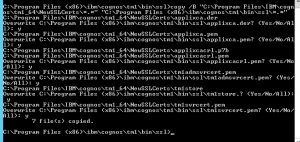
Copy the contents of the folder you extracted earlier <tm1_install_dir>\tm1_64\NewSSLCerts\ , and place them inside of the 3 directories listed above in Step 4. During this process, you will be required to REPLACE all conflicting files as we must replace the old certificate files with new ones.
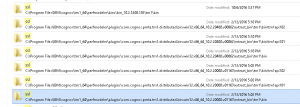
Above after the replacement of files.
After all files have been copied successfully, navigate to <tm1_install_dir>\tm1_64\bin64\ssl\
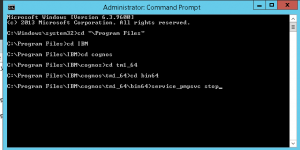
You can start a DOS prompt by right click on the start icon in the left corner of Windows 2012.
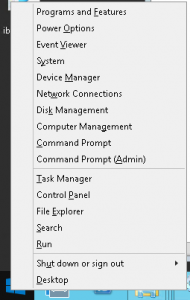 Select Command Prompt (admin).
Then move to the correct folder <tm1_install_dir>\tm1_64\bin64\ssl\
Execute the uninstallSSL.bat file, to uninstall old keys from the Windows Keystore
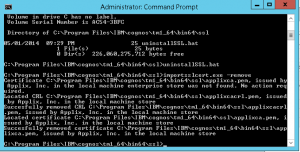
Execute the importsslcert.exe file, to install the new keys in to the Windows Keystore
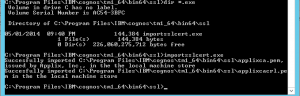
Open and run Windows Command Prompt as an Administrator. Navigate to <tm1_install_dir>\tm1_64\bin64\jre\7.0\bin . Execute the following command:
keytool -delete -alias applixca -keystore ..\lib\security\cacerts -storepass changeit
![]()
keytool -keystore ..\lib\security\cacerts -alias applixca -import -file “C:\Program Files\IBM\cognos\tm1_64\bin64\ssl\applixca.der” -storepass changeit –noprompt

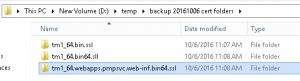
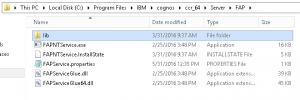
Copy all of folder C:\Program Files\IBM\cognos\tm1_64\bin64 to a backup folder like d:\temp\bin64.
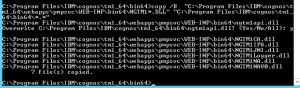
Navigate to and copy all NGTM1*.dll files from your <tm1_install_dir>\webapps\pmpsvc\WEB-INF\bin64\ directory, and paste in to your <tm1_install_dir>\bin64\ directory. If prompted, REPLACE/OVERWRITE any conflicting files (specifically the NGTM1API.DLL file). This can be done by a COPY command in DOS.
Enter below string in CMD to copy the files
copy /B “C:\Program Files\IBM\cognos\tm1_64\webapps\pmpsvc\WEB-INF\bin64\NGTM1*.DLL” “C:\Program Files\IBM\cognos\tm1_64\bin64\*.*”
Navigate to <tm1_install_dir>\bin64\ and open/edit the service_pmpsvc.bat file
Find the line beginning with ‘set BASE_JVM_OPTIONS’
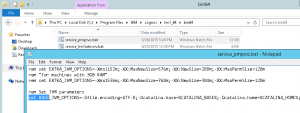
Append the following to the end of the string:
;-Dcom.ibm.cognos.tm1.bin=%PMPSVC_ROOT%\bin64
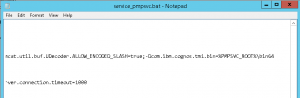
Save your changes and close the open service_pmpsvc.bat file
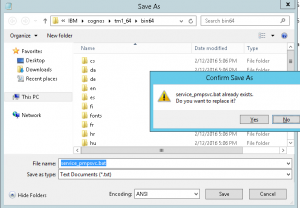
If that does not work, then you need to save it to the Desktop.
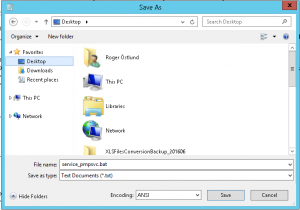
And from there (desktop) copy it to the right folder.
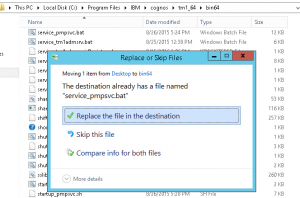
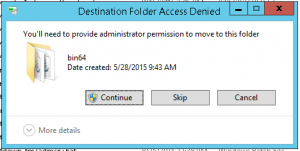
Press CONTINUE on above dialog. Then the file is copied over.
You can do this with a BAT script – ensure the path are correct, and the ” are correct:
d:
REM new cert files should be in the D:\NewSSLCerts folder
copy /B /Y D:\NewSSLCerts\*.* “D:\Program Files\ibm\cognos\tm1_64\webapps\pmpsvc\WEB-INF\bin64\ssl\*.*”
copy /B /Y D:\NewSSLCerts\*.* “D:\Program Files\ibm\cognos\tm1_64\bin\ssl\*.*”
copy /B /Y D:\NewSSLCerts\*.* “D:\Program Files\ibm\cognos\tm1_64\bin64\ssl\*.*”
cd “D:\Program Files\ibm\cognos\tm1_64\bin64\ssl”
importsslcert.exe -remove
importsslcert.exe
cd “D:\Program Files\ibm\cognos\tm1_64\bin64\jre\7.0\bin”
keytool -delete -alias applixca -keystore ..\lib\security\cacerts -storepass changeit
keytool -keystore ..\lib\security\cacerts -alias applixca -import -file “d:\Program Files\IBM\cognos\tm1_64\bin64\ssl\applixca.der” -storepass changeit –noprompt
cd “D:\Program Files\ibm\cognos\tm1_64\bin64”
copy /B “d:\Program Files\IBM\cognos\tm1_64\webapps\pmpsvc\WEB-INF\bin64\NGTM1*.DLL” “d:\Program Files\IBM\cognos\tm1_64\bin64\*.*”
REM now you need to update the service_pmpsvc.bat file – as shown before.
Open Windows Command Prompt as an Administrator, and navigate to <tm1_install_dir>\tm1_64\bin64\
Execute the following commands in the sequence below.
If your TM1 Services were configured to run as a service account, be sure to update the service to include the service account again – as it will likely be lost with this step. Adding > d:\temp\stop.txt will create a text file in folder d:\temp\ that you can open in notepad, to check the result of the task.
service_pmpsvc stop > d:\temp\stop.txt
After each command the DOS prompt is closed so you need to start it again as an administrator.
service_pmpsvc uninstall > d:\temp\uninstall.txt
![]()
This removes the services IBM Cognos TM1 Application Server from the list of installed services in Microsoft Windows.
service_pmpsvc install > d:\temp\install.txt
![]()
Start your IBM Cognos TM1 Services, from Windows services.
![]()
You can maybe create your own BAT file to run above 3 commands in an instance.
Use the d:\temp\install.txt file to check if the process was a success, you should not get any errors in the txt file.
Using JVM: C:\Program Files\ibm\cognos\tm1_64\bin64\jre\7.0\bin\j9vm\jvm.dll
More help is available by typing NET HELPMSG 2185.
Installing the service “pmpsvc” …
Using CATALINA_HOME: C:\Program Files\ibm\cognos\tm1_64\tomcat
Using CATALINA_BASE: C:\Program Files\ibm\cognos\tm1_64\tomcat
Using JAVA_HOME:
1 file(s) copied.
keytool error: java.lang.Exception: Certificate not imported, alias <applixca> already exists
keytool error: java.lang.Exception: Certificate not imported, alias <tm1ca_v2> already exists
The service “pmpsvc” has been installed.
errorlevel 0 exit 0
Above is an example of a correct install.txt log file.
Looks like the PMHUB and Operations Console will work direct on server after this updates, no need to update them further.
Below steps to update clients, are the same for all versions of Cognos TM1 10.2.2
How to Update Your TM1 Architect / TM1 Perspectives Client Installations – ALL VERSIONS
To update your IBM Cognos TM1 Architect or Perspectives Client, the below steps can be followed:
Back up the following directories in your <tm1_client_install_dir>
<tm1_client_install_dir>\tm1_64\bin\ssl
<tm1_client_install_dir>\tm1_64\bin64\ssl
If you have installed 32 Bit TM1 Perspective, then it should be this folder;

Copy the contents of the folder you extracted earlier <tm1_client_install_dir>\tm1_64\NewSSLCerts\ , and place them inside of the 2 directories listed above. During this process, you will be required to REPLACE all conflicting files as we must replace the old certificate files with new ones. This can be done with a COMMAND like this;
copy /B “C:\Program Files\IBM\cognos\tm1_64\NewSSLCerts\*.*” “C:\Program Files (x86)\ibm\cognos\tm1\bin\ssl\*.*”
You need to enter Y to all replace file requests.
After all files have been copied successfully, navigate to <tm1_client_install_dir>\tm1_64\bin\ssl\
Execute the uninstallSSL.bat file, to uninstall old keys from the Windows Keystore
Execute the importsslcert.exe file, to install the new keys in to the Windows Keystore
Above step is not needed if your TM1 client tools are installed on the same server as TM1 server, but on your developer laptop you need to do above two steps.
At this stage, (and assuming your IBM Cognos TM1 Server components have been set up correctly and are running) – you should be able to confirm that you are able to successfully connect to your TM1 Server via IBM Cognos TM1 Architect or IBM Cognos TM1 Perspectives.
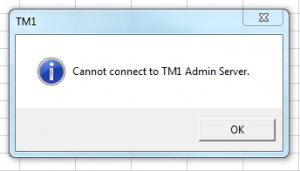
Above message do you get if you connect to TM1 server from TM1 perspective without having replaced the cert files locally on your laptop.
A simpler way to do the install on clients are to unzip the files to folder C:\arbete\newSSLcerts
And then create a BAT file with this content:
copy /B /Y “C:\arbete\NewSSLCerts\*.*” “C:\Program Files (x86)\ibm\cognos\tm1\bin\ssl\*.*”
copy /B /Y “C:\arbete\NewSSLCerts\*.*” “C:\Program Files (x86)\ibm\cognos\tm1\bin64\ssl\*.*”
copy /B /Y “C:\arbete\NewSSLCerts\*.*” “C:\Program Files\ibm\cognos\tm1_64\bin\ssl\*.*”
copy /B /Y “C:\arbete\NewSSLCerts\*.*” “C:\Program Files\ibm\cognos\tm1_64\bin64\ssl\*.*”
cd c:
cd “C:\Program Files\ibm\cognos\tm1_64\bin\ssl\”
importsslcert.exe -remove
importsslcert.exe
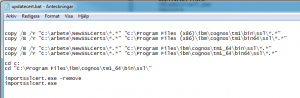
This file will work if you have admin rights on your PC, and is not blocked by any group policy.
How to Update Your Performance Modeler / Cognos Insight Client Installations – ALL VERSIONS
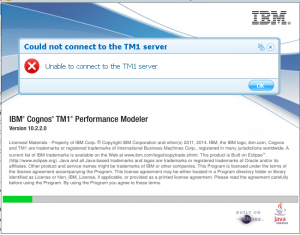
Above will show when you connect if you have not updated the files for Performance Modeler.
There is a updater kit – that each user of Performance Modeler on a Citrix server need to run – to update the certificates for that user. You run the file RcpSslUpdater64.exe from a DOS prompt as Administrator. More info here: http://www-01.ibm.com/support/docview.wss?uid=swg21991797
To update your IBM Cognos TM1 Performance Modeler / IBM Cognos Insight installation, the below steps can be followed:
In your Windows Start menu, find and right-click you’re IBM Cognos TM1 Performance Modeler / Cognos Insight shortcut and click ‘Open File Location’, this can be different place depending on how it was installed. If they are installed on the TM1 10.2.2 server, then your path may be like below;
This can be your folder; C:\Program Files\IBM\cognos\tm1_64\perfmodeler\bins\bin_10.2.5240.84\tm1\bin\ssl\
And in most cases you have a different folder for the versions you have installed
C:\Program Files\IBM\cognos\tm1_64\perfmodeler\bins\bin_10.2.5200.145\tm1\bin\ssl\
Both above folders need to be updated, plus some more shown below.
Back up one of the SSL Folders to ensure that you have the original keys, just in case.
Copy the contents of the folder you extracted earlier C:\NewSSLCerts\ , and place them inside of ALL \ssl\ folder found in your Performance Modeler or Cognos Insight installation directory. During this process, you will be required to REPLACE all conflicting files as we must replace the old certificate files with new ones.
You need to update the files in all SSL folders found, including this;
C:\Program Files\IBM\cognos\tm1_64\perfmodeler\bins\bin_10.2.5200.145\tm1\bin\tm1api101\ssl
C:\Program Files\IBM\cognos\tm1_64\perfmodeler\bins\bin_10.2.5200.145\tm1\bin\tm1api102\ssl
C:\Program Files\IBM\cognos\tm1_64\perfmodeler\bins\bin_10.2.5240.84\tm1\bin\tm1api101\ssl
C:\Program Files\IBM\cognos\tm1_64\perfmodeler\bins\bin_10.2.5240.84\tm1\bin\tm1api102\ssl
Plus some more folders, best is to search for SSL folders.
So in total for Cognos TM1 Performance Modeler you need to copy the new certificate files to 12 different directory’s on one Server. Then it will work.
If you are using IBM Cognos TM1 10.1.0 or TM1 10.1.1 Performance Modeler / Cognos Insight, they do not contain shortcuts in the Start menu by default. If you are not sure where Performance Modeler/Cognos Insight had been installed, you will need to launch Performance Modeler and then open Task Manager on your computer. With Task Manager open, look for the ModelingMDT process – on the Processes tab. Right click the ModelingMDT process and select ‘Open File Location’
‘C:\Users\username\AppData\Roaming\IBM\Cognos Performance Modeler\’ directory.
From within the directory just opened, use the Windows Search utility to find all folders named ‘ssl’
Depending on your installation, you may have MULTIPLE directories. For example, if you have two versions of TM1 you use in your environment – you will likely have two unique versions of Performance Modeler that will require SSL file updates
An example SSL folder location would look like the following: C:\Users\username\AppData\Local\Programs\IBM\Cognos TM1 Performance Modeler\bins\bin_10.2.5240.84\tm1\bin\ssl
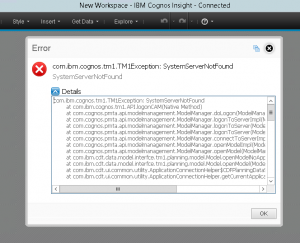
Above error is when you have not update the files for Cognos Insight.
Check where the program is for Cognos Insight by right click on the icon, it may be this path:
“C:\Program Files\IBM\cognos\tm1_64\coginsight\cognosrcp.exe”
Below that folder are these folders that we also need to copy the SSL files too;
C:\Program Files\IBM\cognos\tm1_64\coginsight\bins\bin_10.2.5200.148\tm1\bin\ssl
C:\Program Files\IBM\cognos\tm1_64\coginsight\bins\bin_10.2.5200.148\tm1\bin\tm1api101\ssl
C:\Program Files\IBM\cognos\tm1_64\coginsight\bins\bin_10.2.5200.148\tm1\bin\tm1api102\ssl
C:\Program Files\IBM\cognos\tm1_64\coginsight\bins\bin_10.2.5240.82\tm1\bin\ssl
C:\Program Files\IBM\cognos\tm1_64\coginsight\bins\bin_10.2.5240.82\tm1\bin\tm1api101\ssl
C:\Program Files\IBM\cognos\tm1_64\coginsight\bins\bin_10.2.5240.82\tm1\bin\tm1api102\ssl
After above folders have been updated, and you have MODIFY rights to folder C:\Program Files\IBM\cognos\tm1_64\coginsight, then Cognos Insight works with the new certificates.
At this stage, (and assuming your IBM Cognos TM1 Server components have been set up correctly and are running) – you should be able to confirm that you are able to successfully use IBM Cognos TM1 Performance Modeler and/or Cognos Insight.
How to update the BI client:
On most Cognos BI servers, there is a TM1 client installed, this need to be updated.
Stop your IBM Cognos BI services in Windows.
Back up the following directories in your <tm1_client_install_directory>
<tm1_client_install_directory>\bin\ssl
<tm1_client_install_directory>\bin64\ssl
Copy the contents of the folder you extracted earlier <cognos_bi_install_dir>\NewSSLCerts\, and place them inside of the 2 directories listed above. During this process, you will be required to REPLACE all conflicting files as we must replace the old certificate files with new ones.
After all files have been copied successfully, start a dos prompt and navigate to <tm1_client_install_dir>\tm1_64\bin\ssl\ folder.
run importsslcert.exe -remove from Command Line
and after that run importsslcert.exe, to install the new keys in to the Windows Keystore.
Start your IBM Cognos BI services.
It can be different on your version of Cognos BI Server.
How to update Cognos controller:
After you change the certificate files on the TM1 10.2.2 server, the FAP service will work, normally you do not need to do anything.
In CMPLST.TXT can you see your version of Cognos Controller FAP client.
CONTRL_UPDATE_version=CCR-AW64-ML-RTM-10.2.5130.108-0
CONTRL_UPDATE_name=IBM Cognos Controller Update
You need to restart the FAP service, and do a IP.
Stop the Cognos Controller FAP service.
Erase the log file in the folder C:\Program Files\IBM\cognos\ccr_64\Server\FAP\. This to make it easier to read the errors in the file.
Start the Cognos Controller FAP service if it is on the same server as the TM1 server.
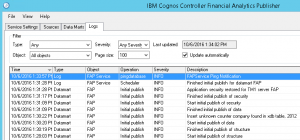
Login to the FAP client and start an Initial Publish.
If FAP services and client is installed on other computer than the TM1 server, then you need to update the local TM1 client installation. Follow the steps for TM1 architect, that should work fine. http://www-01.ibm.com/support/docview.wss?uid=swg21991657
If this does not work, or If you have an older version of Cognos Controller FAP you may need to contact Cognos Support to get more instructions.
More information can be found here: https://www.ibm.com/developerworks/community/forums/html/topic?id=26c0d643-7018-4c23-a74c-76ebdcc9c94f&ps=25
How to update CDM:
IBM Cognos Disclosure Management (CDM) will not be able to contact the TM1 server after the certificates are changed on the TM1 server.
You need to go to the CDM windows server and find the installation of TM1 perspective.
Copy the new Cert zip file to your CDM server.
Extracting the files, to a folder like this <tm1_client_install_dir>\tm1_64\NewSSLCerts\ .
Back up the following directories in your <tm1_client_install_dir>
<tm1_client_install_dir>\tm1_64\bin\ssl
<tm1_client_install_dir>\tm1_64\bin64\ssl
Copy the contents of the folder you extracted earlier <tm1_client_install_dir>\tm1_64\NewSSLCerts\ , and place them inside of the 2 directories listed above. During this process, you will be required to REPLACE all conflicting files as we must replace the old certificate files with new ones.
If the folder is F:\Program Files\ibm\cognos\tm1_64\bin64\ssl then a script like this:
copy /B /Y “F:\Program Files\ibm\cognos\tm1_64\NewSSLCerts\*.*” “F:\Program Files\ibm\cognos\tm1_64\bin64\ssl\*.*”
will copy the files there.
At this stage, (and assuming your IBM Cognos TM1 Server components have been set up correctly and are running) – you should be able to confirm that you are able to successfully connect to your TM1 Server via IBM Cognos CDM.
You may also need to;
Execute the uninstallSSL.bat file, to uninstall old keys from the Windows Keystore
Execute the importsslcert.exe file, to install the new keys in to the Windows Keystore
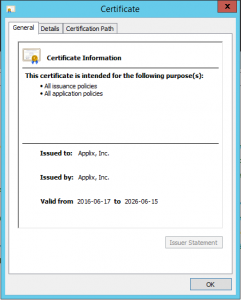
Check that the certificate is correct in the Windows Keystore
On the TM1 server or the TM1 client computer, go to Windows Control panel, and select Internet Options.
Click on tab Content.
Click on button Certificates.
Click on Trusted Root Certification… to see a list of Certificates.
Double click on the Applix certificate. It should only be One line for Applix.
It should show that it is valid from 2016-06-17 to 2026-06-15. Then it is the correct cert.
Above steps are only suggestions, the best way to update is to follow the guidelines at
http://www-01.ibm.com/support/docview.wss?uid=swg21991653
Please do a test change in your test/development environment first.