Product:
Cognos Analytics 11.1.5
Microsoft Windows 2016 server
Linux red hat 7.7 or other flavor
Problem:
How install cognos jupyter notebook on linux?
Solution:
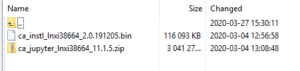
Download the file from IBM;
IBM Cognos Analytics for Jupyter Notebook 11.1.5 Linux x86-64 Multilingual CC4QEML
https://www.ibm.com/support/pages/downloading-ibm-cognos-analytics-11150
Install instructions:
https://www.ibm.com/support/knowledgecenter/SSEP7J_11.1.0/com.ibm.swg.ba.cognos.inst_cr_winux.doc/t_inst_jupyter.html
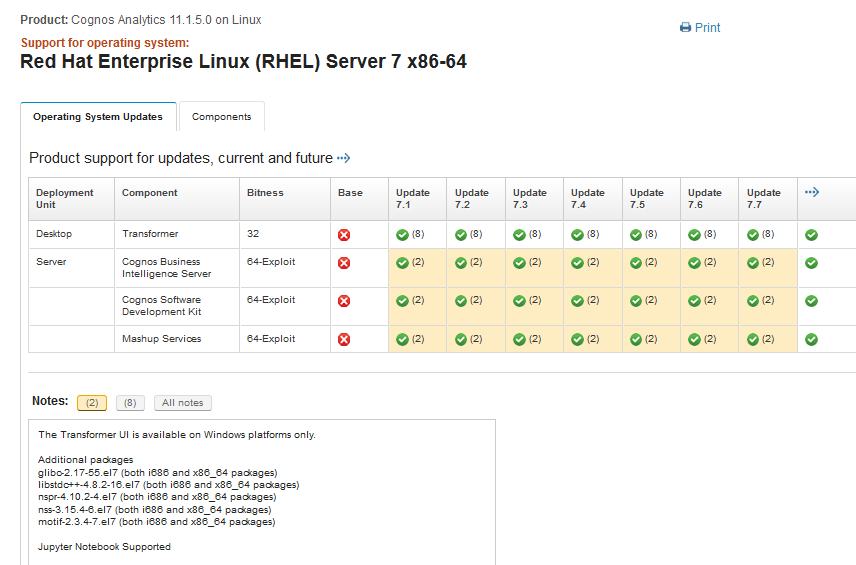
Check what linux version jupyter notebook is supported on.
Help for linux commands:
https://ss64.com/bash/
Login to your linux server with putty:
https://www.ssh.com/ssh/putty/windows
Change to root user
sudo su
Check free disk space on server with
df -h
Ensure you have 200 GB free for you IBM folder and 200 Gb free for you folder where you store the docker containers.
Install docker:
sudo yum install -y docker
sudo systemctl enable docker.service
sudo systemctl start docker.service
Create the docker user:
groupadd docker
useradd -G docker dockeruser
Create the folders we need:
mkdir -p /ibm/jupyter
mkdir -p /ibm/install
Copy the media with WINSCP to linux box folder /ibm/install
https://www.doteasy.com/web-hosting-getting-started/uploading-your-web-files-using-winscp-windows
Create a text file in Notepad++ with below content:
#
# Replay feature output
# ———————
# This file was built by the Replay feature of InstallAnywhere.
# It contains variables that were set by Panels, Consoles or Custom Code.
#false
#—–
BISRVR_CA_INSTALL=0
#true
#—-
BISRVR_CA_TOOLS_INSTALL=1
#false
#—–
CA_FM=0
CA_LCM=0
CA_DCUBEMODEL=0
CA_DQA=0
#true
#—-
CA_JUPYTER=1
USER_INSTALL_DIR=/ibm/jupyter
Save the file as responsefile.properties in folder /ibm/install
Change the rights on the file, so dockeruser can access it
chown dockeruser:docker responsefile.properties
Run the unattended install:
Make dockeruser able to run docker commands
chmod 666 /var/run/docker.sock
Change to dockeruser
sudo su dockeruser
Go to the /ibm/install folder
cd /íbm/install
Enter this command
./ca_instl_lnxi38664_2.0.191205.bin -DREPO=/ibm/install/ca_jupyter_lnxi38664_11.1.5.zip -f responsefile.properties -i silent
Check the log file for errors – in folder /ibm/jupyter/uninstall/logs
Install jupyter:
Go to folder /ibm/jupyter/dist/scripts/unix
Enter ./install.sh to run the installation
When finish, test the notebook, from IE browse to it at http://linuxservername:8000
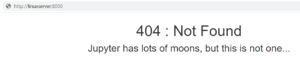
If above show, then you are a success, go then to Cognos Analytics.
If you get a error during install like;
Error step 3/12 : Copy –chown=ca_user:users pip.conf $HOME/.config/pip/ .
Unknown flag: chown
Above error is solved by replace the file “Dockerfile_server_instance” with this content:
# IBM Cognos Products: Notebook
FROM ca_jupyter_server_instance_original:installed
USER ca_user
WORKDIR $HOME
# copy additional_packages & install if not empty
# COPY –chown=ca_user:users pip.conf $HOME/.config/pip/.
# COPY –chown=ca_user:users additional_packages.txt .
# Change below
COPY additional_packages.txt .
USER root
RUN chown ca_user:users additional_packages.txt
USER ca_user
WORKDIR $HOME
COPY pip.conf $HOME/.config/pip/.
USER root
RUN chown -R ca_user:users $HOME
USER ca_user
WORKDIR $HOME
# Stop change
RUN if [ -s additional_packages.txt ]; then \
pip install –user -r additional_packages.txt; \
fi \
&& rm additional_packages.txt
# install certificates for trusted external servers as root
USER root
WORKDIR /tmp
COPY build-tmp certificates
RUN if [ `ls -1 /tmp/certificates/*.crt 2>/dev/null | wc -l` -ne 0 ]; then \
cp /tmp/certificates/*.crt /usr/local/share/ca-certificates/; \
chmod 754 /usr/local/share/ca-certificates/*.crt; \
update-ca-certificates; \
fi \
&& rm -rf certificates
# switch to notebook user
USER ca_user
WORKDIR $HOME
Save the file as Dockerfile_server_instance2
Copy the file over to /ibm/install/ folder on the linux server
Rename the Dockerfile_server_instance to Dockerfile_server_instance_org
Rename the Dockerfile_server_instance2 to Dockerfile_server_instance
Change access to the file
chmod 755 Dockerfile_server_instance
Run the install again from the unix folder
./install.sh
https://pypi.org/project/pixiedust/#files
If you get a error like Could not fetch URL https://pypi.org/simple/pixiedust/: There was a problem confirming the ssl certificate HTTPSConnectionPool (host=’pypi.org’, port=443): Max retries exceeded with url: /simple/pixiedust….
Then the Linux box have not access to internet, and can not download the software. Solve by temporary allow the Linux box Internet access during installation.
You can also try to do this steps:
Open IE on your laptop and paste this line, to download the tar file.
https://files.pythonhosted.org/packages/16/ba/7488f06b48238205562f9d63aaae2303c060c5dfd63b1ddd3bd9d4656eb1/pixiedust-1.1.18.tar.gz
Copy the pixiedust-1.1.18.tar.gz file over to /ibm/install folder on linux server with WINSCP program.
Change the user access
chown dockeruser:dockeruser pixiedust-1.1.18.tar.gz
Extract the file with command
tar -xvf pixiedust-1.1.18.tar.gz
Change the owner of all files in folder with command
chown dockeruser:docker pixiedust-1.1.18
Go to folder /ibm//jupyter/dist/scripts
Edit the file additional_packages.txt
nano additional_packages.txt

Comment out all the lines and then add the following line:
–no-index –find-links=/ibm/install/pixiedust-1.1.18 pixiedust
Save the file and exit nano program
Go to the folder unix and run the install again;
cd /ibm/jupyter/dist/scripts/unix
./install.sh
Change on IIS server:
- If you want to integrate Cognos Analytics for Jupyter Notebook Server, you must add a rule to map WebSocket requests from IBM Cognos Analytics notebooks to the back end Jupyter Notebook Server.
For more information, see Installing IBM Cognos Analytics for Jupyter Notebook Server.
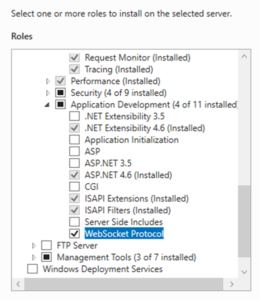
Important You must also install WebSocket Protocol support in IIS. For more information, see WebSocket <webSocket> (https://docs.microsoft.com/en-us/iis/configuration/system.webserver/web socket).
- Select the ibmcognos alias. Click on URL rewrite icon.
- Click Add Rules > Inbound Rules > Blank Rule .
- If proxies are not already enabled, you are prompted to enable. Click OK.
- The server name and port are defined in the config.conf file when you configure Jupyter Notebook Server.
-
- Select the newly created rule and click Edit.
- Pattern is v1/jupyter/(user/[^/]*)/(api/kernels/[^/]+/channels)
- Action type is Rewrite.
- Rewrite URL (for SSL configurations) is https://jupyter_host_name:jupyter_host_port/bi/v1/jupyter/{R:1}/{R:2}
Note For non-SSL configurations use the following rewrite URL: http://jupyter_host_name:jupyter_host_port/bi/v1/jupyter/{R:1}/{R:2}
-
- Check Append query string.
- Check Stop processing of subsequent rules.
- Click Apply and Back to Rules.
- exit iis manager.
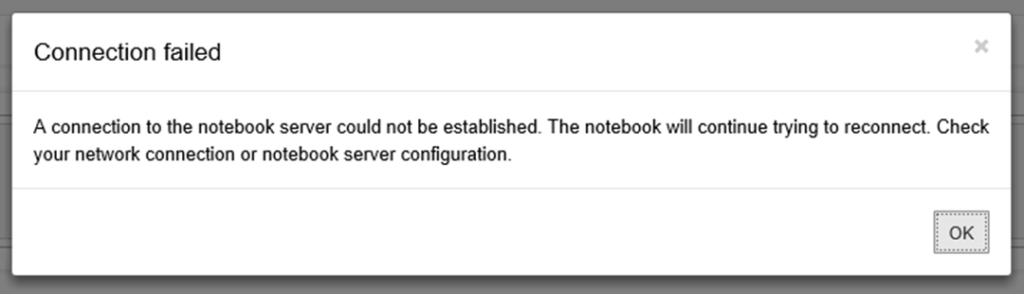
If above step is missed you get above error.
Enable jupyter notebook in CA11
Login to CA11 as administrator
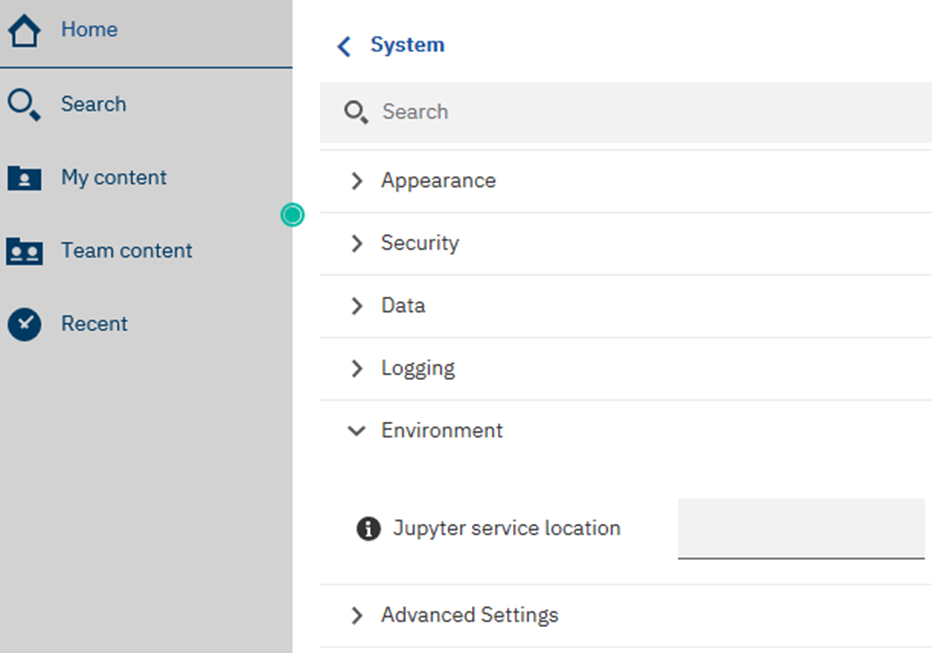
Go to Manage
Click on configuration
Click on system
Click on environment
At Jupyter service location enter linux server name as
http://linuxservername.domain.com:8000
Click Apply
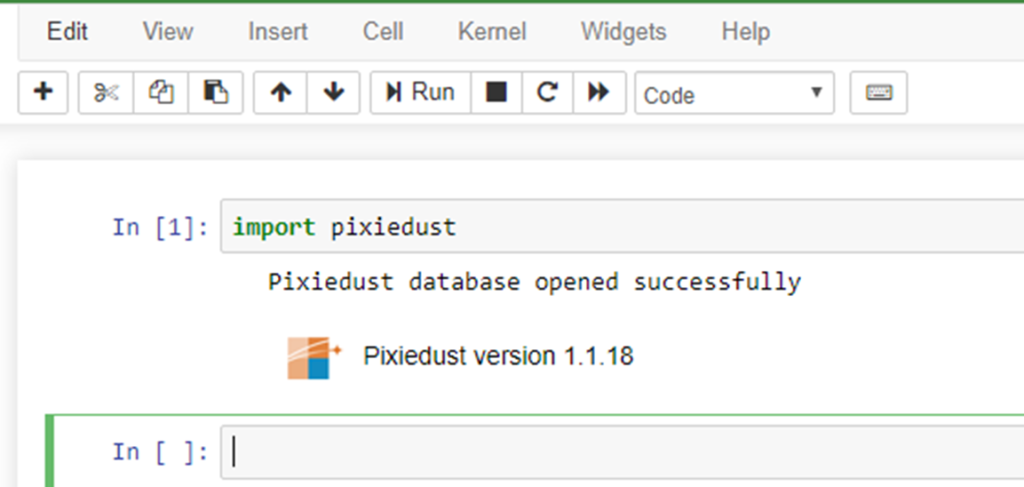
Refresh the web page in the web browser (IE)
Click on new
Click on notebook

Enter import pixiedust to test
Import Samples to Cognos Analytics versions 11.1.5
- Copy the deployment archive, IBM_Cognos_Notebook_Samples.zip, for the notebook samples into the deployment folder: cognos_analytics_server_install_location\deployment.
- Go to and open IBM Cognos Administration.
- On the Configuration tab, click Content Administration.
- On the toolbar, click the New Import icon
 .
. - Select IBM_Cognos_Notebook_Samples in the first step of the New Import wizard.
- At the Run with options screen, ensure that Do not Assign new IDs during import is selected. Click Run and complete process using default settings.
- After the import is complete, you can navigate to the notebook samples by clicking Team content > Samples > By feature > Notebooks.
https://www.ibm.com/support/pages/node/1125165
The docker images are normally in folder /var/lib/docker/overlay2 folder
https://www.freecodecamp.org/news/where-are-docker-images-stored-docker-container-paths-explained/
More Information:
https://www.edx.org/course/fundamentals-of-red-hat-enterprise-linux
https://www.redhat.com/en/services/training/rh024-red-hat-linux-technical-overview
The folder dist/scripts/unix contains all the scripts that you need to run.
| Script | Purpose |
|---|---|
| build.sh | Run this to rebuild the images, after you change config. |
| config.conf | Edit this configuration file to change Jupyter parameters. |
| install.sh | Run this to load and start the Docker containers. |
| prune.sh | Run this to remove old Docker images. |
| start.sh | Run this to start the Jupyter server. |
| stop.sh | Run this to stop the Jupyter server. |
| uninstall.sh | Run this to uninstall Jupyter server. |