Product:
Microsoft SQL server
Cognos Controller 11.0.1
Issue:
Open account define take long time to open – can it be that we need to index the database?
If the issue is only for one user – please ask that user to inside cognos controller client run “clear local cache”, to see if it helps.
Check if you move the user to a diffrent subnet, e.g. move from LAN to WIFI at the office, does it help?
Does it help to run it over VPN to the office?
If the issue is for all users, but on a specific network, it can be a windows group policy to the client computer that give the issue.
Create a ticket to your IT department, and ask them to check intune policy and firewall and network, when you reproduce the issue.
Solution:
Enter below script in SSMS for your cognos controller SQL server database, to check when it was last updated:
-
- SELECT *,
-
- STATS_DATE(object_id, stats_id) AS LastStatsUpdate
-
- FROM sys.stats
-
- WHERE left(name,4) = ‘NC_X’ order by laststatsupdate
Below SQL script will list the size of the tables in the database:
;with cte as (
SELECT
t.name as TableName,
SUM (s.used_page_count) as used_pages_count,
SUM (CASE
WHEN (i.index_id < 2) THEN (in_row_data_page_count + lob_used_page_count + row_overflow_used_page_count)
ELSE lob_used_page_count + row_overflow_used_page_count
END) as pages
FROM sys.dm_db_partition_stats AS s
JOIN sys.tables AS t ON s.object_id = t.object_id
JOIN sys.indexes AS i ON i.[object_id] = t.[object_id] AND s.index_id = i.index_id
GROUP BY t.name
)
,cte2 as(select
cte.TableName,
(cte.pages * 8.) as TableSizeInKB,
((CASE WHEN cte.used_pages_count > cte.pages
THEN cte.used_pages_count - cte.pages
ELSE 0
END) * 8.) as IndexSizeInKB
from cte
)
select TableName,TableSizeInKB,IndexSizeInKB,
case when (TableSizeInKB+IndexSizeInKB)>1024*1024
then cast((TableSizeInKB+IndexSizeInKB)/1024*1024 as varchar)+'GB'
when (TableSizeInKB+IndexSizeInKB)>1024
then cast((TableSizeInKB+IndexSizeInKB)/1024 as varchar)+'MB'
else cast((TableSizeInKB+IndexSizeInKB) as varchar)+'KB' end [TableSizeIn+IndexSizeIn]
from cte2
order by 2 desc
If it is a SQL Index issue, then normally all cognos controller users are affected.
More information:
Manually purge the ‘xdbaudit’ table from audit information by performing the following steps:
1. Obtain a short period of downtime (no other users on the system)
2. Logon to Controller as an administrator
3. Click “Maintain – User- Single Mode”
4. Click “Maintain – System Audit Log – Configuration”
5. Choose how recent the audit data they wish to keep
6. Enter that chosen value (for example ’30’) into the section “Delete Data change details older than (days)”:
7. Click “delete”.
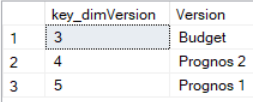 The key value for the version need to be collected from the version table.
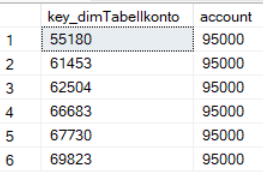 The account value you want to update in fact table may have more than one key value, that you need to check and include.