Product:

Microsoft Windows 2019 server

Issue:

The new hard disk is empty, but file manager still show it contain some files. When you go to the drive it is empty in file manager.

File manager show that only a part of the disk is free space.

Solution:

Some person have moved files to the recycle bin. The recycle bin is empty for you, but the other user on the windows server have a not empty recycle bin – he should empty the recycle bin, then the hard drive will show 100% free space.

Files are not removed from windows until the recycle bin is empty, so if you try to clean a hard disk, you need to empty the recycle bin also when you are done deleting files.

Product:

Microsoft SQL server 2019

Issue:

How do i log if a table is deleted or truncated in SQL server databases?

Solution:

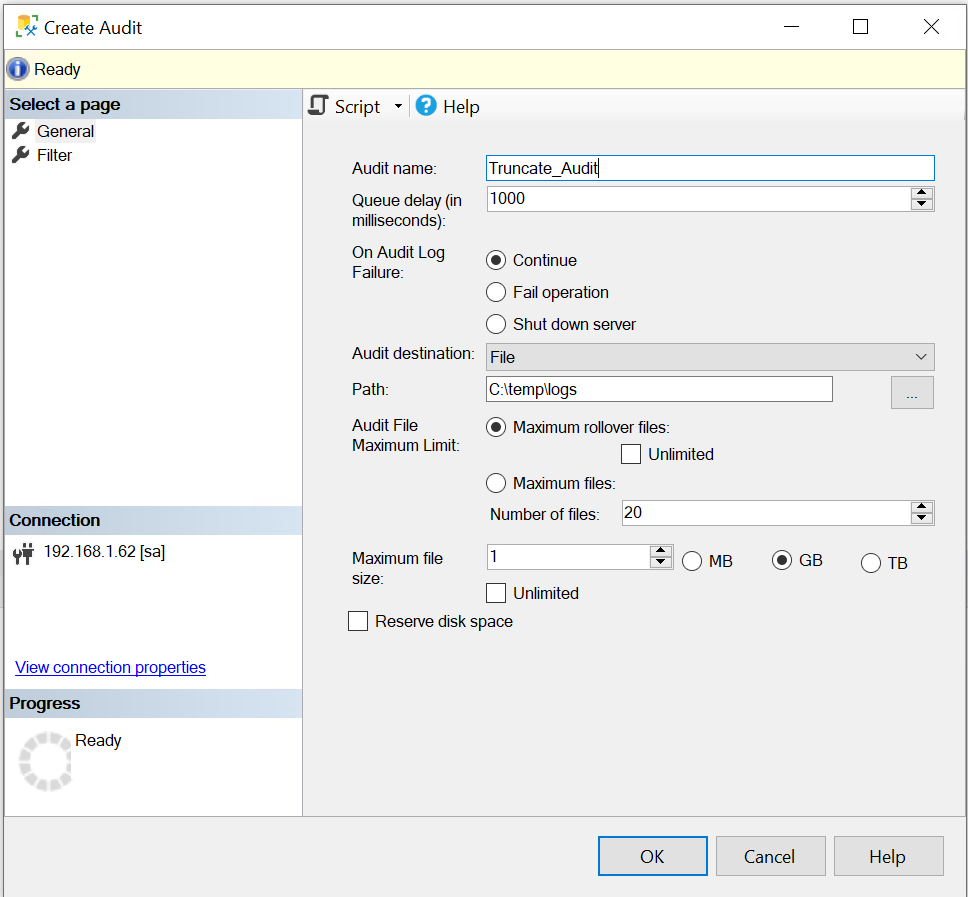
Create a audit log file with this SQL command:

USE master

CREATE SERVER AUDIT [Truncate_Audit]
TO FILE
(FILEPATH = N'c:\temp\logs'
,MAXSIZE = 1 GB
,MAX_ROLLOVER_FILES = 20
,RESERVE_DISK_SPACE = OFF
)
WITH
(QUEUE_DELAY = 1000
,ON_FAILURE = CONTINUE
)

ALTER SERVER AUDIT [Truncate_Audit] WITH (STATE = ON)

Then to make all database that start with letter A to be monitor run below SQL command:

DECLARE @command varchar(500)
SELECT @command = 'IF ''?'' LIKE ''A%'' BEGIN USE ?
EXEC(''Create database audit specification [DatabaseAuditSpecification-Truncate]
FOR SERVER AUDIT [Truncate_Audit]
ADD (Delete on database::[?] by [dbo])
WITH (STATE=ON)'')END'

EXEC sp_MSforeachDB @command

Now, do some add and delete of a table in your database to create some action to log.

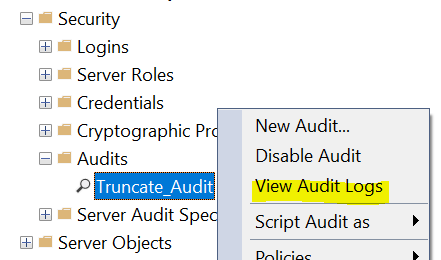
Then to see the log enter this SQL command:

SELECT event_time, succeeded, object_id, object_name,session_server_principal_name,server_principal_name,server_instance_name,database_name,statement,file_name,audit_file_offset
FROM fn_get_audit_File ('c:\temp\logs\Truncate_Audit_*.sqlaudit',null,null) order by event_time DESC

You have to adjust the SQL code for your needs.

More Information:

SQL Server auditing with Server and Database audit specifications

https://docs.microsoft.com/en-us/sql/relational-databases/security/auditing/create-a-server-audit-and-database-audit-specification?view=sql-server-ver15  

https://www.sqlshack.com/various-techniques-to-audit-sql-server-databases/

https://sqlship.wordpress.com/2011/06/30/how-to-capture-delete-and-truncate-t-sql-using-database-audit-specification/

Product:

Microsoft SQL server 2016

Issue:
How do i add a AD group to all databases on the SQL server as read only access?

Solution:

Adjust below script – replace AD\DBAteam with your domain\group and run it in SQL query.

Use master
GO

DECLARE @dbname VARCHAR(50) 
DECLARE @statement NVARCHAR(max)

DECLARE db_cursor CURSOR 
LOCAL FAST_FORWARD
FOR 
SELECT name
FROM MASTER.dbo.sysdatabases
WHERE name NOT IN ('master','model','msdb','tempdb','distribution','SSISDB') 
OPEN db_cursor 
FETCH NEXT FROM db_cursor INTO @dbname 
WHILE @@FETCH_STATUS = 0 
BEGIN 

SELECT @statement = 'use '+@dbname +';'+ ' CREATE USER [AD\DBATeam] 
FOR LOGIN [AD\DBATeam] ; EXEC sp_addrolemember N''db_datareader'', 
[AB\DBATeam] '

exec sp_executesql @statement

FETCH NEXT FROM db_cursor INTO @dbname 
END 
CLOSE db_cursor 
DEALLOCATE db_cursor


The script will work until it reaches a database that is offline – there it will stop and not process any databases below that.

The users login must first be in the database;

CREATE LOGIN [AD\DBATeam] FROM WINDOWS

More information:

https://www.mssqltips.com/sqlservertip/3541/grant-user-access-to-all-sql-server-databases/

https://www.guru99.com/sql-server-create-user.html

https://docs.microsoft.com/en-us/sql/t-sql/statements/create-login-transact-sql?view=sql-server-ver15

Move or copy SQL Logins by assigning roles and permissions

Product:

Microsoft SQL server 2016

Microsoft Windows 2012 server

Issue:

How add read access to all tables in all databases on one server to a user?

Solution:

Add a AD user as a login to the SQL server in SSMS. https://www.guru99.com/sql-server-create-user.html

In our example we use User3, but you change it to your login-name.

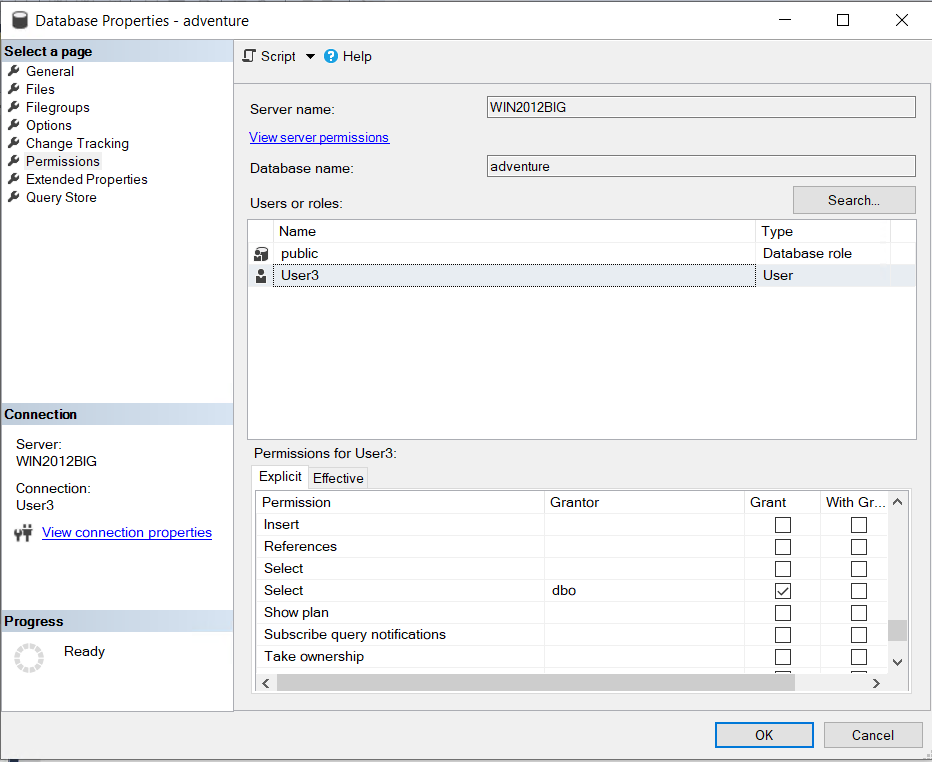
EXEC sp_MSforeachdb ' Use ?; Create user User3 for login User3; Grant select on database :: ? to User3 '

In the string after the sp_MSforeachdb  command, the character ? is replaced by each database.

Use ?, this will move focus to this database, and execute the command after to this database.

Create user User3 for login User3, adds the user name to the database and connect it with the login user.

If the user3 already is in the database, then above will not work.  Then run the command again without the Create user… part.

Grant select on database :: ? to User3, will give this user READ access to all object in the database. Even new tables and views.

The grant select on a database, will give that user full read access to the database tables and views.

More information:

https://www.mssqltips.com/sqlservertip/6702/sql-server-windows-authentication-with-users-and-groups/

https://www.mssqltips.com/sqlservertip/1414/run-same-command-on-all-sql-server-databases-without-cursors/

https://www.techonthenet.com/sql_server/users/create_user.php

https://www.tutorialsteacher.com/sqlserver/grant-permissions-to-user

https://www.mssqltips.com/sqlservertip/2201/making-a-more-reliable-and-flexible-spmsforeachdb/

https://www.mssqltips.com/sqlservertip/1414/run-same-command-on-all-sql-server-databases-without-cursors/

https://www.mssqltips.com/sqlservertip/1476/how-to-read-log-file-in-sql-server-using-tsql/

https://dba.stackexchange.com/questions/117759/granting-select-access-to-all-tables-within-a-specific-database-in-ms-sql

To grant SELECT permissions on the whole database use this:

USE <MY_DATABASE>
GRANT SELECT ON DATABASE :: <MY_DATABASE> TO <MY_USER>

where

  • <MY_USER> is user
  • <MY_DATABASE> is database name

Granting permissions on schema doesn’t help, simple reason: if new schemas occur the user will not have permissions.

Granting permissions on all objects doesn’t for the same reason, the user will not have permissions on new objects created after GRANT event.

Product:
Microsoft SQL Server 2016

Microsoft Windows 2012

Issue:
How read the SQL agent jobs logs without being a sysadmin?

Solution:

Add the user to a AD group and add the AD group as a login in the SQL server. In our example we will instead use SQL login User3.

In SSMS go to Security – Logins – New Login.  https://www.guru99.com/sql-server-create-user.html  Create your login in SQL.

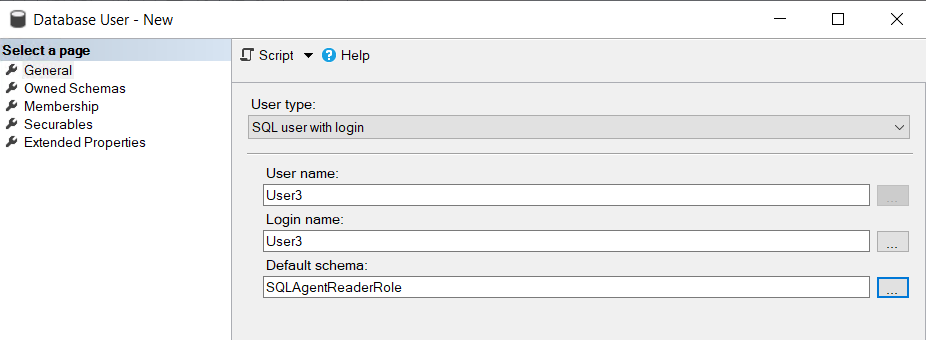
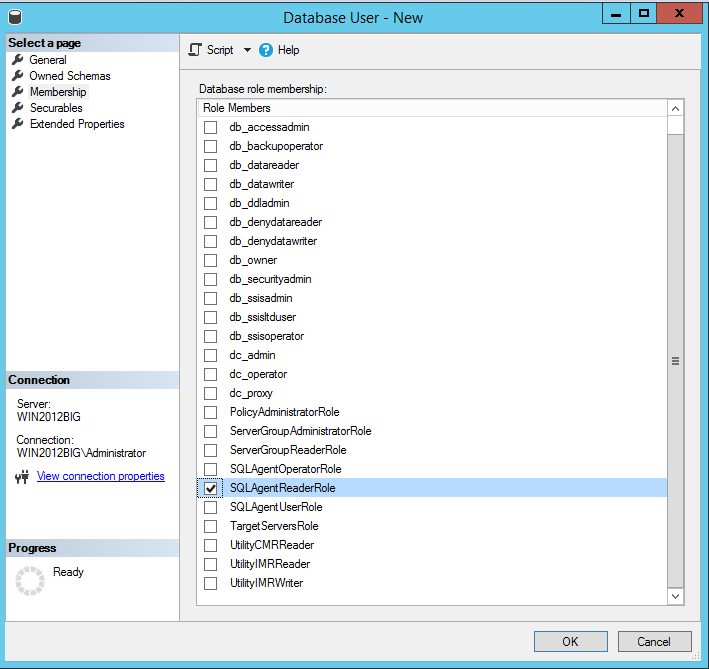
Go to your MSDB database under – Databases – System Databases – msdb – Security – Users – New User.
Add your User3 there to the msdb database.

Expand Membership and select SQLAgentReaderRole, then click OK.

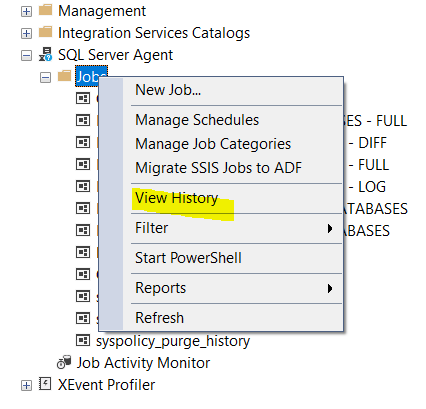
Then that user can in SSMS see SQL Server Agent, and View History and properties of a SQL Agent Job.

With SQL script:

USE [msdb]
exec sp_addrolemember 'SQLAgentReaderRole', 'DomainName\GroupName'


https://zarez.net/?p=36

More Information:

https://docs.microsoft.com/en-us/sql/ssms/agent/sql-server-agent-fixed-database-roles?redirectedfrom=MSDN&view=sql-server-ver15

https://www.techonthenet.com/sql_server/users/create_login.php

https://www.tutorialsteacher.com/sqlserver/grant-permissions-to-user

https://www.vb-net.com/Sql/Index.htm

https://www.tutorialsteacher.com/sqlserver/indexes

Product:

Microsoft Windows

git version 2.33.1.windows.1

Issue:
What is a good order of command to work with GIT?

Suggestion:

Install GIT on your computer from here https://git-scm.com/download/win

https://git-scm.com/book/en/v2/Getting-Started-Installing-Git

Create a folder, where you will work with git, in our example we use C:\kurser\git-demo-example

To setup a repository, you can follow this steps: https://towardsdatascience.com/an-easy-beginners-guide-to-git-2d5a99682a4c

When you are inside your git folder, you can start using GIT from tools like GIT BASH or SOURCETREE. https://www.sourcetreeapp.com/enterprise          https://gitforwindows.org/

Git commands are case sensitive, and git commands is always lowercase. git used to that.

If you work with Azure DevOps as master source, the git function can depend on how Azure DevOps is setup.

We guess you have already clone your repo, so you can start to work.

git status  (to check you are in correct folder and branch, mostly main at start)

git pull  (to download the latest changes to the project from the remote master)

git checkout -b  “Feature/1234”  (to create a branch and start working on the files)

Work with your file in Notepad++ or Visual Studio, and save your work in the folder you have for git.

git add .  (to add all changed files to the git source control)

git commit -m “This is a updated file”   (to save the changes to your branch, add a online comment about the files)

git checkout master (switch to your local main branch to update it with any new remote changes)

git pull  (download the latest changes done by others to your main branch)

git checkout “Feature/1234”  (go back to your local branch, you been working in)

git merge master (get the files from master into your branch, any conflicts have to be solved in Visual Studio locally)

You may have to change the word master to main in your version of GIT, also remember that the branch-name is case sensitive.

git push origin “Feature/1234”   (to push your changes up to the remote git server)

Then you have to go to your remote git (or Azure DevOps) in your web browser and complete the pull there.

This picture will look different for what kind of remote repo you use. Above is from https://github.com

Click on Compare & pull request button
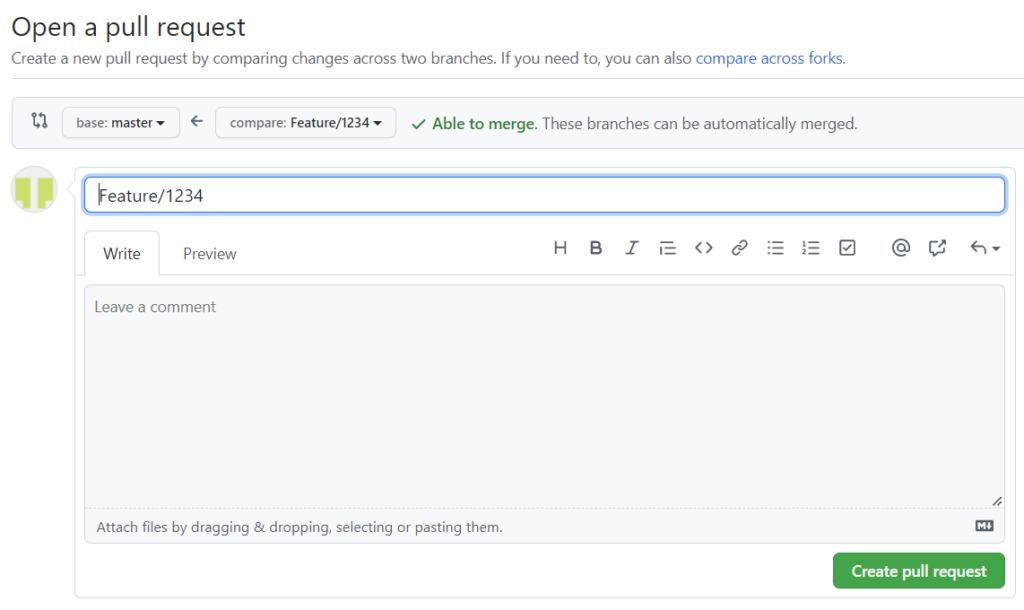
Enter some descriptive text and click on Create pull request button.
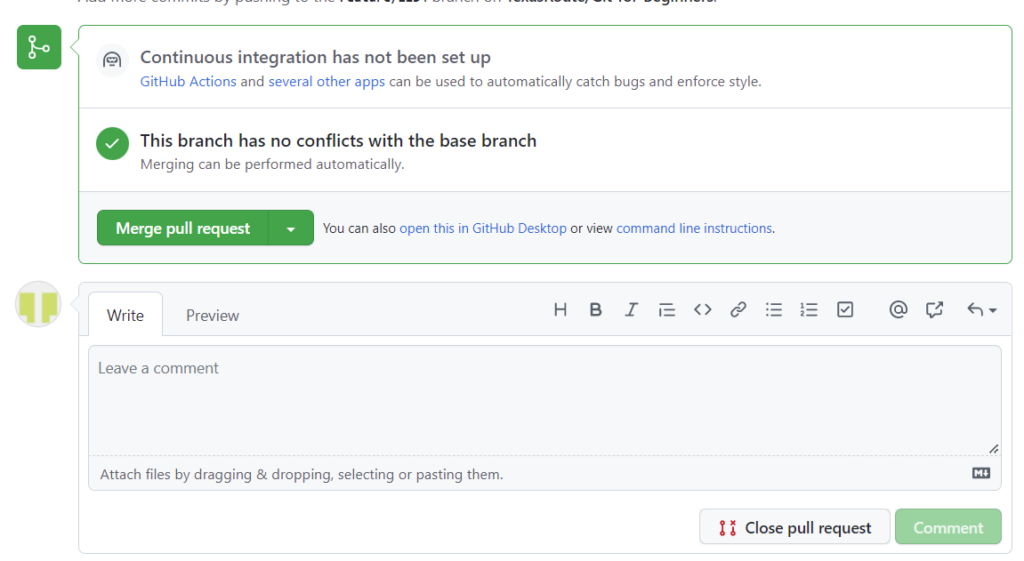
As we are lucky, no conflicts, you can press Merge pull request. Good practice is to leave explaining comments about what the code change is about.

Click on Confirm merge button.

Recommendation is to Delete the branch, so it is not laying around.

Then you are good to go – and start over from top with your next change.

git log –oneline   (enter to see the steps you have done)

Download and install WinMerge, to have a tool to compare files. https://winmerge.org/downloads/

Download and use Visual Studio Code https://code.visualstudio.com/download to solve conflicts.

git reflog  (to see more detail’s of what you done)

If I accidental delete files in my local folder for the git project, i can reset my state to the one before with command:

git reset  –hard origin

This will only work if i have not committed and push the change up to remote repo.


More Information:

https://education.github.com/git-cheat-sheet-education.pdf

https://towardsdatascience.com/an-easy-beginners-guide-to-git-2d5a99682a4c

https://rogerdudler.github.io/git-guide/

https://rogerdudler.github.io/git-guide/files/git_cheat_sheet.pdf

https://www.atlassian.com/git/tutorials/git-bash

https://docs.microsoft.com/en-us/azure/devops/repos/git/pull-requests?view=azure-devops&tabs=browser

https://www.stanleyulili.com/git/how-to-install-git-bash-on-windows/

https://www.freecodecamp.org/news/practical-git-and-git-workflows/

https://docs.microsoft.com/en-us/visualstudio/subscriptions/download-software

https://visualstudio.microsoft.com/vs/older-downloads/

https://visualstudio.microsoft.com/free-developer-offers/

https://github.com/microsoft/vscode

https://medium.com/@deprov447/a-simple-git-guide-8854d5c3ae12

https://git-scm.com/docs/gittutorial

https://www.edureka.co/blog/git-commands-with-example/

Product:

Microsoft Power BI local server

Microsoft Windows 2019 server

Issue:

When user browse to the home or browse button in the Power BI portal they get a error like:

Could not load folder contents

You are not allowed to view this folder. Contact your administrator to obtain the necessary permissions

This when they go to http://servername/Reports/browse

Solution:

In Power BI, all reports and folders, can be you set security on. The root or browse folder is the same, it is only that it is hard to find.  You need to click on “Manage Folder” to get there.

Login to PowerBI as administrator.
Go to the “root” folder by click on browse.

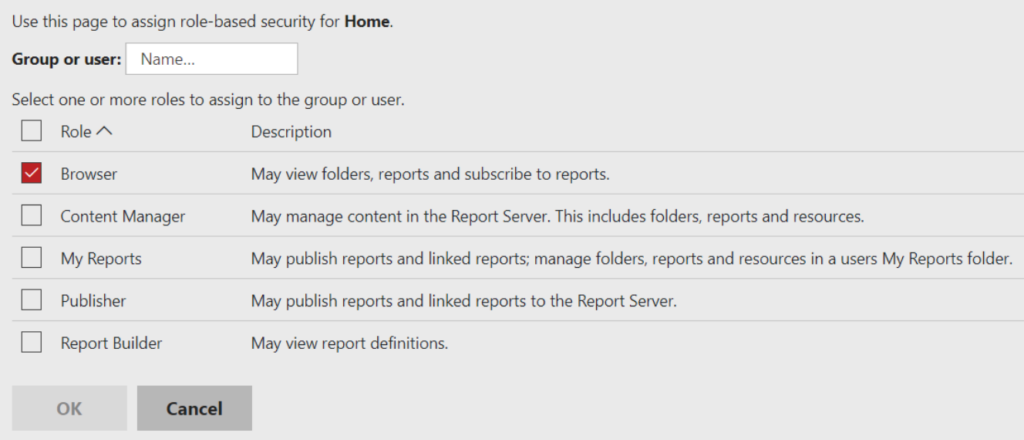
Then click on “manage folder ” on the right to get to the security dialog.

Inside security, click on “Add group or user” to add a group like “everyone”.

Enter the name of the group, mark “browse” and click OK.

Now this group can see this folder, and all sub-folders that do not have “customize security” set.

Recommendation, is that you on all folders and reports in the top (root) folder are having “customize security” active, so you need to manually add the users or AD groups to this folders for users to be able to view them.

Customize Security will make the folder to not inherit the security groups from the folder above.

To be able to see a sub-folder, the user need access to the top folder above as Browser.

More Information:

https://community.powerbi.com/t5/Report-Server/Access-to-the-home-folder/m-p/448374#M6249

https://docs.microsoft.com/en-us/power-bi/enterprise/service-admin-rls

https://guyinacube.com/2020/02/25/can-you-use-groups-with-power-bi-row-level-security-rls/

https://www.bconcepts.pt/power-bi-report-server-configuration-and-security-implementation/

https://iterationinsights.com/article/how-to-get-set-up-with-power-bi-desktop-and-power-bi-service/

https://www.bluegranite.com/blog/tips-for-a-successful-power-bi-report-server-implementation

Product:
Microsoft SQL server 2016

Issue:

SSIS job fail with error:

Could not find database ID 42, name ’42’. The database may be offline. Wait a few minutes and try again.

Solution:
Check if the database have change ID.

select * from sys.databases

Above will list the database name and id.

When you do a detach and attach on a database file, you can if you are unlucky, get a new ID on the database. Then old SSIS job that worked yesterday, will fail.

Repeat the detach and attach process to get the database back to correct number.

Move file locations with ALTER command instead; this script will list the commands for each database

SELECT DB_NAME(database_id) AS [Database] 
, name AS [LogicalName]
, type_desc AS [FileType]
, physical_name AS [FilePath]
, 'ALTER DATABASE ' + DB_NAME(database_id)
+ ' MODIFY FILE ( NAME = ' + name + ', FILENAME = ''' + physical_name + '''); 'AS Command
FROM SYS.master_files
WHERE database_id > 4
ORDER BY database_id ASC, type_desc DESC;

You have to change the path to new location before you run the command.

Also copy the database files to the new location before you run the script.

https://blog.coeo.com/moving-sql-databases


More Information:

https://docs.microsoft.com/en-us/sql/relational-databases/system-catalog-views/sys-databases-transact-sql?view=sql-server-ver15

Understanding different SQL Server database states

https://www.mssqltips.com/sqlservertip/1420/sql-server-system-databases/


Product:

SAS

Microsoft SQL server 2016

Issue:

Some tables are not visible in SAS client program, even do the same user can see the tables in Microsoft SQL Server Management Studio (SSMS) or Tableau.

As the same user can see the tables inside Microsoft SQL Studio, it is not a permission issue.

Solution:

Change the tables and views in SQL to have shorter names. SAS can not show SQL tables or views that have a name longer than 32 characters.


More Information:

http://support.sas.com/documentation/installcenter/en/ikforecastwofrsr/75572/HTML/default/index.html

https://www.tableau.com/sv-se/products/desktop

Product:
Microsoft Power BI
Microsoft Windows 2016 server

Issue:
You have a working Dynamic SQL query, but when you schedule it, it stop working.

Suggested solution:
Rebuild your query to not use Dynamic SQL, to make it possible to schedule it in PowerBi.

See if you can change to use fewer different data sources.

More Information:

https://docs.microsoft.com/en-us/power-query/dataprivacyfirewall

https://medium.datadriveninvestor.com/setting-a-scheduled-refresh-on-a-dynamic-data-source-in-power-bi-409ccec7337b

https://community.powerbi.com/t5/Service/Dynamic-SQL-through-ODBC-is-breaking-refresh-capability/m-p/276408

https://powerbitalks.com/2020/06/refresh-dataset-using-button-powerbi.html

https://docs.microsoft.com/en-us/power-bi/connect-data/refresh-data